HP Designjet L26100 HP Designjet L26500/L26100 Printer Series - User's Guide - Page 55
magnetic and grip the substrate.
 |
View all HP Designjet L26100 manuals
Add to My Manuals
Save this manual to your list of manuals |
Page 55 highlights
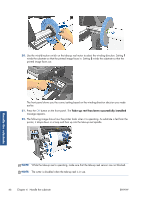
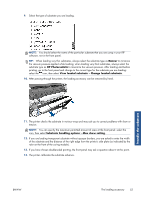
2. Lay the textile loading accessory on the loading table and flip forward enough of the white flaps to cover the width of the substrate. 3. Pull some of the textile substrate from the roll and put the leading edge on the loading accessory. 4. Flip the white flaps back to cover the leading edge of the substrate. The black patches are magnetic and grip the substrate. Handle the substrate ENWW The loading accessory 51
-
 1
1 -
2
-
3
-
4
-
5
-
6
-
7
-
8
-
9
-
10
-
11
-
12
-
13
-
14
-
15
-
16
-
17
-
18
-
19
-
20
-
21
-
22
-
23
-
24
-
25
-
26
-
27
-
28
-
29
-
30
-
31
-
32
-
33
-
34
-
35
-
36
-
37
-
38
-
39
-
40
-
41
-
42
-
43
-
44
-
45
-
46
-
47
-
48
-
49
-
 50
50 -
 51
51 -
 52
52 -
 53
53 -
 54
54 -
 55
55 -
 56
56 -
 57
57 -
 58
58 -
 59
59 -
 60
60 -
61
-
62
-
63
-
64
-
65
-
66
-
67
-
68
-
69
-
70
-
71
-
72
-
73
-
74
-
75
-
76
-
77
-
78
-
79
-
80
-
81
-
82
-
83
-
84
-
85
-
86
-
87
-
88
-
89
-
90
-
91
-
92
-
93
-
94
-
95
 |
 |

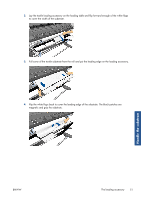
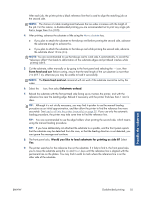
2.
Lay the textile loading accessory on the loading table and flip forward enough of the white flaps
to cover the width of the substrate.
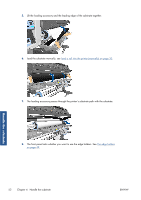
3.
Pull some of the textile substrate from the roll and put the leading edge on the loading accessory.
4.
Flip the white flaps back to cover the leading edge of the substrate. The black patches are
magnetic and grip the substrate.
ENWW
The loading accessory
51
Handle the substrate