HP Designjet L26100 HP Designjet L26500/L26100 Printer Series - User's Guide - Page 58
Double-sided printing, Side A, Ready for side
 |
View all HP Designjet L26100 manuals
Add to My Manuals
Save this manual to your list of manuals |
Page 58 highlights
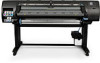
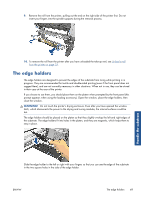
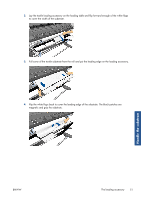
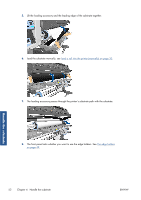
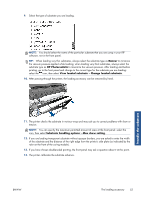
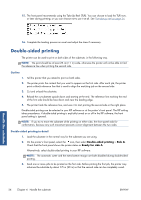
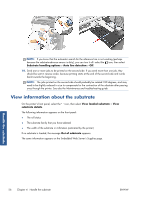
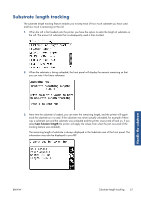
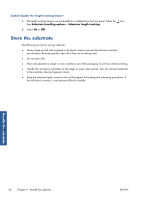
15. The front panel recommends using the Take-Up Reel (TUR). You can choose to load the TUR now, or later during printing; or you can choose not to use it at all. See The take-up reel on page 34. Handle the substrate 16. Complete the loading process as usual and adjust the skew if necessary. Double-sided printing The printer can be used to print on both sides of the substrate, in the following way. NOTE: The print should be at least 28 cm (11 in) wide, otherwise the printer will not be able to find the reference line when printing the second side. Outline 1. Tell the printer that you intend to print on both sides. 2. The printer prints the content that you want to appear on the first side. After each job, the printer prints a black reference line that is used to align the matching job on the second side. 3. Cut and unload the substrate. 4. Reload the cut substrate upside down and starting at the end. The reference line marking the end of the first side should be face down and near the leading edge. 5. The printer finds the reference line, and uses it to start printing the second side in the right place. Double-sided printing can be selected in your RIP software or at the printer's front panel. The RIP setting takes precedence: if double-sided printing is explicitly turned on or off in the RIP software, the front panel setting is ignored. NOTE: If you try to move the substrate while printing on either side, the front panel asks for confirmation, because any such movement prevents correct alignment between the two sides. Double-sided printing in detail 1. Load the substrate in the normal way for the substrate you are using. 2. On the printer's front panel, select the icon, then select Double-sided printing > Side A. Check that the front panel shows the printer status as Ready for side A. Alternatively, select double-sided printing in your RIP software. NOTE: The automatic cutter and the extra bottom margin are both disabled during double-sided printing. 3. Send one or more jobs to be printed on the first side. Before printing the first job, the printer may advance the substrate by about 0.5 m (20 in) so that the second side can be completely cured. 54 Chapter 4 Handle the substrate ENWW
-
 1
1 -
2
-
3
-
4
-
5
-
6
-
7
-
8
-
9
-
10
-
11
-
12
-
13
-
14
-
15
-
16
-
17
-
18
-
19
-
20
-
21
-
22
-
23
-
24
-
25
-
26
-
27
-
28
-
29
-
30
-
31
-
32
-
33
-
34
-
35
-
36
-
37
-
38
-
39
-
40
-
41
-
42
-
43
-
44
-
45
-
46
-
47
-
48
-
49
-
50
-
51
-
52
-
 53
53 -
 54
54 -
 55
55 -
 56
56 -
 57
57 -
 58
58 -
 59
59 -
 60
60 -
 61
61 -
 62
62 -
 63
63 -
64
-
65
-
66
-
67
-
68
-
69
-
70
-
71
-
72
-
73
-
74
-
75
-
76
-
77
-
78
-
79
-
80
-
81
-
82
-
83
-
84
-
85
-
86
-
87
-
88
-
89
-
90
-
91
-
92
-
93
-
94
-
95
 |
 |