HP Designjet L26100 HP Designjet L26500/L26100 Printer Series - User's Guide - Page 67
Load the substrate and print the diagnostic plot, go/L26500/manuals, Select the number of passes
 |
View all HP Designjet L26100 manuals
Add to My Manuals
Save this manual to your list of manuals |
Page 67 highlights
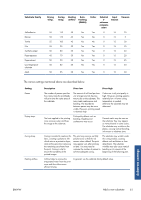
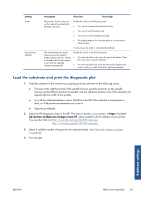
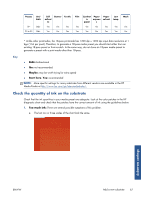
Setting Cutter Auto tracking (OMAS) Description If too low If too high The printer's built-in cutter can cut the substrate automatically between each print. Disable the cutter in the following cases: ● You want to increase the speed of printing. ● You want to use the take-up reel. ● You want to cut the substrate manually. ● The leading edge of the substrate tends to curl and cause substrate jams. In some cases, the cutter is automatically disabled. The substrate-advance sensor (also known as the Optical Media Advance Sensor, OMAS) is located under the print platen; it can track the substrate advance automatically. Disable the sensor in the following cases: ● The substrate allows ink to pass through to the platen. Clean the sensor after using this substrate. ● You are instructed to do so by the front panel, because the sensor is dirty or unable to track this particular substrate. Load the substrate and print the diagnostic plot 1. Load the substrate in the normal way, paying particular attention to the following points. ● The stop at the right-hand end of the spindle has two possible positions on the spindle. Always use the leftmost position if possible. Use the rightmost position only if the substrate roll requires the full width of the spindle. ● Turn off the substrate-advance sensor (OMAS) in the RIP if the substrate is transparent or dark, or if the printer recommends you to do so. ● Align the printheads. 2. Open the HP diagnostic chart in the RIP. The chart is stored in your printer, at http://ip-addr/ hp/device/webAccess/images/new.tif, where ip-addr is the IP address of your printer. You can also find it at http://www.hp.com/go/L26500/manuals/ http://www.hp.com/go/L26100/manuals/ 3. Select a suitable number of passes for the substrate family. See Select the number of passes on page 66. 4. Print the plot. Substrate settings ENWW Add a new substrate 63
-
 1
1 -
2
-
3
-
4
-
5
-
6
-
7
-
8
-
9
-
10
-
11
-
12
-
13
-
14
-
15
-
16
-
17
-
18
-
19
-
20
-
21
-
22
-
23
-
24
-
25
-
26
-
27
-
28
-
29
-
30
-
31
-
32
-
33
-
34
-
35
-
36
-
37
-
38
-
39
-
40
-
41
-
42
-
43
-
44
-
45
-
46
-
47
-
48
-
49
-
50
-
51
-
52
-
53
-
54
-
55
-
56
-
57
-
58
-
59
-
60
-
61
-
 62
62 -
 63
63 -
 64
64 -
 65
65 -
 66
66 -
 67
67 -
 68
68 -
 69
69 -
 70
70 -
 71
71 -
 72
72 -
73
-
74
-
75
-
76
-
77
-
78
-
79
-
80
-
81
-
82
-
83
-
84
-
85
-
86
-
87
-
88
-
89
-
90
-
91
-
92
-
93
-
94
-
95
 |
 |