HP Scitex LX600 HP Scitex LX Printer Family - User's guide
HP Scitex LX600 Manual
 |
View all HP Scitex LX600 manuals
Add to My Manuals
Save this manual to your list of manuals |
HP Scitex LX600 manual content summary:
- HP Scitex LX600 | HP Scitex LX Printer Family - User's guide - Page 1
HP Scitex LX Printer family User's guide (draft 9, 2010-02-21) - HP Scitex LX600 | HP Scitex LX Printer Family - User's guide - Page 2
such products and services. Nothing herein should be construed as constituting an additional warranty. HP shall not be liable for technical or editorial errors or omissions contained herein. Safety notice Read and follow the operating and safety instructions before starting the printer. Trademarks - HP Scitex LX600 | HP Scitex LX Printer Family - User's guide - Page 3
Print Server 14 Set the HP Internal Print Server preferences 14 3 Handle the substrate Overview ...16 Substrate tips ...19 Substrate configurations ...21 Set the carriage beam position ...22 Prepare to print ...23 The substrate edge holders ...24 The ink collector kit (LX800 only) ...25 The curing - HP Scitex LX600 | HP Scitex LX Printer Family - User's guide - Page 4
Ink system components ...68 How to work with ink system components 69 How to order supplies ...74 How to recycle supplies ...75 5 Printing options HP Internal Print Server menus ...76 Manage print jobs ...76 Layout method ...81 CallMe@HP ...85 6 Accessories How to order accessories ...86 7 Printer - HP Scitex LX600 | HP Scitex LX Printer Family - User's guide - Page 5
◦ Printer firmware upgrades ◦ Access to the online HP Printing Knowledge Center Documentation The following documents are provided with your printer, and can also be downloaded from http://www.hp.com/go/LX600/manuals/ or http://www.hp.com/go/LX800/manuals/. ● Site preparation guide ● User's guide - HP Scitex LX600 | HP Scitex LX Printer Family - User's guide - Page 6
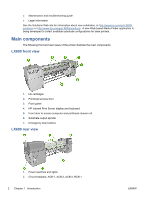
hp.com/go/LX800/solutions/. A new Web-based Media Finder application is being developed to collect available substrate configurations for latex printers. Main components The following front and rear views of the printer illustrate the main components. LX600 front view 1. Ink cartridges 2. Printhead - HP Scitex LX600 | HP Scitex LX Printer Family - User's guide - Page 7
spindle with differential hub (optional accessory, part number Q6705A) LX800 front view 1. Ink cartridges 2. Printhead access door 3. Front panel 4. HP Internal Print Server display and keyboard 5. Front door to access computer and printhead cleaner roll 6. Diverter roller 7. Emergency stop buttons - HP Scitex LX600 | HP Scitex LX Printer Family - User's guide - Page 8
LX800 only) 1. Ink collector container 2. 8 ink collectors with replaceable foams 3. Input diverter roller 4. Output diverter roller The front panel Your printer's front panel is located at the front right of the printer. It has the following important functions: ● It assists you in troubleshooting - HP Scitex LX600 | HP Scitex LX Printer Family - User's guide - Page 9
printer (more information is available from the HP printer's operational status. If the light is off, the printer is not ready. If it is solid green, the printer is ready and idle. If it is flashing green, the printer is busy: receiving data key. When this guide shows a series of front-panel display - HP Scitex LX600 | HP Scitex LX Printer Family - User's guide - Page 10
the HP Internal Print Server. Safety precautions Before using your printer, read the following safety precautions to make sure you use the equipment safely. General safety guidelines ● Refer to installation instructions before connecting the printer to the supply. ● There are no operator-serviceable - HP Scitex LX600 | HP Scitex LX Printer Family - User's guide - Page 11
special care when accessing the substrate path. Fire hazard The drying and curing subsystems of the printer operate at high temperatures. Call your service representative if the printer's built-in Residual Current Circuit Breaker (Ground Fault Circuit Interrupter) is repeatedly tripped. To avoid the - HP Scitex LX600 | HP Scitex LX Printer Family - User's guide - Page 12
problems associated with them. However, HP recommends that you wear gloves when handling ink system components. Warnings and cautions The following symbols are used in this manual to ensure the proper use of the printer and to prevent the printer from being damaged. Follow the instructions - HP Scitex LX600 | HP Scitex LX Printer Family - User's guide - Page 13
energized may represent a hazard during servicing. Refer servicing to qualified service personnel. Turn off the printer using both Branch Circuit Breakers located in the building's Power Distribution Unit (PDU) before servicing. See installation instructions before connecting to the supply. Danger - HP Scitex LX600 | HP Scitex LX Printer Family - User's guide - Page 14
may become trapped between gearwheels When the printer is printing, the printhead carriage travels back and forth across the substrate. Beware of this moving part. Emergency stop buttons There are four emergency stop buttons distributed around the printer. If an emergency occurs, simply push one - HP Scitex LX600 | HP Scitex LX Printer Family - User's guide - Page 15
the mechanical and drying components that use more power. To turn on the printer: 1. Make sure that all the circuit breakers are in the up position panel in case there is a system error, and consult the Maintenance and troubleshooting guide or check with your electrician. 4. Go to the front - HP Scitex LX600 | HP Scitex LX Printer Family - User's guide - Page 16
several minutes. The printer beeps if some problem is encountered. When initialization is complete, the front panel displays a Ready message. If a system error message is displayed, consult the Maintenance and troubleshooting guide. To turn off the printer and the HP Internal Print Server computer - HP Scitex LX600 | HP Scitex LX Printer Family - User's guide - Page 17
If you cannot understand the current front-panel display language, start with the printer powered off. At the front panel, press the OK key and hold it the units of measurement To change the units of measurement in the HP Internal Print Server, select the Tools menu, then Preferences, then the - HP Scitex LX600 | HP Scitex LX Printer Family - User's guide - Page 18
preferences To change the HP Internal Print Server's preferences, select Preferences from the Tools menu. In the Preferences window, you will see four tabs. ● Units of length and temperature ● Remarks (to add as a footer to the printed file) ● Font of footer text ● Printer's IP address ● Action - HP Scitex LX600 | HP Scitex LX Printer Family - User's guide - Page 19
5.0 mm (0.02 in). You can define the default left margin in the Job Properties window. The above fields are to be filled in by your service representative. ENWW Set the HP Internal Print Server preferences 15 - HP Scitex LX600 | HP Scitex LX Printer Family - User's guide - Page 20
3 Handle the substrate Overview Applications For each printing application, some substrate types are more appropriate than others. POP applications ● Banners: Free-hanging, horizontally or vertically. Usually vinyl, but can be fabric. ● Backlit: Usually inside a light box, visible by day and night. - HP Scitex LX600 | HP Scitex LX Printer Family - User's guide - Page 21
● Interior decoration: Walls covered with graphics to create a unique atmosphere. Usually printed on blue back paper and mounted directly on walls or rigid boards. May also be printed on vinyl or fabric. ● Building wrap: Part of a building covered with vinyl or mesh substrate, which is stretched and - HP Scitex LX600 | HP Scitex LX Printer Family - User's guide - Page 22
Supported substrate types For information on new substrates, see http://www.hp.com/go/LX600/solutions/ or http://www.hp.com/ go/LX800/solutions/. Category Type Banners Self-adhesive Film PVC Scrim Banner Frontlit - 100%, 150%, 250% PVC Scrim Banner Backlit - 100%, 150%, 250% Green Banner - 100%, - HP Scitex LX600 | HP Scitex LX Printer Family - User's guide - Page 23
printer does not support substrates substrate, leading to ink smearing and printhead crashes. ● Check HP Internal Print Server to check that any required calibrations have been done: color calibration, substrate-advance compensation, printhead alignment. See the Maintenance and troubleshooting guide - HP Scitex LX600 | HP Scitex LX Printer Family - User's guide - Page 24
based inks can result in an increased amount of water vapor being generated. You can find further information on the Web: ● The specifications, finishing, processing and warranty information for each individual HP substrate are available from http://www.hp.com/go/designjet/supplies/latex/. ● HP - HP Scitex LX600 | HP Scitex LX Printer Family - User's guide - Page 25
your different needs. Before loading, you must go to the HP Internal Print Server and select Substrate > Load/Unload, then select or non-porous substrates. Porous substrates require the use of the ink collector kit: see The ink collector kit (LX800 only) on page 25. ● The roll-to-roll configuration - HP Scitex LX600 | HP Scitex LX Printer Family - User's guide - Page 26
(LX800 only) is suitable when you want to cut and remove each print as soon as it comes out of the printer. carriage beam position determines the vertical distance between the printheads and the platen. If it is too great, print quality maintenance tasks. 22 Chapter 3 Handle the substrate ENWW - HP Scitex LX600 | HP Scitex LX Printer Family - User's guide - Page 27
can print: 1. Ensure that the ink collector kit is installed for porous substrates, and not installed for non-porous substrates. See The ink collector kit (LX800 only) on page 25. 2. Start the printer. See Turn the printer on and off on page 11. 3. Go to the HP Internal Print Server and select - HP Scitex LX600 | HP Scitex LX Printer Family - User's guide - Page 28
press Next to see the on-screen help. 5. Load the substrate. Substrate loading instructions are displayed in the HP Internal Print Server window. For more detailed instructions, see Load a roll onto the spindle on page 32 and Load a roll into the printer on page 39. 6. Press the Load button in the - HP Scitex LX600 | HP Scitex LX Printer Family - User's guide - Page 29
otherwise it could damage the printheads and carriage. The ink collector kit (LX800 only) Before printing on porous substrates, such as textile or mesh substrates, you must install the ink collector kit provided with your printer, to protect the printer from the ink that falls through the substrate - HP Scitex LX600 | HP Scitex LX Printer Family - User's guide - Page 30
container and check that the ink collector foams are dry. 6. Follow the instructions in the HP Internal Print Server to complete the installation. If you need further information, read the steps below. CAUTION: If you install the kit incorrectly, some parts of the printer may be damaged. 26 Chapter - HP Scitex LX600 | HP Scitex LX Printer Family - User's guide - Page 31
7. When the carriage beam has stopped rising, go to the rear of the printer and insert the first ink collector on the left. There is a stop that marks the position of the first ink collector. ENWW The ink collector kit (LX800 only) 27 - HP Scitex LX600 | HP Scitex LX Printer Family - User's guide - Page 32
8. Moving gradually to the right, install the other ink collectors. To install the last ink collector on the right, you have to move a blue spring-loaded clip. 9. Check that all the ink collectors are aligned with each other and that there are no gaps between them. 10. Check that there are no gaps - HP Scitex LX600 | HP Scitex LX Printer Family - User's guide - Page 33
the correct position for the substrate you are loading (see The curing plates (LX800 only) on page 30). 14. Load the substrate, which should pass substrate width into the HP Internal Print Server, if the printer cannot detect them. Uninstall the kit The ink collector kit must be uninstalled before - HP Scitex LX600 | HP Scitex LX Printer Family - User's guide - Page 34
to the printer. To remove the rightmost ink collector, first move aside the blue spring-loaded clip. 6. Store the ink collectors correctly HP Internal Print Server and select Substrate > Load/Unload. In the load configuration, ensure that the Ink collector box is unchecked. The curing plates (LX800 - HP Scitex LX600 | HP Scitex LX Printer Family - User's guide - Page 35
get sufficient curing for a particular substrate with the curing plates down, you could try raising them to the horizontal position. ENWW The curing fans switch (LX800 only) 31 - HP Scitex LX600 | HP Scitex LX Printer Family - User's guide - Page 36
printheads. Try to straighten the edges of the substrate to minimize telescoping on the input roll before loading it into the printer loaded into the printer. TIP: If you are a regular user of different substrate types with your LX800 printer or available as accessories for your LX600 printer. The - HP Scitex LX600 | HP Scitex LX Printer Family - User's guide - Page 37
Loading the dual-roll spindles 1. Ensure that the differential hubs on the input and output spindles are aligned with each other. 2. When both differential hubs are correctly positioned, use an Allen key 6 to tighten the screws and secure them in place. If a differential hub is loose, the substrate - HP Scitex LX600 | HP Scitex LX Printer Family - User's guide - Page 38
4. Unscrew and remove the inner part of each hub. 5. Insert the first roll on the spindle. 6. Replace the hub, and secure it with the Allen key. 7. Insert the second roll on the spindle. 8. Replace the hub, and secure it with the Allen key. 34 Chapter 3 Handle the substrate ENWW - HP Scitex LX600 | HP Scitex LX Printer Family - User's guide - Page 39
tightly on the hub. 11. Ensure that the roll core fits tightly on the differential hub. 12. Load the spindle at the rear of the printer, and secure the spindle latches. 13. Use the same process to load the output spindle at the front of the - HP Scitex LX600 | HP Scitex LX Printer Family - User's guide - Page 40
printheads. Try to straighten the edges of the substrate to minimize telescoping on the input roll before loading it into the printer loaded into the printer. TIP: If you are a regular user of different substrate types with your LX800 printer or available as accessories for your LX600 printer. The - HP Scitex LX600 | HP Scitex LX Printer Family - User's guide - Page 41
Loading the dual-roll spindles 1. Ensure that the differential hubs on the input and output spindles are aligned with each other. 2. When both differential hubs are correctly positioned, use an Allen key 6 to tighten the screws and secure them in place. If a differential hub is loose, the substrate - HP Scitex LX600 | HP Scitex LX Printer Family - User's guide - Page 42
4. Unscrew and remove the inner part of each hub. 5. Insert the first roll on the spindle. 6. Replace the hub, and secure it with the Allen key. 7. Insert the second roll on the spindle. 8. Replace the hub, and secure it with the Allen key. 38 Chapter 3 Handle the substrate ENWW - HP Scitex LX600 | HP Scitex LX Printer Family - User's guide - Page 43
tightly on the hub. 11. Ensure that the roll core fits tightly on the differential hub. 12. Load the spindle at the rear of the printer, and secure the spindle latches. 13. Use the same process to load the output spindle at the front of the - HP Scitex LX600 | HP Scitex LX Printer Family - User's guide - Page 44
shorter cores on the same spindle, which could cause substrate-advance problems. TIP: The spindle by itself is quite heavy, and a lift one end into the printer, and then the other end. 1. Go to the HP Internal Print Server and select printheads and carriage. 40 Chapter 3 Handle the substrate ENWW - HP Scitex LX600 | HP Scitex LX Printer Family - User's guide - Page 45
Cancel key. 5. Bring the new roll on its spindle to the rear of the printer, with the geared end of the spindle on the left. 6. Rest the ends of the spindle on the platforms provided at the rear of the printer; plastic pads are provided to absorb the impacts. 7. Open the latches at both - HP Scitex LX600 | HP Scitex LX Printer Family - User's guide - Page 46
an LX800 printer, you are recommended to use the output diverter from the ink collector kit, to minimize wrinkles. 15. At the rear of the printer, measure the distance between the printer's left plate may be acceptable without problems of skew or wrinkles. 42 Chapter 3 Handle the substrate ENWW - HP Scitex LX600 | HP Scitex LX Printer Family - User's guide - Page 47
or substrates that may wrinkle in the print zone, to avoid ink smearing. Be aware that raising the printhead from the substrate may give poorer print quality. WARNING! Do not insert your hands or anything else into the printer while the carriage beam is descending. ENWW Load a roll into the - HP Scitex LX600 | HP Scitex LX Printer Family - User's guide - Page 48
value for the right-hand edge that must be entered manually in the HP Internal Print Server. 23. In the HP Internal Print Server, choose from the list of substrate types page 61 and the Maintenance and troubleshooting guide. The printer is now ready to print. 44 Chapter 3 Handle the substrate ENWW - HP Scitex LX600 | HP Scitex LX Printer Family - User's guide - Page 49
printer, you must have both rolls loaded on the rear dual-roll spindle and two empty cores loaded on the front dual-roll spindle. See Load a roll onto the spindle on page 32. 1. Go to the HP damage the printheads and carriage. 3. Lift the substrate pressure handles at the rear of the printer. 4. If - HP Scitex LX600 | HP Scitex LX Printer Family - User's guide - Page 50
spindles while loading. 6. Bring the new rolls on their spindle to the rear of the printer, with the geared end of the spindle on the left. 7. If the two rolls are longer roll should be on the right as seen from the front of the printer; on the left as seen from the rear. 8. Rest the ends of the spindle - HP Scitex LX600 | HP Scitex LX Printer Family - User's guide - Page 51
to the output spindle. TIP: Two people are recommended for this operation (one per roll). 14. Once in front of the printer, if you find that you haven't unrolled enough substrate, select Start main roller motion from the front panel's Substrate menu to unroll some more. The - HP Scitex LX600 | HP Scitex LX Printer Family - User's guide - Page 52
both rolls to the empty cores on the output spindle. 17. Install the four edge holders. See The substrate edge holders on page ink smearing. Be aware that raising the printhead from the substrate may give poorer print quality. WARNING! Do not insert your hands or anything else into the printer while - HP Scitex LX600 | HP Scitex LX Printer Family - User's guide - Page 53
the right-hand edge that must be entered manually in the HP Internal Print Server. 21. In the HP Internal Print Server, choose from the list of 61 and the Maintenance and troubleshooting guide. The printer is now ready to print. Load a roll (roll-to-free-fall configuration) (LX800 only) The substrate - HP Scitex LX600 | HP Scitex LX Printer Family - User's guide - Page 54
it into position; otherwise, lift one end into the printer, and then the other end. 1. Go to the HP Internal Print Server and select Substrate > Load/Unload, damage the printheads and carriage. 3. Lift the substrate pressure handles at the rear of the printer. 50 Chapter 3 Handle the substrate ENWW - HP Scitex LX600 | HP Scitex LX Printer Family - User's guide - Page 55
Cancel key. 5. Bring the new roll on its spindle to the rear of the printer, with the geared end of the spindle on the left. 6. Rest the ends the spindle (if they were closed) and push the roll on its spindle into the printer. 8. Close the latches to secure the spindle in place. TIP: If you cannot - HP Scitex LX600 | HP Scitex LX Printer Family - User's guide - Page 56
leading edge of the substrate through the printer, over the main roller and the front roller to the tension roller. 12. Once in front of the printer, if you find that you haven't unrolled through the holes provided in the substrate guide around the roller. 52 Chapter 3 Handle the substrate ENWW - HP Scitex LX600 | HP Scitex LX Printer Family - User's guide - Page 57
rear side plate and front side plate may be acceptable without problems of skew or wrinkles. Rear Front 15. When the substrate ink smearing. Be aware that raising the printhead from the substrate may give poorer print quality. WARNING! Do not insert your hands or anything else into the printer - HP Scitex LX600 | HP Scitex LX Printer Family - User's guide - Page 58
value for the right-hand edge that must be entered manually in the HP Internal Print Server. 21. In the HP Internal Print Server, choose from the list of substrate types page 61 and the Maintenance and troubleshooting guide. The printer is now ready to print. 54 Chapter 3 Handle the substrate ENWW - HP Scitex LX600 | HP Scitex LX Printer Family - User's guide - Page 59
LX800 only) This configuration is similar to the roll-to-free-fall configuration, but with the addition of a collector roller and loop shaper. The following illustration shows a completed configuration with a single roll of porous substrate, so the ink collector kit has been installed the printer 55 - HP Scitex LX600 | HP Scitex LX Printer Family - User's guide - Page 60
: Loop detection is done on the right-hand side of the printer; so avoid putting your foot or any other object under the collector on the right-hand side . 7. Go to the HP Internal Print Server and press the Enable collector button. 8. Select the winding - HP Scitex LX600 | HP Scitex LX Printer Family - User's guide - Page 61
substrate types available, your printer contains substrate presets for only the most commonly used substrate types. For your convenience, substrate settings from many substrate vendors have been collected at http://www.hp.com/go/LX600/solutions/ and http:// www.hp.com/go/LX800/solutions/. You can - HP Scitex LX600 | HP Scitex LX Printer Family - User's guide - Page 62
specifies how many times the printheads will print over the same area of substrate. The printer cannot deposit enough ink over a given area, so , and printhead health is well maintained. However, printing speed is relatively low. Curing temperature Curing is needed to coalesce the latex, creating - HP Scitex LX600 | HP Scitex LX Printer Family - User's guide - Page 63
in horizontal bands. Ink restrictions A way of specifying the maximum amount of each color of ink that can be laid maintenance task, in particular printhead checks and alignment. 2. Stop the print queue and wait for the printer to finish the current job. No jobs should be sent to the printer - HP Scitex LX600 | HP Scitex LX Printer Family - User's guide - Page 64
the HP Internal Print Server. 2. Choose a name for your substrate. TIP: To avoid confusing other users, it is a good idea to use the substrate's commercial name. TIP: If you plan to use more than one ink density with this substrate, or more than one number of print passes, include the ink - HP Scitex LX600 | HP Scitex LX Printer Family - User's guide - Page 65
Select the number of print passes that you want to use. Color calibration uses six passes with 100% ink density, eight passes with 150% ink density, or fourteen passes with 250% ink density. You are recommended to create a preset suitable for color calibration; for normal printing, you may want to - HP Scitex LX600 | HP Scitex LX Printer Family - User's guide - Page 66
. Look for any potential problems during printing, such as: ● Potential head crashes or ink smears between the carriage and the substrate. Cancel the job and/or turn off the printer if necessary to avoid damaging the printheads or any other sensitive printer components. ● Potential substrate - HP Scitex LX600 | HP Scitex LX Printer Family - User's guide - Page 67
Maintenance and troubleshooting guide). ● Look for ink bleeding problems in the lower part of the sample (see the Maintenance and troubleshooting guide). You are recommended to check the sample for problems the substrate advance manually (see the Maintenance and troubleshooting guide). NOTE: This - HP Scitex LX600 | HP Scitex LX Printer Family - User's guide - Page 68
printhead crashes, ink smears, substrate deformation, wrinkles or cockle, try these adjustments in this order: a. Check that the substrate is correctly loaded. b. LX800 only: If there are wrinkles on self-adhesive vinyl substrates, install the following table as a guide. Curing (°C) Drying (°C) 80 - HP Scitex LX600 | HP Scitex LX Printer Family - User's guide - Page 69
damp in the 70% to 10% columns, increase the number of passes. g. Decrease the ink density by adjusting the total ink limit in the RIP, or using the ink restrictions in the Color pane. 4. If you see ink bleeding or coalescence, such as the coalescence shown below, try these adjustments in this order - HP Scitex LX600 | HP Scitex LX Printer Family - User's guide - Page 70
decrease tensions in steps of 10 N/m. c. Increase the number of passes. 8. If colors are misaligned, try realigning the printheads manually. See the Maintenance and troubleshooting guide. When you have adjusted the settings for one print mode, you can proceed to other print modes. However, it's not - HP Scitex LX600 | HP Scitex LX Printer Family - User's guide - Page 71
in the HP Internal Print Server. See the 'Printer calibration' chapter in the Maintenance and troubleshooting guide for more information. 2. Create ICC profiles for your substrate; see your RIP documentation for instructions. Normally, the procedure includes setting the total ink limit as - HP Scitex LX600 | HP Scitex LX Printer Family - User's guide - Page 72
of HP Latex Ink, which requires no special ventilation and creates no hazardous waste. The cartridge consists of a bag contained in a recyclable cardboard box. Printheads The printheads take ink from the ink cartridges and deposit it on the substrate. You can purchase printheads for your printer - HP Scitex LX600 | HP Scitex LX Printer Family - User's guide - Page 73
them. To change the filters when necessary, see the Maintenance and troubleshooting guide. Ink deposits In order to check the status of the printhead nozzles, the printer expels a few drops of ink from each nozzle of each printhead into the ink deposits. This is done at the start of each print - HP Scitex LX600 | HP Scitex LX Printer Family - User's guide - Page 74
. The black, yellow and cyan cartridges sit at the front of the printer; the magenta, light magenta and light cyan cartridges are at the rear. 5. Check that the rubber part around the needle in the cartridge connector is clean. Clean gently if necessary. 70 Chapter 4 Handle the ink system ENWW - HP Scitex LX600 | HP Scitex LX Printer Family - User's guide - Page 75
expired or if you feel that its performance is not adequate. 1. Ensure that the printer is not trying to print: stop the job queue. 2. At the front panel, select the Ink System icon and then Replace printheads. 3. Open the printhead access door in the side of the printer. ENWW How to work with - HP Scitex LX600 | HP Scitex LX Printer Family - User's guide - Page 76
underneath the carriage structure. Remove it carefully. 7. Remove the printhead from the printer. Later, use the packaging from the new printhead to return the old printhead to HP as instructed on the package. Insert a printhead 1. Check that the new printhead is of the correct colors. NOTE: Each - HP Scitex LX600 | HP Scitex LX Printer Family - User's guide - Page 77
according to the instructions on the packaging. 3. Remove its packaging and protective caps. TIP: You may wish to keep the protective caps for later reuse, in case you ever want to remove a printhead from the printer. 4. Put the new printhead into its correct place in the printer, and lower its - HP Scitex LX600 | HP Scitex LX Printer Family - User's guide - Page 78
Call your service representative (see the Maintenance and troubleshooting guide). The following ink supplies can be ordered for your printer. Table 4-1 Ink cartridges Cartridge Part number HP LX600 3-liter Black Latex Scitex Ink Cartridge CC585A HP LX600 3-liter Cyan Latex Scitex Ink Cartridge - HP Scitex LX600 | HP Scitex LX Printer Family - User's guide - Page 79
Yellow Latex Scitex Ink Cartridge HP LX600 3-liter Light Cyan Latex Scitex Ink Cartridge HP LX600 3-liter Light Magenta Latex Scitex Ink Cartridge Part number CC588A CC589A CC590A Table 4-2 Printheads Printhead HP LX600 Yellow/Magenta Scitex Printhead HP LX600 Cyan/Black Scitex Printhead HP LX600 - HP Scitex LX600 | HP Scitex LX Printer Family - User's guide - Page 80
● Service Information ● Maintenance ● Accounting The Substrate menu ● Load/Unload ● Rename ● Find new presets ● Properties ● Create ● Edit ● Remove ● Color calibration ● Presets management ● Settings The Tools menu ● Preferences ● Proactive Support ● Firmware update ● CallMe@HP The Printer menu - HP Scitex LX600 | HP Scitex LX Printer Family - User's guide - Page 81
folder should be the shared folder on the HP Internal Print Server computer that was created during printer installation. The HP Internal Print Server cannot take files directly from the network because access would not be fast enough. 1. Go to the HP Internal Print Server. 2. Select the Add New - HP Scitex LX600 | HP Scitex LX Printer Family - User's guide - Page 82
text to be printed in the bottom of each copy with the annotations, if any. 4. Click the Save button to store the job in the HP Internal Print Server for further processing. Rotate a job A job can be rotated by 90 degrees in either direction by using the rotation icons at the - HP Scitex LX600 | HP Scitex LX Printer Family - User's guide - Page 83
NOTE: Rotation is available only when the printer is not printing. The effect of rotation is shown in the it is done, the job is ready for printing. Manage the print queue The main screen of the HP Internal Print Server displays the queue of print jobs and various icons that can be used to manage the - HP Scitex LX600 | HP Scitex LX Printer Family - User's guide - Page 84
job to the queue that has been printed already. Printed jobs remain available unless deleted manually. ● Edit Job : Edit the properties of a job in the queue. ● job immediately. The job status changes to Finishing, and the printer will dry the partially-printed job before continuing with the next - HP Scitex LX600 | HP Scitex LX Printer Family - User's guide - Page 85
the files may or may not be left on the printer's hard disk, and the file may or may not the HP Internal Print Server, or when you right-click on the job queue in the HP Internal use the Advanced Nesting Arrangement window to alter the layout manually. See Nesting on page 83. All layout methods give - HP Scitex LX600 | HP Scitex LX Printer Family - User's guide - Page 86
This method has the following options: ● Steps: the number of copies to print horizontally, across the width of the substrate. ● Step gap: the horizontal gap between copies. ● Repeat gap: the vertical gap between copies. ● Fit Substrate Width: if this option is checked, the number of steps will be - HP Scitex LX600 | HP Scitex LX Printer Family - User's guide - Page 87
throughput and uses less substrate. You can use nesting in the HP Internal Print Server, from the Choose Image File window or the Job Properties window. The Choose Image File window From the HP Internal Print Server's main window, click the Add New Job icon to - HP Scitex LX600 | HP Scitex LX Printer Family - User's guide - Page 88
with nesting enabled, the Advanced Nesting Arrangement window opens (see The Advanced Nesting Arrangement window on page 85). The Job Properties window From the HP Internal Print Server's main window, right-click on the print queue to open the Job Properties window. In this window, you can click the - HP Scitex LX600 | HP Scitex LX Printer Family - User's guide - Page 89
. If you want to return to the default layout, press the Reset button. When you are satisfied with the layout, press the OK button. CallMe@HP This option allows you to call HP for remote support. For more information, please contact your - HP Scitex LX600 | HP Scitex LX Printer Family - User's guide - Page 90
your service representative (see the Maintenance and troubleshooting guide). The following accessories can be ordered for your printer. For more information about cleaning and maintenance kits, see the Maintenance and troubleshooting guide. Name HP Scitex LX Printer Cleaning Kit HP LX600 Scitex - HP Scitex LX600 | HP Scitex LX Printer Family - User's guide - Page 91
Printer specifications Functional specifications Table 7-1 Ink supplies Printheads Ink cartridges Cyan and black, light magenta and light cyan, yellow and magenta Cartridges containing 3 liters of ink 1200 600 × 1200 600 × 1200 Printing speed (m²/h) LX600 LX800 Uni Bidi Uni Bidi 9 13 10 15 - HP Scitex LX600 | HP Scitex LX Printer Family - User's guide - Page 92
speeds estimated above are from the first to the last drop of ink printed, on a fullwidth substrate. Physical specifications Table 7-4 Printer physical specifications Doors closed Weight Width (LX600) Width (LX800 Table 7-5 Memory specifications for the HP Internal Print Server computer Memory ( - HP Scitex LX600 | HP Scitex LX Printer Family - User's guide - Page 93
kW 50 A The electronic control components and HP Internal Print Server are powered with a single required, operating at 200 V ac. The LX600 printer requires four circuit breakers: two for the residual, at least 20 A capacity The LX800 printer requires two branch circuit breakers: one for the single - HP Scitex LX600 | HP Scitex LX Printer Family - User's guide - Page 94
Table 7-11 LX800 single-phase circuit breaker specifications High-voltage systems Input voltage (line to line) specifications of your printer, please go to http://www.hp.com/ and search for "ecological specifications". Environmental specifications Table 7-13 Printer environmental specifications - HP Scitex LX600 | HP Scitex LX Printer Family - User's guide - Page 95
C (131°F) Not operating (in transport or -25 to 55°C (-13 to 131°F) storage), no ink in tubes 90% Relative Humidity at 55° 10°C/h (50°F/h) or less C (131°F) Maximum operating altitude: 3000 m (10000 ft) The printer should not be exposed to direct sunlight or any other strong light source, and it - HP Scitex LX600 | HP Scitex LX Printer Family - User's guide - Page 96
A Preset creation owchart 92 Appendix A Preset creation flowchart ENWW - HP Scitex LX600 | HP Scitex LX Printer Family - User's guide - Page 97
ink spreads on the substrate across areas of different colors. Carriage beam The beam supporting the printhead carriage as it moves back and forth across the printer on different monitors. Curing Curing is needed to coalesce the latex, creating a polymeric film which acts as a protective layer, - HP Scitex LX600 | HP Scitex LX Printer Family - User's guide - Page 98
passing of data between one device and another. ICC The International Color Consortium, a group of companies that have agreed on a common standard for color profiles. Ink cartridge A removable printer component that stores ink of a particular color and provides it to the printhead. Ink density The - HP Scitex LX600 | HP Scitex LX Printer Family - User's guide - Page 99
the printer. It needs to be evenly distributed along the whole width of the substrate, thus substrate loading is a critical operation. Vacuum pressure The vacuum applied to the substrate in the printing zone helps to hold the substrate down on the print platen, keeping the distance to the printheads - HP Scitex LX600 | HP Scitex LX Printer Family - User's guide - Page 100
remove 69 specification 87 ink collector kit 21 ink deposits about 69 ink system status 74 L labels, warning 8 language 13 load substrate into printer 24 load substrate onto the spindle 24, 36 M memory specifications 88 N nesting 81 O order accessories 86 ink cartridges 68 printheads 75 P physical - HP Scitex LX600 | HP Scitex LX Printer Family - User's guide - Page 101
printing resolutions 87 printing speeds 87 substrate size 87 statistics ink system 74 step and repeat 81 substrate add new 58 applications 16 configurations 21 create preset 58 dual roll to roll 45 edit preset 67 load into printer 24 load onto the spindle 24, 36 porous 21 preset 57 remove preset 67
-
 1
1 -
 2
2 -
 3
3 -
 4
4 -
 5
5 -
 6
6 -
 7
7 -
8
-
9
-
10
-
11
-
12
-
13
-
14
-
15
-
16
-
17
-
18
-
19
-
20
-
21
-
22
-
23
-
24
-
25
-
26
-
27
-
28
-
29
-
30
-
31
-
32
-
33
-
34
-
35
-
36
-
37
-
38
-
39
-
40
-
41
-
42
-
43
-
44
-
45
-
46
-
47
-
48
-
49
-
50
-
51
-
52
-
53
-
54
-
55
-
56
-
57
-
58
-
59
-
60
-
61
-
62
-
63
-
64
-
65
-
66
-
67
-
68
-
69
-
70
-
71
-
72
-
73
-
74
-
75
-
76
-
77
-
78
-
79
-
80
-
81
-
82
-
83
-
84
-
85
-
86
-
87
-
88
-
89
-
90
-
91
-
92
-
93
-
94
-
95
-
96
-
97
-
98
-
99
-
100
-
101
 |
 |

HP Scitex LX Printer family
User’s guide
(draft 9, 2010-02-21)