HP Scitex LX600 HP Scitex LX Printer Family - User's guide - Page 63
Prepare the printer for a new substrate
 |
View all HP Scitex LX600 manuals
Add to My Manuals
Save this manual to your list of manuals |
Page 63 highlights
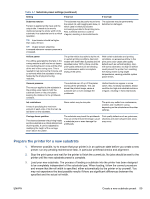
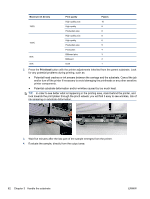
Table 3-1 Substrate preset settings (continued) Setting If too low If too high Substrate tension Tension is applied at the input and the output side. It needs to be evenly distributed along the whole width of the substrate, thus substrate load is a critical operation. The substrate may be poorly wound onto the output roll, with sagging and skew, in which case it is likely to become increasingly wrinkled in the printing zone. Also, substrate advance could be irregular, resulting in horizontal bands. The substrate may be permanently deformed or damaged. TIP: Input tension should be higher than output tension. TIP: Output tension should be increased whenever vacuum pressure is increased. Airflow power The airflow generated by the fans in the curing module is split into two air layers, one reaching the print zone and the other at the end of the curing zone. This is needed to help remove the moisture and co-solvents while the substrate is being heated by the drying and curing modules. The printer will be less able to dry the ink. In certain printing conditions (fast print modes with fewer than 5 passes and ink densities below 150%), there could be print-quality defects such as bleeding and coalescence and/or incomplete drying of the prints. With certain substrates and printing conditions, an excessive airflow in the print zone could cause print-quality defects such as vertical banding. Also, with some substrates, too high an airflow could prevent the printer from reaching the drying and/or curing target temperatures, causing potential system power errors. Vacuum pressure The vacuum applied to the substrate in the printing zone helps to hold the substrate down on the print platen, keeping the distance to the printheads constant. The substrate can lift up off the platen and touch the printheads. This can smear the printed image, cause a substrate jam or even damage the printheads. Vertical bands can appear in some colors. Also, for sticky substrates, friction could be too high and substrate advance irregular, resulting in horizontal bands. Ink restrictions A way of specifying the maximum amount of each color of ink that can be laid down on the substrate. Some colors may be too pale. The print may suffer from coalescence, wrinkles and insufficient curing, depending on the substrate and the other settings. Carriage beam position The distance between the printing heads and the substrate is a critical determinant of print quality. It can be adjusted by modifying the height of the carriage beam above the platen. The substrate may touch the printheads. This can smear the printed image, cause a substrate jam or even damage the printheads. Print quality defects such as graininess, shadows and worm-shaped dark areas may occur. Prepare the printer for a new substrate 1. Whenever possible, try to ensure that your printer is in an optimum state before you create a new preset: run any pending maintenance task, in particular printhead checks and alignment. 2. Stop the print queue and wait for the printer to finish the current job. No jobs should be sent to the printer until the new substrate preset is complete. 3. Load your new substrate. The process of loading a substrate into the printer has been designed to be completely independent of the substrate type. When loading, follow the correct procedure and ensure that the roll width is specified, either automatically by the printer or by yourself. You may not experience the best possible results if there are significant differences between the specified and the actual roll width. ENWW Create a new substrate preset 59
-
 1
1 -
2
-
3
-
4
-
5
-
6
-
7
-
8
-
9
-
10
-
11
-
12
-
13
-
14
-
15
-
16
-
17
-
18
-
19
-
20
-
21
-
22
-
23
-
24
-
25
-
26
-
27
-
28
-
29
-
30
-
31
-
32
-
33
-
34
-
35
-
36
-
37
-
38
-
39
-
40
-
41
-
42
-
43
-
44
-
45
-
46
-
47
-
48
-
49
-
50
-
51
-
52
-
53
-
54
-
55
-
56
-
57
-
 58
58 -
 59
59 -
 60
60 -
 61
61 -
 62
62 -
 63
63 -
 64
64 -
 65
65 -
 66
66 -
 67
67 -
 68
68 -
69
-
70
-
71
-
72
-
73
-
74
-
75
-
76
-
77
-
78
-
79
-
80
-
81
-
82
-
83
-
84
-
85
-
86
-
87
-
88
-
89
-
90
-
91
-
92
-
93
-
94
-
95
-
96
-
97
-
98
-
99
-
100
-
101
 |
 |
