HP Scitex LX600 HP Scitex LX Printer Family - User's guide - Page 62
Create a new substrate preset, Substrate, Presets management
 |
View all HP Scitex LX600 manuals
Add to My Manuals
Save this manual to your list of manuals |
Page 62 highlights
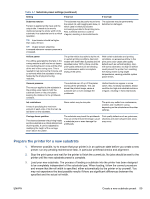
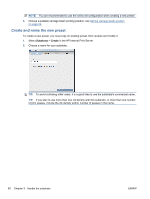
To install a new substrate preset that you have downloaded, go to the HP Internal Print Server and select Substrate > Presets management. Create a new substrate preset Whenever you load a new substrate type into your printer, you must choose a substrate preset for it. 1. If possible, select a preset for the specific substrate type that you intend to load. 2. If no specific preset is available, select a generic preset that corresponds to the specific type that you intend to load. You may be able to get better results by creating a specific preset for your substrate type. 3. If no specific nor generic preset matches your substrate, select whatever preset seems to resemble it most closely. You will probably get better results by creating a specific preset for your substrate type. Creating a new preset has several purposes. ● You can assign a name of your own choice to a particular substrate. ● You can adjust the preset to suit the precise characteristics of your substrate. ● You can adjust the preset to your intended use of the substrate, which may range from highestquality printing to fast production output. NOTE: You can change only the presets that you have created yourself. The presets supplied by HP cannot be changed. Before creating a new preset, it is useful to understand a little about how the printer works. Here are some of the available settings. Table 3-1 Substrate preset settings Setting If too low If too high Number of passes The number of passes specifies how many times the printheads will print over the same area of substrate. The printer cannot deposit enough ink over a given area, so colors are muted. Because larger substrate advances are required and ink has to be placed faster on the substrate, the boundaries between passes are more visible and may be seen as horizontal lines across the image. However, printing speed is relatively high. Colors are vivid, print quality is high, and printhead health is well maintained. However, printing speed is relatively low. Curing temperature Curing is needed to coalesce the latex, creating a polymeric film which acts as a protective layer, while at the same time removing the remaining co-solvents from the print. Curing is vital to ensure the durability of the printed images. The print may emerge not fully dry, so that the ink smears when rubbed with a finger. The print may appear dry immediately after printing and then become wet to touch some seconds later. If the curing temperature is very low, the latex film is not created, in which durability is drastically reduced. The substrate may wrinkle on the platen, causing vertical banding or ink smears, with substrate jams in extreme cases. Fragile substrates may be damaged. Drying temperature The heat applied in the printing zone removes water and fixes the image to the substrate. Print quality defects such as bleeding and coalescence may occur. Boundaries between colors are not well defined. Single-color area fills are not uniform: ink is concentrated at the edges or in clusters within the area fill. Thermal marks may be seen on the substrate; they may appear as vertical bands in some colors. The substrate may wrinkle on the platen, causing vertical banding or ink smears, with substrate jams in extreme cases. 58 Chapter 3 Handle the substrate ENWW
-
 1
1 -
2
-
3
-
4
-
5
-
6
-
7
-
8
-
9
-
10
-
11
-
12
-
13
-
14
-
15
-
16
-
17
-
18
-
19
-
20
-
21
-
22
-
23
-
24
-
25
-
26
-
27
-
28
-
29
-
30
-
31
-
32
-
33
-
34
-
35
-
36
-
37
-
38
-
39
-
40
-
41
-
42
-
43
-
44
-
45
-
46
-
47
-
48
-
49
-
50
-
51
-
52
-
53
-
54
-
55
-
56
-
 57
57 -
 58
58 -
 59
59 -
 60
60 -
 61
61 -
 62
62 -
 63
63 -
 64
64 -
 65
65 -
 66
66 -
 67
67 -
68
-
69
-
70
-
71
-
72
-
73
-
74
-
75
-
76
-
77
-
78
-
79
-
80
-
81
-
82
-
83
-
84
-
85
-
86
-
87
-
88
-
89
-
90
-
91
-
92
-
93
-
94
-
95
-
96
-
97
-
98
-
99
-
100
-
101
 |
 |