HP Scitex LX600 HP Scitex LX Printer Family - User's guide - Page 9
highlight, select, Item1, HP Internal Print Server.
 |
View all HP Scitex LX600 manuals
Add to My Manuals
Save this manual to your list of manuals |
Page 9 highlights
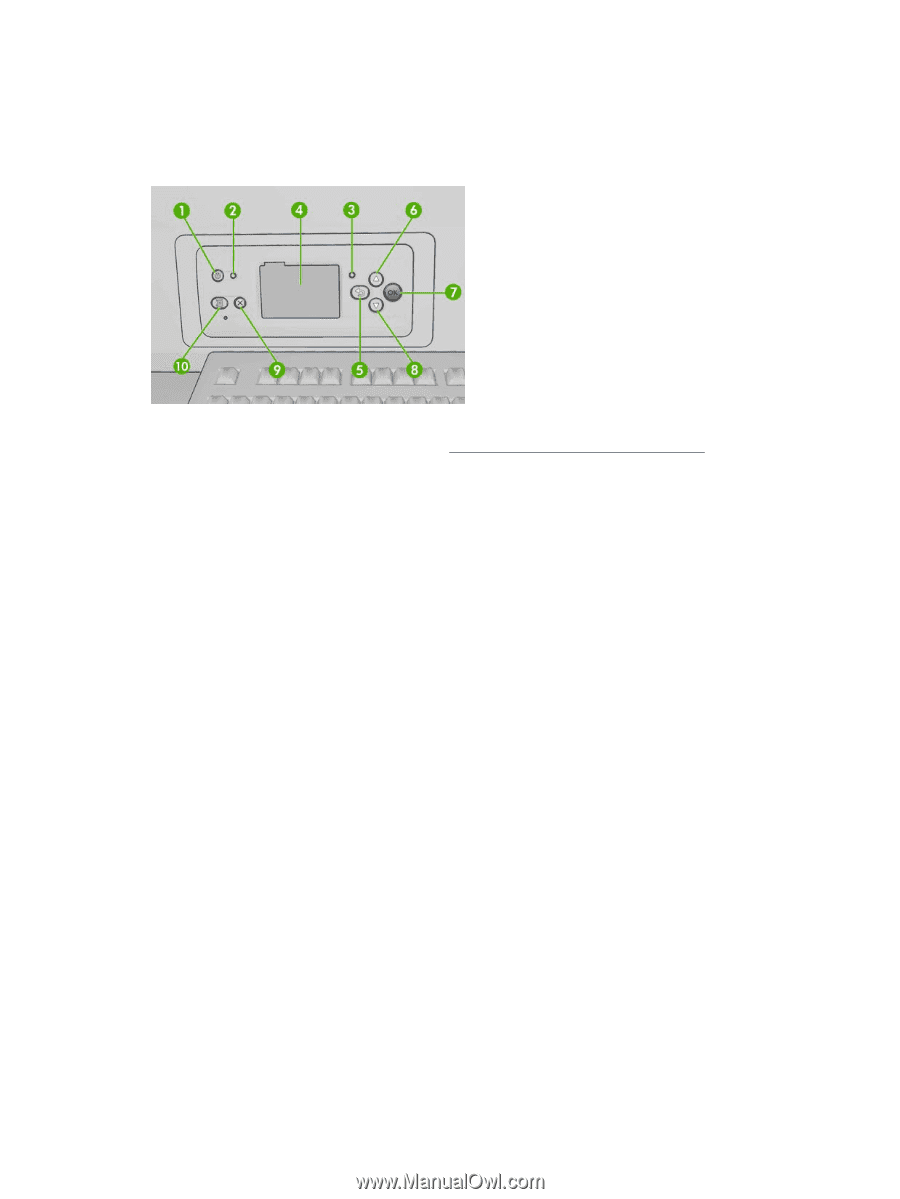
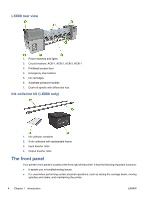
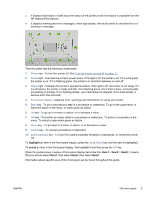
● It displays information in brief about the status of the printer (more information is available from the HP Internal Print Server). ● It displays warning and error messages, when appropriate, with audio alerts to call attention to a warning or message. The front panel has the following components: 1. Power key - To turn the printer off. See Turn the printer on and off on page 11. 2. Power light - Indicates the printer's power status. If the light is off, the printer is off. If it is solid green, the printer is on. If it is flashing green, the printer is in transition between on and off. 3. Status light - Indicates the printer's operational status. If the light is off, the printer is not ready. If it is solid green, the printer is ready and idle. If it is flashing green, the printer is busy: receiving data, processing or printing. If it is flashing amber, your intervention is required. If it is solid amber, a serious error has occurred. 4. Front-panel display - Displays error, warnings and information on using your printer. 5. Back key - To go to the previous step in a procedure or interaction. To go to the upper level, or leave the option in the menu, or when given an option. 6. Up key - To go up in a menu or option, or to increase a value. 7. OK key - To confirm an action while in a procedure or interaction. To enter in a submenu in the menu. To select a value when given an option. 8. Down key - To go down in a menu or option, or to decrease a value. 9. Cancel key - To cancel a procedure or interaction. 10. Move substrate key - To move the loaded substrate forwards or backwards, or rewind the whole roll. To highlight an item in the front-panel display, press the Up or Down key until the item is highlighted. To select an item in the front-panel display, first highlight it and then press the OK key. When this guide shows a series of front-panel display items like this: Item1 > Item2 > Item3, it means that you should select Item1, then select Item2, then select Item3. Information about specific uses of the front panel can be found throughout this guide. ENWW The front panel 5
-
 1
1 -
2
-
3
-
 4
4 -
 5
5 -
 6
6 -
 7
7 -
 8
8 -
 9
9 -
 10
10 -
 11
11 -
 12
12 -
 13
13 -
 14
14 -
15
-
16
-
17
-
18
-
19
-
20
-
21
-
22
-
23
-
24
-
25
-
26
-
27
-
28
-
29
-
30
-
31
-
32
-
33
-
34
-
35
-
36
-
37
-
38
-
39
-
40
-
41
-
42
-
43
-
44
-
45
-
46
-
47
-
48
-
49
-
50
-
51
-
52
-
53
-
54
-
55
-
56
-
57
-
58
-
59
-
60
-
61
-
62
-
63
-
64
-
65
-
66
-
67
-
68
-
69
-
70
-
71
-
72
-
73
-
74
-
75
-
76
-
77
-
78
-
79
-
80
-
81
-
82
-
83
-
84
-
85
-
86
-
87
-
88
-
89
-
90
-
91
-
92
-
93
-
94
-
95
-
96
-
97
-
98
-
99
-
100
-
101
 |
 |