Nextar Q4-MD User Manual - Page 37
Viewing the entire route on the map Fit-to-Screen, 6 Watching the simulation of the route - manual
 |
UPC - 714129929912
View all Nextar Q4-MD manuals
Add to My Manuals
Save this manual to your list of manuals |
Page 37 highlights
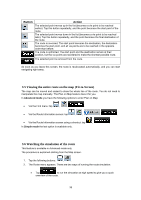
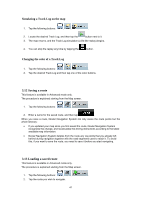
Button Action The selected point moves up in the list (becomes a via point to be reached earlier). Tap this button repeatedly, and the point becomes the start point of the route. The selected point moves down in the list (becomes a via point to be reached later). Tap this button repeatedly, and the point becomes the final destination of the route. The route is reversed. The start point becomes the destination, the destination becomes the start point, and all via points are to be reached in the opposite order than before. The route is optimized. The start point and the destination remain at their position, but the via points are reordered to make the shortest possible route. The selected point is removed from the route. As soon as you leave this screen, the route is recalculated automatically, and you can start navigating right away. 3.5 Viewing the entire route on the map (Fit-to-Screen) The map can be moved and scaled to show the whole line of the route. You do not need to manipulate the map manually. The Plan on Map feature does it for you. In Advanced mode you have the following options to enter Plan on Map: • Via the Find menu: tap , , . • Via the Route Information screen: tap , , , . • Via the Route Information screen using a shortcut: tap , . In Simple mode the last option is available only. 3.6 Watching the simulation of the route This feature is available in Advanced mode only. The procedure is explained starting from the Map screen. 1. Tap the following buttons: , . 2. The Route menu appears. There are two ways of running the route simulation: • Tap to run the simulation at high speed to give you a quick overview of the route. 38
-
 1
1 -
2
-
3
-
4
-
5
-
6
-
7
-
8
-
9
-
10
-
11
-
12
-
13
-
14
-
15
-
16
-
17
-
18
-
19
-
20
-
21
-
22
-
23
-
24
-
25
-
26
-
27
-
28
-
29
-
30
-
31
-
 32
32 -
 33
33 -
 34
34 -
 35
35 -
 36
36 -
 37
37 -
 38
38 -
 39
39 -
 40
40 -
 41
41 -
 42
42 -
43
-
44
-
45
-
46
-
47
-
48
-
49
-
50
-
51
-
52
-
53
-
54
-
55
-
56
-
57
-
58
-
59
-
60
-
61
-
62
-
63
-
64
-
65
-
66
-
67
-
68
-
69
-
70
-
71
-
72
-
73
-
74
-
75
-
76
-
77
-
78
-
79
-
80
-
81
-
82
-
83
-
84
-
85
 |
 |
