Nextar Q4-MD User Manual - Page 50
Reference Guide Advanced mode
 |
UPC - 714129929912
View all Nextar Q4-MD manuals
Add to My Manuals
Save this manual to your list of manuals |
Page 50 highlights
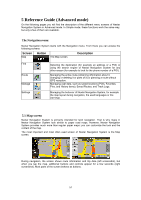
5 Reference Guide (Advanced mode) On the following pages you will find the description of the different menu screens of Nextar Navigation System in Advanced mode. In Simple mode, these functions work the same way, but only a few of them are available. The Navigation menu: Nextar Navigation System starts with the Navigation menu. From there you can access the following screens: Screen Map Button The Map screen. Description Find Route Manage Settings Selecting the destination (for example an address or a POI) or using the search engine of Nextar Navigation System for any other reason (for example to look for the phone number of a POI). Managing the active route (obtaining information about it, changing or deleting it or parts of it) or planning a route without GPS reception. Managing user data, such as saved locations (POIs, Favorites, Pins, and History items), Saved Routes, and Track Logs. Managing the behavior of Nextar Navigation System, for example the map layout during navigation, the used languages or the warnings. 5.1 Map screen Nextar Navigation System is primarily intended for land navigation. That is why maps in Nextar Navigation System look similar to paper road maps. However, Nextar Navigation System provides much more than regular paper maps: you can customize the look and the content of the map. The most important and most often used screen of Nextar Navigation System is the Map screen. During navigation, the screen shows route information and trip data (left screenshot), but when you tap the map, additional buttons and controls appear for a few seconds (right screenshot). Most parts of the screen behave as buttons. 51
-
 1
1 -
2
-
3
-
4
-
5
-
6
-
7
-
8
-
9
-
10
-
11
-
12
-
13
-
14
-
15
-
16
-
17
-
18
-
19
-
20
-
21
-
22
-
23
-
24
-
25
-
26
-
27
-
28
-
29
-
30
-
31
-
32
-
33
-
34
-
35
-
36
-
37
-
38
-
39
-
40
-
41
-
42
-
43
-
44
-
 45
45 -
 46
46 -
 47
47 -
 48
48 -
 49
49 -
 50
50 -
 51
51 -
 52
52 -
 53
53 -
 54
54 -
 55
55 -
56
-
57
-
58
-
59
-
60
-
61
-
62
-
63
-
64
-
65
-
66
-
67
-
68
-
69
-
70
-
71
-
72
-
73
-
74
-
75
-
76
-
77
-
78
-
79
-
80
-
81
-
82
-
83
-
84
-
85
 |
 |
