Panasonic KXFPG381 KXFPG381 User Guide
Panasonic KXFPG381 - FAX W/2.4GHZ PHONE Manual
 |
View all Panasonic KXFPG381 manuals
Add to My Manuals
Save this manual to your list of manuals |
Panasonic KXFPG381 manual content summary:
- Panasonic KXFPG381 | KXFPG381 User Guide - Page 1
2.4 GHz Expandable Cordless Phone System and Fax Operating Instructions Model No. KX-FPG381 FOR FAX ADVANTAGE ASSISTANCE: - PHONE CALL 1-800-HELP-FAX (1-800-435-7329) - E-MAIL TO [email protected] for customers in the U.S.A. or Puerto Rico - REFER TO www.panasonic.com for customers in - Panasonic KXFPG381 | KXFPG381 User Guide - Page 2
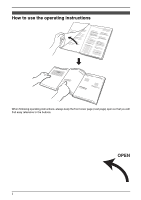
Location of Controls How to use the operating instructions When following operating instructions, always keep the front cover page (next page) open so that you will find easy reference to the buttons. OPEN I - Panasonic KXFPG381 | KXFPG381 User Guide - Page 3
operating instructions. For a description of each button, see page 10. A B CD EF GH I J K L M N O P Q R S TU Buttons (Listed in alphabetical order) AUTO ANSWER H GREETING C CALLER ID B HELP M CONF F HOLD E COPY J LOCATOR/INTERCOM A DIGITAL SP-PHONE R MAILBOX G ERASE P MEMO N FAX - Panasonic KXFPG381 | KXFPG381 User Guide - Page 4
charges.) In order to program this information into your fax machine, you should complete the instructions on page 29 to page 32. L Note that the Copyright: L This manual is copyrighted by Panasonic Communications Co., Ltd. (PCC) and its licensee. Under the copyright laws, this manual may not be - Panasonic KXFPG381 | KXFPG381 User Guide - Page 5
from power outlets and refer servicing to an authorized service center when the following conditions occur: A. When the power cord is damaged or frayed. Safety Instructions B. If liquid has been benzine, thinner, or any abrasive powder. For Fax Advantage assistance, call 1-800-435-7329. 3 - Panasonic KXFPG381 | KXFPG381 User Guide - Page 6
injury to persons, read and follow these instructions. L Use only the battery(ies) waste management codes for special disposal instructions. L Do not open or mutilate instructions and limitations specified in this manual if any regulations posted in the area instruct you not to do so. Hospitals - Panasonic KXFPG381 | KXFPG381 User Guide - Page 7
the speaker. Move away from the microwave oven and closer to the base unit. L If you use the handset near another cordless phone's base unit, noise may be heard. Move away from the other cordless phone's base unit and closer to your base unit. For Fax Advantage assistance, call 1-800-435-7329. 5 - Panasonic KXFPG381 | KXFPG381 User Guide - Page 8
the way to use your fax machine 21 2.5 Case 1: TAM/FAX 22 2.6 Case 2: Distinctive Ring (1 phone line with 2 or more phone numbers) ....... 23 2.7 Case 3: TEL ONLY 24 2.8 Case 4: FAX ONLY 26 Help Button 2.9 Base unit help function 27 Volume 2.10 Adjusting handset volume 27 2.11 Adjusting base - Panasonic KXFPG381 | KXFPG381 User Guide - Page 9
7.4 Listening to recorded messages ...... 62 7.5 Remote operation with the handset.. 64 Remote Operation 7.6 Operating from a remote location..... 66 8. Warranty 11.4 Limited Warranty 99 Customer Services 11.5 Customer Services directory .......... 101 Table of Contents 12.Index 12.1 Index - Panasonic KXFPG381 | KXFPG381 User Guide - Page 10
clip PQKE10340Z1 1 7 Charger unit Charger:PQLV30013YS 1 AC adaptor:KX-TCA1-G (KX-TCA1) 8 Paper tray PFKS1088Z1 1 9 A4 paper guide PFKS1089Z1 1 j Ink film (10 meters long) ---------- 1 k Operating instructions PFQX1855Z 1 l Quick start sheet PFQW1978Z 1 Specifications prints - Panasonic KXFPG381 | KXFPG381 User Guide - Page 11
Headset (KX-TCA60, KX-TCA86, KXTCA88, KX-TCA91, KX-TCA92, KXTCA98): Allows hands-free telephone conversations. - Additional handset (KX-TGA270S, KXTGA271B, KX-TGA271V, KX-TGA271W, KX-TGA272S*2, KX-TGA273S) *1 To ensure the unit operates properly, we recommend the use of a Panasonic replacement film - Panasonic KXFPG381 | KXFPG381 User Guide - Page 12
{LOCATOR/INTERCOM}{TRANSFER} L To page or locate the handset (page 45). L To transfer a call (page 46 services. J {COPY} L To initiate copying (page 58). K {FAX/START}{SET} L To initiate fax PHONE} L For speakerphone operation (page 35, 36). S {FLASH/CALL WAIT} L To access special telephone services - Panasonic KXFPG381 | KXFPG381 User Guide - Page 13
To make/answer calls (page 34, 35). C {SP-PHONE} L For speakerphone operation (page 34, 35). D {TONE during dialing when your line has rotary pulse services. E {CONF/FUNCTION} L To make a handset or base unit) or the answering machine is responding to a call. Someone is calling you. For Fax - Panasonic KXFPG381 | KXFPG381 User Guide - Page 14
while listening to messages (page 64). L It will be displayed while in the 2-way radio mode using the handset speakerphone (page 49). L It will be displayed while monitoring a room from the speaker (page 48). 3 the soft key below it (page 10). 12 For Fax Advantage assistance, call 1-800-435-7329. - Panasonic KXFPG381 | KXFPG381 User Guide - Page 15
Installation (Base Unit) 1.8 Ink film 1.8.1 Installing the ink film 1 Open the front cover (1) by pulling up the center of the blue core (1) into the left slot of the unit (2). Insert the rear ink film roll (3). L The ink film is safe to touch, and will not rub off on your hands like carbon paper. 3 - Panasonic KXFPG381 | KXFPG381 User Guide - Page 16
new ink film (3). 2 1 3 1 4 Insert the ink film and close the covers (see steps 4 to 6 on page 13). 1.8.2 Replacing the ink film The included film roll is a complimentary starter ink film. To ensure that the unit operates properly, we recommend the use of Panasonic 14 For Fax Advantage assistance - Panasonic KXFPG381 | KXFPG381 User Guide - Page 17
slot on the paper tray (2) and push the guide until it clicks into place. Attach the paper tray to the back of the unit. 2 Pull the tension plate forward (1) and insert the paper, print-side down (2), then push the tension plate back. 2 1 2 1 For Fax Advantage assistance, call 1-800-435-7329. 15 - Panasonic KXFPG381 | KXFPG381 User Guide - Page 18
calls, the battery needs to be replaced. Please use only Panasonic batteries. See page 9 for accessory information. L Only use to recycle this battery. 1.13 Belt clip You can hang the handset on your belt or pocket using the belt clip. 1.12 Battery For Fax Advantage assistance, call 1-800-435-7329. - Panasonic KXFPG381 | KXFPG381 User Guide - Page 19
the arrow (2). 2 1 1.14 Headset (optional) Plugging an optional headset into the handset allows to have hands-free phone conversations. Please use only a Panasonic headset. See page 9 for accessory information. L Model shown is KX-TCA88. To switch to the speakerphone while using the headset: Press - Panasonic KXFPG381 | KXFPG381 User Guide - Page 20
provided from your service company. Please attach the filter to the telephone line cord of the fax machine. Telephone line cord Filter To a single telephone line jack 2.1.2 Charger unit AC adaptor To a power outlet (120 V, 60 Hz) Note: L USE ONLY WITH the included Panasonic AC adaptor. L The - Panasonic KXFPG381 | KXFPG381 User Guide - Page 21
(2), slide it down (3), then slide down to the right (4) until it is secured. 2.45 cm (31/32") 1 2 3 4 2. Preparation Wall Template 2.45 cm (31/32") For Fax Advantage assistance, call 1-800-435-7329. 19 - Panasonic KXFPG381 | KXFPG381 User Guide - Page 22
to 3.5 hours while using the reception booster feature (page 34). L If your Panasonic battery is fully charged and the 2-way radio mode (page 49) is used: the handset will not work. The handset will display "Charge for 15HRS" and 68885 when you place the handset on the charger. 20 For Fax - Panasonic KXFPG381 | KXFPG381 User Guide - Page 23
situation, you can select the way you prefer to use your fax machine in Quick Setup feature #00. You can print out the Quick Setup Guide as a reference. - Case 1: TAM/FAX (page 22) - Case 2: Distinctive Ring (1 phone line with 2 or more phone numbers) (page 23) - Case 3: TEL ONLY (page 24) - Case - Panasonic KXFPG381 | KXFPG381 User Guide - Page 24
L Do not connect an answering machine to the same telephone line. If one is connected, set the automatic answer feature to OFF. L Do not subscribe to voice mail service as it may disturb fax reception. If you do subscribe to a voice mail service, call Panasonic Fax Advantage assistance at 1-800-435 - Panasonic KXFPG381 | KXFPG381 User Guide - Page 25
, or page 75). 2.6.3 How to receive calls If the number assigned for phone calls is called, the fax machine will ring and record a voice message automatically. If the number assigned for fax is called, the fax machine will ring and start fax reception automatically. If you subscribe to three or more - Panasonic KXFPG381 | KXFPG381 User Guide - Page 26
(slow beep) is heard, or - no sound is heard, press {FAX/START}. L The fax machine will start fax reception. With the handset 1 Lift the handset and press {TALK} or {SP- PHONE} to answer the call. 2 When: - document reception is required, - a fax calling tone (slow beep) is heard, or - no sound is - Panasonic KXFPG381 | KXFPG381 User Guide - Page 27
L The fax machine will start fax reception. Note: L To receive fax documents using the extension telephone, you must set the remote fax activation to ON (feature #41 on page 71) beforehand. 2. Preparation For Fax Advantage assistance, call 1-800-435-7329. 25 - Panasonic KXFPG381 | KXFPG381 User Guide - Page 28
You wish to use the fax machine only for fax reception/transmission. 2.8.2 How to setup ON {SET} {A}{B} {MENU} {STOP} 1 Press {MENU}. 2 Press {#} then {0}{0}. QUICK SETUP PRESS SET 3 Press {SET} PRINT SETUP? YES:SET/NO:STOP 4 Press {SET} again to print the Quick Setup Guide. L If you do not wish - Panasonic KXFPG381 | KXFPG381 User Guide - Page 29
is announced by a voice guide and is not printed out.) Basic settings: How to set the date, time, your logo and fax number. Feature list: How to program the features. TAM operation: How to use the answering machine. Fax sending/receiving: Help with problems sending/receiving faxes. Copier: How to - Panasonic KXFPG381 | KXFPG381 User Guide - Page 30
2. Preparation 2.11 Adjusting base unit volume 2.11.4 Answering machine volume 9 levels (high to off) are available. While listening to recorded are available. While using the speakerphone, press {A} or {B}. 2.11.3 Fax voice guidance volume 9 levels (high to off) are available. While listening to - Panasonic KXFPG381 | KXFPG381 User Guide - Page 31
time can be set using either the handset or the base unit. 2.12.1 Using the handset {SAVE} {>}{e}{v} {OFF} {CONF/FUNCTION} Make sure the base unit and the handset are not being used. 1 Press 4-digit hour/minute. Press {*} to select "AM" or "PM". For Fax Advantage assistance, call 1-800-435-7329. 29 - Panasonic KXFPG381 | KXFPG381 User Guide - Page 32
{>} to move the cursor to the incorrect number, and make the correction. For Caller ID service users (page 40) L Caller ID will reset the clock after the first ring if the adjusted {5} Characters 1 a b c ABC2 d e f DEF 3 g h i GHI 4 j k l J KL 5 30 For Fax Advantage assistance, call 1-800-435-7329. - Panasonic KXFPG381 | KXFPG381 User Guide - Page 33
is selected. 3. Return to step 1 to enter the next character. 2. Preparation Display order of characters Lower-case alphabet Number Symbol : Pressing {A} : Pressing {B} Capital alphabet For Fax Advantage assistance, call 1-800-435-7329. 31 - Panasonic KXFPG381 | KXFPG381 User Guide - Page 34
be displayed. 6 Press {MENU} to exit the program. Note: L Your fax number will be printed on each page transmitted from your unit. L The use your unit. + Up to 7 additional handsets can be added. L Model shown is KX-TGA270S. The included handset is pre-registered and is assigned the extension number - Panasonic KXFPG381 | KXFPG381 User Guide - Page 35
of usage, such as using the reception booster mode (page 34), or when the answering machine is taking a call. The handset display shows the instructions as follows. OK 1 Base unit: Press {MUTE}. 2 Handset: 1. Press the right soft key ({OK}). 2. Wait until a long beep sounds and the display shows - Panasonic KXFPG381 | KXFPG381 User Guide - Page 36
hold Press {HOLD/CLEAR} twice. L "IN USE" will flash on the display, "Hold" will be displayed. L To release the hold, press {TALK} or {SP- PHONE} on the handset or {DIGITAL SPPHONE} on the base unit. L If you do not press a button for more than 6 minutes, a beep will sound every 30 seconds. After - Panasonic KXFPG381 | KXFPG381 User Guide - Page 37
party cannot hear you. When the call is muted, you will be able to hear the other party. Press {MUTE}. {TALK} {SP-PHONE} {OFF} 1 Lift the handset and press {TALK}. L You can also answer a call by pressing any dialing button {0} to {9}, {*}, or {#} (Any key talk feature). 2 When finished talking - Panasonic KXFPG381 | KXFPG381 User Guide - Page 38
numbers into the navigator directory You can make a call or send a fax to a person stored in the directory by selecting an item shown on the display. The base unit and handset each have their own individual directories, up to 50 names and phone numbers each, and you can copy directory items from one - Panasonic KXFPG381 | KXFPG381 User Guide - Page 39
page 30 for instructions). 4 Press { FAX (1-800- 435-7329) has been stored in the base unit 3. Telephone directory. If you cannot solve a problem handset Make sure the handset is not being used. 1 Press {}. 2 Press {v} or {e} repeatedly to display the desired item. 3 Press {TALK} or {SP-PHONE - Panasonic KXFPG381 | KXFPG381 User Guide - Page 40
stop the search, press {STOP}. L To dial the displayed number, press {DIGITAL SP-PHONE}. 3.5 Editing a stored item L Keep the front cover page open for button locations. 3.5.1 Using the handset Make sure the handset is not being used. 1 Press {}. 2 Press {v} or {e} repeatedly to display the - Panasonic KXFPG381 | KXFPG381 User Guide - Page 41
Copying the directory You can copy one or all of the directory items between a handset and the base unit or between two handsets. Items copied to the destination unit are added to its directory (Phone directory sharing). L Keep the front cover page open for button locations. Important: L Make sure - Panasonic KXFPG381 | KXFPG381 User Guide - Page 42
Caller ID service. Change the following ring setting to 2 or more rings beforehand. - FAX ring setting handset. Printing the Caller ID list (Base unit only) The Caller ID list can be printed manually is placed on hold. - the answering machine is recording an incoming message, - an extension telephone - Panasonic KXFPG381 | KXFPG381 User Guide - Page 43
number includes data other than numbers (i.e., * or #). - The caller information does not include a telephone number. 3.9.1 Using the handset {DIAL} {TALK} {SP-PHONE} {EDIT} {>}{e}{v} {OFF} 1 Press {v} or {e}. Example: 3. Telephone 2 Press {v} to search from the most recent call. Press {e} to - Panasonic KXFPG381 | KXFPG381 User Guide - Page 44
page 43. 3.9.2 Using the base unit {CALLER ID} {STOP} {A}{B} {FAX/START} {DIGITAL SP-PHONE} 1 Press {CALLER ID}. Example: 10 NEW CALLS PRESS NAVI.[+ -] with the new call entry. L The base unit and handset (and any additional handsets) store caller information individually. When a call or message is - Panasonic KXFPG381 | KXFPG381 User Guide - Page 45
feature allows the unit to automatically edit incoming phone numbers, and display or store phone numbers using a preset pattern of your choosing. handset or the base unit. The default setting is ON. 3.10.1 Using the handset L Keep the front cover page open for button locations. Make sure the handset - Panasonic KXFPG381 | KXFPG381 User Guide - Page 46
again. L To cancel erasing, press {STOP}, then {MENU}. 4 Press {SET}. 5 Press {STOP}. 3.11.2 Erasing specific caller information Using the handset Make sure the handset is not being used. 1 Press {v} or {e} repeatedly to display the desired item. 2 Press {HOLD/CLEAR}. L To erase other items, repeat - Panasonic KXFPG381 | KXFPG381 User Guide - Page 47
answers first. 3 When the paged party answers, talk into the microphone. 4 To end the intercom, press {DIGITAL SP- PHONE} or {LOCATOR/INTERCOM}. 3.13.2 Answering intercom calls Handset When a handset is being paged, it will beep and display the paging extension's number. Example: Base unit is paging - Panasonic KXFPG381 | KXFPG381 User Guide - Page 48
transferred between two extensions using the intercom feature. L Keep the front cover page open for button locations. 3.14.1 To transfer a call from the handset 1 During a phone call, press {INTERCOM/TRANSFER}. L "IN USE" will flash on the display and the call will be put on hold. 2 To page the base - Panasonic KXFPG381 | KXFPG381 User Guide - Page 49
with an outside caller. While you are talking with a caller, page the base unit or a handset to start the conference call. L Keep the front cover page open for button locations. 3.15.1 Handset 1 During a phone call, press {INTERCOM/TRANSFER}. L "IN USE" will flash on the display and the call will - Panasonic KXFPG381 | KXFPG381 User Guide - Page 50
ROOM MONITOR". 4 To end monitoring, press {OFF}. L The base unit user can stop being monitored by pressing {LOCATOR/INTERCOM} or {DIGITAL SP-PHONE}. The monitored handset user can stop being monitored by pressing {OFF}. Using the base unit 1 Press {LOCATOR/INTERCOM}, then press {MUTE}. 2 To call the - Panasonic KXFPG381 | KXFPG381 User Guide - Page 51
Off". 3. Press the right soft key ({SAVE}). 3.18.2 To call another handset Make sure the mode is ON on both your handset and the destination handset, and the displays show "2Way radio mode". 1 Press {TALK}, {SP-PHONE} or {INTERCOM/TRANSFER}. 2 Enter an extension number using a dialing button ({1} to - Panasonic KXFPG381 | KXFPG381 User Guide - Page 52
Fax 4SeFnadxing Faxes 4.1 Sending a fax manually 1 2 {HELP} {STOP} {A}{B} {FAX/START} {DIGITAL SP-PHONE} {SET} {REDIAL/PAUSE} 1 Adjust the width of the document guides printing. This setting only works with other compatible fax machines. - "PHOTO": For originals containing photographs, shaded - Panasonic KXFPG381 | KXFPG381 User Guide - Page 53
record of the 30 most recent faxes. To print it manually, see page 93. To print it automatically after every 30 new fax communications, activate feature #22 a copy machine to copy the original document onto A4 or letter-sized paper, then transmitting the copied document. 4.3 Sending a fax using the - Panasonic KXFPG381 | KXFPG381 User Guide - Page 54
not send a fax L Confirm that you have entered the number correctly, and that the number is a fax number. L Confirm that the other party's fax machine is answering by allowing frequent re-use. See page 52 for broadcast transmission instructions. L Keep the front cover page open for button locations - Panasonic KXFPG381 | KXFPG381 User Guide - Page 55
The display will show "SEND CANCELED?". 2. Press {SET}. 4. Fax Receiving Faxes 4.5 Receiving a fax manually (AUTO ANSWER OFF) 4.5.1 Activating TEL mode {STOP} {FAX/START} {DIGITAL SP-PHONE} OFF {TALK} {SP-PHONE} Set the fax machine to TEL mode by pressing {AUTO ANSWER} repeatedly to display the - Panasonic KXFPG381 | KXFPG381 User Guide - Page 56
15 rings, the unit will temporarily activate the answering machine. The greeting message will then be played and the other party can then send a fax. How to receive calls/faxes with the handset 1. Lift the handset and press {TALK} or {SP- PHONE} to answer the call. 2. When: - document reception is - Panasonic KXFPG381 | KXFPG381 User Guide - Page 57
receiving calls, the unit works as a fax and/or answering machine. L If the call is a phone call, the unit will record a voice message automatically. L If a fax calling tone is detected, the unit will receive a fax automatically. Receiving a voice message and fax document in one call The caller can - Panasonic KXFPG381 | KXFPG381 User Guide - Page 58
for Distinctive Ring, you can make the fax machine automatically start fax reception when a call comes to the fax number. To use this service, you must subscribe to the Distinctive Ring service offered by your local telephone company. 5.2 Using two or more phone numbers on a single telephone line - Panasonic KXFPG381 | KXFPG381 User Guide - Page 59
pattern Settings in feature #32 Other triple ring (short-short- D long rings) 1st ring 2nd ring 5.4 Programming the ring pattern assigned for fax L Keep the front cover page open for button locations. 1 Set feature #31 to "ON" (page 56). 2 Press {MENU}. 3 Press {#}, then {3}{2}. 4 Press {A} or - Panasonic KXFPG381 | KXFPG381 User Guide - Page 60
6. Copy 6CoCpoypinyg 6.1 Making a copy 1 2 {STOP} {START} {>}{A}{B} {COPY} 1 Adjust the width of the document guides (1) to the size of the document. 2 Insert the document (up to 10 pages) FACE DOWN (2) until a single beep is heard and the unit grasps the - Panasonic KXFPG381 | KXFPG381 User Guide - Page 61
Setting Recording paper size Original document size 100% (default) Letter Legal Letter Letter, A4, Legal A4 A4, Letter 92% Letter A4 86% Letter A4 72% Letter Legal A4 Legal Letter = 216 mm × 279 mm (81/2" × 11") Legal = 216 mm × 356 mm (81/2" × 14") A4 = 210 mm × 297 mm (81/4" × - Panasonic KXFPG381 | KXFPG381 User Guide - Page 62
mailbox 3 password, see feature #52 of the base unit programming (page 71). L You can also program a password using the handset (page 76). 3 Set the unit to TAM/FAX mode (page 54). 7.1.2 When a caller calls If not specified Incoming voice messages L If the caller does not enter a mailbox number - Panasonic KXFPG381 | KXFPG381 User Guide - Page 63
record a message of less than 12 seconds to make it easier to receive faxes. If a greeting message is not recorded, one of two pre-recorded greetings message. L You can also finish recording by pressing {STOP}. 7. Answering Machine Note: L If 6 beeps sound and the unit announces "Your greeting - Panasonic KXFPG381 | KXFPG381 User Guide - Page 64
7. Answering Machine Memo Message 7.3 Leaving a message for others or yourself You can record no messages. 12 7.4.1 To play back messages {TRANSFER} {STOP} {ERASE} {}{A}{B} {DIGITAL SP-PHONE} {MAILBOX} FLASH/LIGHT {INTERCOM/TRANSFER} Press the {MAILBOX} button whose icon is flashing on the - Panasonic KXFPG381 | KXFPG381 User Guide - Page 65
page 74). To answer the call, press {DIGITAL SP-PHONE}. L If the unit announces "Memory full" after playback stop playback temporarily Press {STOP}. 7. Answering Machine L To resume playback, press the {MAILBOX} each message was recorded. For Caller ID service users (page 40) During playback, the - Panasonic KXFPG381 | KXFPG381 User Guide - Page 66
(feature #73 on page 72, or page 74). To answer the call, press {TALK} or {SP-PHONE}. L If the unit announces "Memory full" after playback, erase unnecessary messages (page 65). Voice menu for handset remote operation If no commands are entered after you listened to new messages in the mailbox and - Panasonic KXFPG381 | KXFPG381 User Guide - Page 67
number of new messages in mailbox 3. 7. Answering Machine For Caller ID service users (page 40) During playback, the display handset Press the left soft key ({DIAL}) while the number is displayed. L The handset stops playback and automatically dials the phone number. L If you need to edit the phone - Panasonic KXFPG381 | KXFPG381 User Guide - Page 68
answering machine. Important: L Program the remote operation ID beforehand (feature #11 on page 69, or page 76). L Set the unit to TAM/FAX mode there are no new messages Voice guide: "Mailbox (no.), no new messages." 66 When voice memory is full Voice guide: "Memory full" Erase unnecessary messages - Panasonic KXFPG381 | KXFPG381 User Guide - Page 69
.". {0} Turning OFF the answering machine L The unit hangs up and FAX mode, depending on the setting of feature #77 (page 73). 7.6.4 Interrupting remote operation If you mistakenly answer the call while a user is accessing a mailbox from a remote location: 1 Press {INTERCOM/TRANSFER} on the handset - Panasonic KXFPG381 | KXFPG381 User Guide - Page 70
PRESS SET See page 29 for details. Code #02: Setting your logo YOUR LOGO PRESS SET See page 30 for details. Code #03: Setting your fax number YOUR FAX NO. PRESS SET See page 32 for details. Code #04: Printing a sending report SENDING REPORT MODE=ERROR [±] To print a sending report for - Panasonic KXFPG381 | KXFPG381 User Guide - Page 71
service. "TONE" (default): For tone dial service. "PULSE": For rotary pulse dial service. Note: L You can also program this feature with the handset ): The unit will print a journal report automatically after every 30 new fax communications (page 51). "OFF": The unit will not print a journal report - Panasonic KXFPG381 | KXFPG381 User Guide - Page 72
the Distinctive Ring feature DISTINCTIVE RING MODE=OFF [±] See page 56 for details. 70 Code #32: Setting the ring pattern for fax (Distinctive Ring feature) FAX RING PATTERN RING=B-D [±] See page 57 for details. Code #34: Setting the quick scan QUICK SCAN MODE=OFF [±] This feature is - Panasonic KXFPG381 | KXFPG381 User Guide - Page 73
a received fax document is stored into memory due to some existing problem. The slow beeps will continue until you clear the printing problem and make entering the password. Note: L You can also program this feature with the handset (page 76). Code #52: Setting the mailbox 3 password BOX3 PASSWORD ID - Panasonic KXFPG381 | KXFPG381 User Guide - Page 74
our customer call center or service personnel, change the line mode to "A". Note: L You can also program this feature with the handset (page 75). Code MODE=ON [±] If you often have trouble when sending faxes, this feature allows you to hear connecting tones; fax tone, ring back tone and busy tone - Panasonic KXFPG381 | KXFPG381 User Guide - Page 75
AUTO ANSWER MODE=TAM/FAX [±] "TAM/FAX" (default): Telephone Answering Machine/Facsimile mode (page 54) "FAX ONLY": Facsimile only mode Sub-menu Initial setting LCD contrast (page 74) Auto talk (page 74) Room monitor (for handset) (page 48) Caller ID edit (page 43) Set tel line L Set dial mode - Panasonic KXFPG381 | KXFPG381 User Guide - Page 76
call by lifting the handset off the charger without pressing {TALK} or {SP-PHONE}. The default setting is OFF. Make sure the handset is not being If you subscribe to Caller ID service and want to view the caller's information on the handset display after lifting up the handset to answer a call, turn - Panasonic KXFPG381 | KXFPG381 User Guide - Page 77
by our customer call center or service personnel, change the line mode to "A". Make sure the base unit and the handset are not being used. 8. 72). Changing the ring setting in TAM/FAX mode To change the number of rings before the unit answers a call in TAM/FAX mode. You can select "2" (default), - Panasonic KXFPG381 | KXFPG381 User Guide - Page 78
program this feature with the base unit (feature #10 on page 69). Setting remote operation code Make sure the base unit and the handset are not being used. 1. Press {CONF/FUNCTION}. 2. Scroll to "Initial setting" by pressing {v} or {e}, and press {>}. 3. Scroll to "Set answering" by pressing {v} or - Panasonic KXFPG381 | KXFPG381 User Guide - Page 79
registration at the previous base unit (page 77), start from step 5. L Keep the front cover page open for button locations. 1 Handset: Press {CONF/FUNCTION}. 2 Scroll to "Initial setting" by pressing {v} or {e}, and press {>}. 3 Scroll to "Registration" by pressing {v} or {e}, and press {>}. 4 Press - Panasonic KXFPG381 | KXFPG381 User Guide - Page 80
unit. L If you have not canceled the handset registration at the previous base unit (page 77), the handset number still remains on that base unit memory. To erase the handset number from the previous base unit, see the base unit operating instructions. For this base unit: 1. Press {MENU}. 2. Press - Panasonic KXFPG381 | KXFPG381 User Guide - Page 81
. Re- insert the document and try again. L The other party's fax machine rang too many times. Send the fax manually (page 50). L The other party's machine is not a fax machine. Check with the other party. L The number you dialed is not in service. PRESSED THE STOP KEY L {STOP} was pressed and - Panasonic KXFPG381 | KXFPG381 User Guide - Page 82
MEMORY L There is something wrong with the unit. Contact our service personnel. NO FAX REPLY L The unit has a document in memory. See the other displayed message instructions to print out the document. FAX MEMORY FULL L The other party's fax machine is busy or has run out of recording paper. Try - Panasonic KXFPG381 | KXFPG381 User Guide - Page 83
L You tried to copy your directory items to a handset, but your directory was empty. OPEN CABINET CHECK FILM SLACK b OPEN CABINET CHECK FILM TYPE L The ink film is slack or creased. Tighten it (see step 5 on page 13). L The fax machine is positioned near appliances such as TVs or speakers which - Panasonic KXFPG381 | KXFPG381 User Guide - Page 84
to register or unregister the handset, the handset and the base unit could not {3}{3}{5}. 5. Press {SET}. 6. Enter that handset number ({1} to {8}). (The name/number is handset was out of range, or - the destination unit user pressed {TALK}, {SP-PHONE} or {DIGITAL SP-PHONE}. L The called handset - Panasonic KXFPG381 | KXFPG381 User Guide - Page 85
(page 20). L Radio communication between the handset and the base unit is partially impaired. faxes. L Change to TEL mode (page 53) or TAM/FAX mode (page 54). L If you use a Distinctive Ring service, turn AUTO ANSWER OFF so that the fax machine is in TEL mode. L If you use a Distinctive Ring service - Panasonic KXFPG381 | KXFPG381 User Guide - Page 86
film. Whenever I try to retrieve my voice mail messages, I am interrupted by the fax tone. L You are probably entering *#9. This is the default setting for the fax activation code. If you use a voice mail service, turn the fax {SP-PHONE} or {DIGITAL SP-PHONE} to sounds. L The handset is too far - Panasonic KXFPG381 | KXFPG381 User Guide - Page 87
item in the navigator directory, the handset starts to ring. L To answer a call, press {TALK} or {SP- PHONE}. Storing will be canceled. Store the 16). I cannot receive documents by pressing {*}{#}{9} on the handset. L You must set the remote fax activation to ON (feature #41 on page 71) beforehand. - Panasonic KXFPG381 | KXFPG381 User Guide - Page 88
their fax machine facing the wrong way. Check with the other party. A white line or a smudge appears on your recording paper. L The glass or rollers are dirty. Clean them (page 90). The printing quality is poor. Please do not reuse the ink film! Please use genuine Panasonic replacement film. Refer - Panasonic KXFPG381 | KXFPG381 User Guide - Page 89
it (page 91). The printing quality is poor. Please do not reuse the ink film! Please use genuine Panasonic replacement film. Refer to page 9 for further details. Original ABC Copy L Some paper has instructions recommending which side to print on. Try turning the recording paper over. L You may - Panasonic KXFPG381 | KXFPG381 User Guide - Page 90
is not designed for making emergency telephone calls when the power fails. Alternative arrangements should be made for access to emergency services. L Fax transmission and reception will be interrupted. L If delayed transmission (feature #25, page 70) is programmed and the start time occurs during - Panasonic KXFPG381 | KXFPG381 User Guide - Page 91
(1) and insert the paper. Then push the tension plate back. 3 Incorrect 1 turn Tight The ink film is not wrapped around the blue core. Slack/Crease Reverse 6 First close the back cover securely (1) the tension plate forward (1) and insert the For Fax Advantage assistance, call 1-800-435-7329. 89 - Panasonic KXFPG381 | KXFPG381 User Guide - Page 92
smudges or black/white lines appear on the original document when transmitting or copying. 1 Disconnect the power cord and the telephone line cord. 90 For Fax Advantage assistance, call 1-800-435-7329. - Panasonic KXFPG381 | KXFPG381 User Guide - Page 93
cover (1) by pulling up the center part (2). 2 3 1 3 Release the back cover by pushing the green button (1) on the right side of the unit. OR For Fax Advantage assistance, call 1-800-435-7329. 91 - Panasonic KXFPG381 | KXFPG381 User Guide - Page 94
(2). 6 Reinstall the ink film and close the covers (see steps 4 to 6 on page 13). 7 Connect the power cord and the telephone line cord. 1 2 5 Clean the thermal head (1) with a cloth moistened with isopropyl rubbing alcohol, and let it dry thoroughly. 92 For Fax Advantage assistance, call 1-800 - Panasonic KXFPG381 | KXFPG381 User Guide - Page 95
Keeps a record of fax transmission and reception. This report will be printed automatically after every 30 fax communications (feature #22 last 50 different callers of the base unit after subscribing to a Caller ID service. To print automatically after every 50 new calls, activate feature #26 (page - Panasonic KXFPG381 | KXFPG381 User Guide - Page 96
environment: Dimensions: Mass (Weight): Power consumption: Power supply: Fax memory capacity*3: Voice memory capacity*4: Public Switched Telephone Network Max page content, resolution, telephone line conditions, and the other party's machine. *2 Transmission speed is based upon the ITU-T No. 1 Test - Panasonic KXFPG381 | KXFPG381 User Guide - Page 97
paper packs until you are ready to use the paper. Store unused paper in the original packaging, in a cool and dry location. 11.2.2 Handset Operating environment: Frequency: Dimensions: Mass (Weight): Power supply: Security codes: 5°C - 40°C (41°F - 104°F) 2.40 GHz - 2.48 GHz Approx. height 242 mm - Panasonic KXFPG381 | KXFPG381 User Guide - Page 98
/32" × 229/32" × 225/32") Approx. 95 g (0.21 lb.) Standby: Approx. 0.8 W Maximum: Approx. 4.0 W AC adaptor (120 V AC, 60 Hz) Note: L Any details given in these instructions are subject to change without notice. L The pictures and illustrations in these - Panasonic KXFPG381 | KXFPG381 User Guide - Page 99
phone. trouble is experienced with this equipment, for repair or warranty information, please contact a Factory Servicenter or other Authorized Servicer. If the equipment is causing harm to the telephone network, the telephone company may request that you disconnect the equipment until the problem - Panasonic KXFPG381 | KXFPG381 User Guide - Page 100
and, if not installed and used in accordance with the instructions, may cause harmful interference to radio communications. However, there and all person's body (excluding extremities of hands, wrist and feet). The handset unit may be carried and operated with only the specific provided belt-clip. - Panasonic KXFPG381 | KXFPG381 User Guide - Page 101
purchase date is required for Limited Warranty service. Carry-In or Mail-In Service For Carry-In or Mail-In Service in the United States call 1-800-HELP-FAX (1-800-435-7329) For assistance in Puerto Rico call Panasonic Sales Company (787)-750-4300 or fax (787)-768-2910. Limited Warranty Limits And - Panasonic KXFPG381 | KXFPG381 User Guide - Page 102
has expired, please contact our Continued Services Technical Support Line at 1-900-555-PANA (1-900-5557262) for support on a fee basis. When you ship the product • Carefully pack your unit, preferably in the original carton. • Attach a letter, detailing the symptom or problem, to the outside of the - Panasonic KXFPG381 | KXFPG381 User Guide - Page 103
contact:1-800-HELP-FAX (1-800-435-7329), Monday-Friday 9am-8pm EST. To obtain support or service after the warranty has expired, please contact: 1-900-555-PANA (1-900-555-7262) for support on a fee basis. For hearing or speech impaired TTY users, TTY: 1-866-741-6422 Web Site: www.panasonic.com (for - Panasonic KXFPG381 | KXFPG381 User Guide - Page 104
73 A Accessories: 8 A4 paper guide: 15 Belt clip: 16 Paper service: 56 Document size: 51 E Error messages: 79 Extension number: 32, 45, 77 Extension telephone: 24, 54 F Fax activation code: 71 Fax number: 32 Fax voice guidance: 71 Flash time: 72, 75 Friendly reception: 71 Function menu table (Handset - Panasonic KXFPG381 | KXFPG381 User Guide - Page 105
: 72 Ink film Installing: 13 faxes: 51 Storing: 36 O Overseas mode: 69 P Paper size: 69 Phone directory sharing: 39 Power failure: 88 Privacy feature: 48 Programming Base unit programming: 68 Handset programming: 73 Q Quick scan: 50, 58, 70 Quick Setup: 21 R Receiving Automatically: 54 Manually - Panasonic KXFPG381 | KXFPG381 User Guide - Page 106
KX-FPG381 Proof of Purchase Panasonic FAX ADVANTAGE PROGRAM Free peace of mind, direct from Panasonic NO EXTRA COST FAX ADVANTAGE PROGRAM I 6-month limited warranty1: parts, labor, and toll-free help line2 I Free replacement3 and repair program The Panasonic Fax Advantage Consumer Service
-
 1
1 -
 2
2 -
 3
3 -
 4
4 -
 5
5 -
 6
6 -
 7
7 -
8
-
9
-
10
-
11
-
12
-
13
-
14
-
15
-
16
-
17
-
18
-
19
-
20
-
21
-
22
-
23
-
24
-
25
-
26
-
27
-
28
-
29
-
30
-
31
-
32
-
33
-
34
-
35
-
36
-
37
-
38
-
39
-
40
-
41
-
42
-
43
-
44
-
45
-
46
-
47
-
48
-
49
-
50
-
51
-
52
-
53
-
54
-
55
-
56
-
57
-
58
-
59
-
60
-
61
-
62
-
63
-
64
-
65
-
66
-
67
-
68
-
69
-
70
-
71
-
72
-
73
-
74
-
75
-
76
-
77
-
78
-
79
-
80
-
81
-
82
-
83
-
84
-
85
-
86
-
87
-
88
-
89
-
90
-
91
-
92
-
93
-
94
-
95
-
96
-
97
-
98
-
99
-
100
-
101
-
102
-
103
-
104
-
105
-
106
 |
 |

Please read these Operating
Instructions before using the unit
and save for future reference.
This model is designed to be
used only in the U.S.A.
2.4 GHz Expandable
Cordless Phone System and Fax
Operating Instructions
Model No.
KX-FPG381
FOR FAX ADVANTAGE ASSISTANCE:
— PHONE CALL
1-800-HELP-FAX (1-800-435-7329)
— E-MAIL TO
for customers in the U.S.A. or Puerto
Rico
— REFER TO
www.panasonic.com
for customers in the U.S.A. or Puerto
Rico