Ricoh Aficio MP C3500 Facsimile Reference - Page 262
Checking Transmission Using LAN-Fax Driver, Confirming Transmission Results by E-mail
 |
View all Ricoh Aficio MP C3500 manuals
Add to My Manuals
Save this manual to your list of manuals |
Page 262 highlights
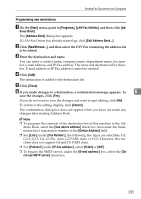
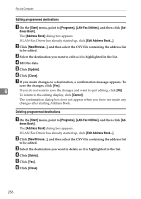
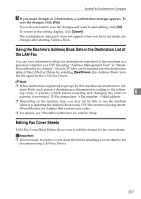
Fax via Computer Checking Transmission Using LAN-Fax Driver From "SmartDeviceMonitor for Admin", "SmartDeviceMonitor for Client", or Web Image Monitor, you can check information about files sent using LAN-Fax Driver. For the maximum number of transmission results you can check, see "Maximum Values". Also, you can save the contents of the Journal in a personal computer as a CSV file using [Load Fax Journal] in "SmartDeviceMonitor for Admin". Note ❒ When data is transmitted from the LAN-Fax Driver via the "SmartDeviceMonitor for Client" port, the "Data-transmission complete." message appears on the computer's display, so you can easily ascertain the communication progress. However, if the volume of communication data from the LAN-Fax to this machine increases, the message may appear during the operation, due to the differences in memory capacity between this machine and "SmartDeviceMonitor for Client". For more accurate fax transmission results, use "E-mail TX results". ❒ The job history may differ from the machine's transmission results. In that case, refer to the machine's transmission results. 6 ❒ See the relevant Help for details. Reference p.278 "Maximum Values" Confirming Transmission Results by E-mail After communicating in the LAN-Fax mode, this function transmits the communication results with the computer by e-mail. When you have done [Send] or [Send & Print] using the LAN-Fax, and when the communication was successful, it transmits e-mail of the transmission result. Result notification e-mail is sent when printing is complete, or if an error occurs during communication between this machine and a computer. A Click the [E-mail Settings] tab. B Select the [Notify] check box under [E-mail TX results]. C Enter the destination. When entering the e-mail address directly, click the [Specify destinations] radio button, and then enter the e-mail address in the [Specify destinations] field. When entering the machine's programmed address, click the [Device Address] radio button, and then enter the registration number of the Destination key in the [Device Address] box. The [Device Address] box is unavailable when the [Specify destinations] is selected, and you cannot enter anything in the text box. D 252 Click [Send] or [Send & Print].
-
 1
1 -
2
-
3
-
4
-
5
-
6
-
7
-
8
-
9
-
10
-
11
-
12
-
13
-
14
-
15
-
16
-
17
-
18
-
19
-
20
-
21
-
22
-
23
-
24
-
25
-
26
-
27
-
28
-
29
-
30
-
31
-
32
-
33
-
34
-
35
-
36
-
37
-
38
-
39
-
40
-
41
-
42
-
43
-
44
-
45
-
46
-
47
-
48
-
49
-
50
-
51
-
52
-
53
-
54
-
55
-
56
-
57
-
58
-
59
-
60
-
61
-
62
-
63
-
64
-
65
-
66
-
67
-
68
-
69
-
70
-
71
-
72
-
73
-
74
-
75
-
76
-
77
-
78
-
79
-
80
-
81
-
82
-
83
-
84
-
85
-
86
-
87
-
88
-
89
-
90
-
91
-
92
-
93
-
94
-
95
-
96
-
97
-
98
-
99
-
100
-
101
-
102
-
103
-
104
-
105
-
106
-
107
-
108
-
109
-
110
-
111
-
112
-
113
-
114
-
115
-
116
-
117
-
118
-
119
-
120
-
121
-
122
-
123
-
124
-
125
-
126
-
127
-
128
-
129
-
130
-
131
-
132
-
133
-
134
-
135
-
136
-
137
-
138
-
139
-
140
-
141
-
142
-
143
-
144
-
145
-
146
-
147
-
148
-
149
-
150
-
151
-
152
-
153
-
154
-
155
-
156
-
157
-
158
-
159
-
160
-
161
-
162
-
163
-
164
-
165
-
166
-
167
-
168
-
169
-
170
-
171
-
172
-
173
-
174
-
175
-
176
-
177
-
178
-
179
-
180
-
181
-
182
-
183
-
184
-
185
-
186
-
187
-
188
-
189
-
190
-
191
-
192
-
193
-
194
-
195
-
196
-
197
-
198
-
199
-
200
-
201
-
202
-
203
-
204
-
205
-
206
-
207
-
208
-
209
-
210
-
211
-
212
-
213
-
214
-
215
-
216
-
217
-
218
-
219
-
220
-
221
-
222
-
223
-
224
-
225
-
226
-
227
-
228
-
229
-
230
-
231
-
232
-
233
-
234
-
235
-
236
-
237
-
238
-
239
-
240
-
241
-
242
-
243
-
244
-
245
-
246
-
247
-
248
-
249
-
250
-
251
-
252
-
253
-
254
-
255
-
256
-
 257
257 -
 258
258 -
 259
259 -
 260
260 -
 261
261 -
 262
262 -
 263
263 -
 264
264 -
 265
265 -
 266
266 -
 267
267 -
268
-
269
-
270
-
271
-
272
-
273
-
274
-
275
-
276
-
277
-
278
-
279
-
280
-
281
-
282
-
283
-
284
-
285
-
286
-
287
-
288
-
289
-
290
-
291
-
292
-
293
-
294
-
295
-
296
-
297
-
298
 |
 |