Samsung SCX 4828FN SyncThru 5.0 Guide (ENGLISH) - Page 29
Devices, Groups
 |
UPC - 635753612172
View all Samsung SCX 4828FN manuals
Add to My Manuals
Save this manual to your list of manuals |
Page 29 highlights
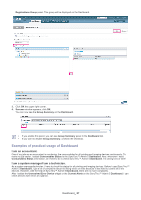
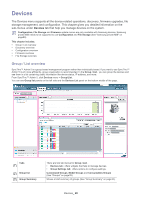
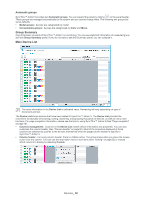
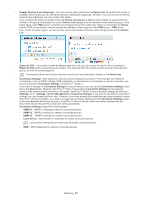
4 Device List 5 Device Information Shows a list of devices added to your SyncThru™ Admin 5 (See "Main Device List" on page 30). Shows the information of the device you selected from the Device List (See "Device information" on page 34). Devices Groups Grouping the devices will help you to manage the devices more effectively. The number next to group name stands for [the total number of devices / the number of devices in error status]. Customized groups SyncThru™ Admin 5 supports Customized groups for flexibility. You can create, modify and delete groups under Customized groups. There are three predefined groups: All, Ungrouped, and Grouped. These groups are provided by default for group management. Although they are under Customized groups, you cannot change these groups manually. However, you can create, modify and delete groups under Grouped. • All: displays all the devices in the system. • Ungrouped: displays the devices, that are not assigned to any group. A device is moved from Ungrouped to Grouped after it has been assigned to at least one group. • Grouped: displays the devices, that are in at least one group. You can also add specific options to groups by checking the Automatically add discovered device to this group. Check the and set three options below. For example, if you are a device manager for building A, you can create your group with this option: Property = Location, Compound Option = Equal to and Property Value = building A. However, only works during discovery time. This means that if you assign an option to a group (when you create or modify a group), during the next discovery, the new device will be added to this group automatically if it fits the specified criteria (See "Filtering" on page 34, "Using customized group with options" on page 40). Adding groups 1. Click the button on the bottom of the Customized groups panel. A window appears. 2. Enter a Group Name. Description is optional. If you want to create a group with options, check "Using customized group with options" on page 40). If you want to add more options, click Add Function. 3. Click OK. and configure the criteria (See "Filtering" on page 34, If you want to add devices to a specified group, select the devices you want to add in the Devices list and drag and drop the devices into the group. If you drag-and-drop the devices from another customized group, the devices will be copied, not moved, to the group. Modifying groups 1. Select a group you want to modify from the Customized groups panel. 2. Click the button on the bottom of the Customized groups panel. A window appears. 3. Make your modifications. 4. Click OK. Deleting groups 1. Select a group you want to delete from the Customized groups panel. 2. Click the button on the bottom of the Customized groups panel. A window appears. 3. Click Delete. The device(s) of the deleted group will be moved to Ungrouped. If the device(s) of the deleted group also belong(s) to other groups, you may not find the device(s) in the Ungrouped since the device(s) will still be located in other groups. Deleting a group does not mean removing devices from the system. Devices_ 29
-
 1
1 -
2
-
3
-
4
-
5
-
6
-
7
-
8
-
9
-
10
-
11
-
12
-
13
-
14
-
15
-
16
-
17
-
18
-
19
-
20
-
21
-
22
-
23
-
 24
24 -
 25
25 -
 26
26 -
 27
27 -
 28
28 -
 29
29 -
 30
30 -
 31
31 -
 32
32 -
 33
33 -
 34
34 -
35
-
36
-
37
-
38
-
39
-
40
-
41
-
42
-
43
-
44
-
45
-
46
-
47
-
48
-
49
-
50
-
51
-
52
-
53
-
54
-
55
-
56
-
57
-
58
-
59
-
60
-
61
-
62
-
63
-
64
-
65
-
66
-
67
-
68
-
69
-
70
-
71
-
72
-
73
-
74
-
75
-
76
-
77
-
78
-
79
-
80
-
81
-
82
-
83
-
84
-
85
-
86
-
87
-
88
-
89
-
90
-
91
-
92
-
93
-
94
-
95
-
96
-
97
-
98
-
99
-
100
-
101
-
102
-
103
-
104
-
105
-
106
-
107
-
108
-
109
-
110
-
111
 |
 |