Samsung SCX 4828FN SyncThru 5.0 Guide (ENGLISH) - Page 59
Con the file ID, File Storage History, History list
 |
UPC - 635753612172
View all Samsung SCX 4828FN manuals
Add to My Manuals
Save this manual to your list of manuals |
Page 59 highlights
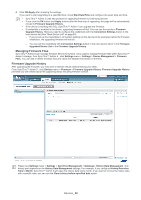
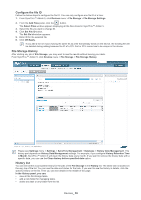
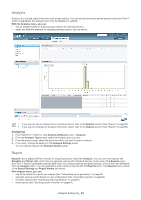
Configure the file ID Follow the below steps to configure the file ID. You can only configure one file ID at a time: 1. From SyncThru™ Admin 5, click Devices menu > File Storage > File Storage Settings. 2. From the Add Files panel, click the button. The Select Files window appears displaying all the files stored in SyncThru™ Admin 5. 3. Select the file you want to change ID. 4. Click Set File ID button. The Set file id window appears. 5. Enter ID for the selected file. 6. Click OK/Apply. If you add a font or macro having the same ID as a file that already exists on the device, the existing file will be deleted during adding because the ID of a PCL font or PCL macro has to be unique in the device. File Storage History After starting any job of File Storage, you may want to see the results without leaving your desk. From SyncThru™ Admin 5, click Devices menu > File Storage > File Storage History. Please see Settings menu > Settings > SyncThru Management > Database > History Data Management. This history part depends on History Data Management settings. For example, if you configure History Retention Time to Month, SyncThru™ Admin 5 will clean the history data every month. If you want to remove the history data with a specific date, you can use the Clean history before specified date option. History list You can see all the accumulated history for the jobs of the File Storage in the History list. The latest task is located on the very top of the list. You can see the date and status for the task. If you want to see the history in details, click the specific history on the list. Then you can see details in the middle of the page. In the History panel, you can: • view all the file storage tasks. • add a new folder for managing tasks. • delete any task or any folder from the list. Devices_ 59
-
 1
1 -
2
-
3
-
4
-
5
-
6
-
7
-
8
-
9
-
10
-
11
-
12
-
13
-
14
-
15
-
16
-
17
-
18
-
19
-
20
-
21
-
22
-
23
-
24
-
25
-
26
-
27
-
28
-
29
-
30
-
31
-
32
-
33
-
34
-
35
-
36
-
37
-
38
-
39
-
40
-
41
-
42
-
43
-
44
-
45
-
46
-
47
-
48
-
49
-
50
-
51
-
52
-
53
-
 54
54 -
 55
55 -
 56
56 -
 57
57 -
 58
58 -
 59
59 -
 60
60 -
 61
61 -
 62
62 -
 63
63 -
 64
64 -
65
-
66
-
67
-
68
-
69
-
70
-
71
-
72
-
73
-
74
-
75
-
76
-
77
-
78
-
79
-
80
-
81
-
82
-
83
-
84
-
85
-
86
-
87
-
88
-
89
-
90
-
91
-
92
-
93
-
94
-
95
-
96
-
97
-
98
-
99
-
100
-
101
-
102
-
103
-
104
-
105
-
106
-
107
-
108
-
109
-
110
-
111
 |
 |