Samsung SCX 4828FN SyncThru 5.0 Guide (ENGLISH) - Page 40
History, History Summary/Con Found Device List, Usage example, Strategy recommendations, - parts manual
 |
UPC - 635753612172
View all Samsung SCX 4828FN manuals
Add to My Manuals
Save this manual to your list of manuals |
Page 40 highlights
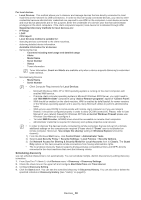
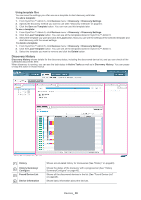
Please see Settings menu > Settings > SyncThru Management > Database> History Data Management. This history part depends on History Data Management settings. For example, if you configure History Retention Times to Month, SyncThru™ Admin 5 will clean the history data every month. If you want to remove the history data with a specific date, you can use the Clean history before specified date option. History You can see all the accumulated history for discoveries in the History panel. The latest task is located on the very top of the list. If you want to see the history in details, click the specific history on the list. You can now see details on the History Summary/Configure and Found Device List. In the History panel, you can: • view all the discovery tasks. • add a new folder for managing tasks by clicking the button. • delete any task or folder from the list by clicking the button. History Summary/Configure The History Summary/Configure panel displays the status of the discovery with a progress bar. In the History Summary/Configure panel, you can: • view the status of the discovery task. • stop the discovery task by clicking the button. • pause or resume the discovery task by clicking the button. • modify the discovery task by clicking the button. Found Device List You can see all the discovered devices in the Found Device List. In the Found Device List panel, you can: • view the discovered devices' information. • view previous discovery results in case of periodical discovery. Viewing periodical discovery When you configure a scheduled discovery, SyncThru™ Admin 5 accumulates all the scheduled discoveries but you can choose only the one you want to see. For example, if you configure a weekly discovery with Time Interval option (See "Scheduling discovery" on page 38), there will be several discoveries generated by SyncThru™ Admin 5 after a while. From the drop-down list in the upper left of the Found Device List panel, select the time and date of the discovery you want to see. Usage example Strategy recommendations • To minimize the impact on other network traffic, configure SyncThru™ Admin 5 to perform regularly scheduled discoveries during off-hours at intervals that are appropriate for your network environment. • To search through a range of addresses for TCP/IP devices on local or remote networks, use the IP Range discovery method for the local or remote network. • To search new TCP/IP devices as they are added to the local network, use the Broadcast discovery method or add the devices manually in the Device List (See "Adding a device" on page 34). • To run a very quick discovery with some network traffic, use the Broadcast discovery method or the SLP discovery method. • To search devices on the local network, use the Broadcast discovery method. • To search devices on more than one subnet, use the IP Range discovery method, CSV Import discovery method or SLP discovery method. • To search devices when you have the devices listed as a file, use the CSV Import discovery method . Using customized group with options You can group the devices with options. For example, make a group in which the Location is the option for First Floor. Then, when you start discovery, SyncThru™ Admin 5 searches using the selected discovery methods and automatically adds the devices with First Floor for Location to the configured group. If you want to organize groups automatically, you can use the custom filter function. Before starting discovery, create Customized Group with in the Group Settings. 1. From SyncThru™ Admin 5, click Devices menu > Group/List > Group Settings. Or you can create groups from the Customized Groups panel with the button.) 2. From the Customized Groups panel, click the Add SubGroup for "xxx" appears. button. Devices_ 40
-
 1
1 -
2
-
3
-
4
-
5
-
6
-
7
-
8
-
9
-
10
-
11
-
12
-
13
-
14
-
15
-
16
-
17
-
18
-
19
-
20
-
21
-
22
-
23
-
24
-
25
-
26
-
27
-
28
-
29
-
30
-
31
-
32
-
33
-
34
-
 35
35 -
 36
36 -
 37
37 -
 38
38 -
 39
39 -
 40
40 -
 41
41 -
 42
42 -
 43
43 -
 44
44 -
 45
45 -
46
-
47
-
48
-
49
-
50
-
51
-
52
-
53
-
54
-
55
-
56
-
57
-
58
-
59
-
60
-
61
-
62
-
63
-
64
-
65
-
66
-
67
-
68
-
69
-
70
-
71
-
72
-
73
-
74
-
75
-
76
-
77
-
78
-
79
-
80
-
81
-
82
-
83
-
84
-
85
-
86
-
87
-
88
-
89
-
90
-
91
-
92
-
93
-
94
-
95
-
96
-
97
-
98
-
99
-
100
-
101
-
102
-
103
-
104
-
105
-
106
-
107
-
108
-
109
-
110
-
111
 |
 |