Samsung SCX 4828FN SyncThru 5.0 Guide (ENGLISH) - Page 48
 |
UPC - 635753612172
View all Samsung SCX 4828FN manuals
Add to My Manuals
Save this manual to your list of manuals |
Page 48 highlights
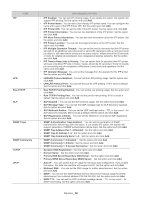
E-mail ITEM SMTP Client SMTP Server Address Book OPTION&DESCRIPTION • Scan to Email Default Original Type: You can set the default original type for the Scan to Email service. Set the option and click Add. • Scan to Email Default Scan Resolution: You can set the default resolution in dots-per-inch (DPI) for the Scan to Email service. Set the option and click Add. • Scan to Email Default File Format: You can set the default file format for the Scan to Email service. Set the option and click Add. • Scan to Email Default Scan Color: You can set the default scan color mode for Scan to Email service. Set the option and click Add. • Scan to Email Default [From:] Address: You can set the default sender [From:] address for Scan to Email. Set the option and click Add. • Scan to Email Auto Send To Self: You can set this option to automatically send the scanned document to the sender as well as the recipients when using Scan to Email. If you enable this option, then the sender [From:] address will be automatically added to recipients list (CC :). Set the option and click Add. • Scan to Email Default Subject: You can set the default subject for emails when using Scan to Email. Set the option and click Add. • Scan to Email Default Mail Text Enabled: You can set the default for using default body text for emails when using Scan to Email. Set the option and click Add. • Scan to Email Default Body Text: You can set the default body text for emails when using Scan to Email. Set the option and click Add. • Scan to Email Print Confirmation Sheet: You can set this option to automatically print a report after a Scan to Email job is finished. If it's set to Always, a report will always print out after a Scan to Email job. If it's set to On Errors Only, a report will print out only when an error occurs during transmission. If it's set to Never, a report will not printout. Set the option and click Add. • SMTP Server Address: You can set the default SMTP server address for the Scan to Email service. Set the option and click Add. • SMTP Server Port: You can set the default SMTP server port number for the Scan to Email service. Twenty-five is set as a default. Set the option and click Add. • SMTP Server Authentication Enabled: You can set the SMTP client authentication usage with this option. If you enable this option, SMTP client authentication will be used. You need to configure the SMTP Login Name and SMTP Login Password if this option is enabled. This option is related to the SMTP server settings. If your SMTP server requires client authentication, you need to enable this option. Set the option and click Add. • SMTP Login Name: You can set the user name for client authentication on the STMP server. Set the option and click Add. • SMTP Login Password: You can set the login password for client authentication on the SMTP server. Set the option and click Add. • SMTP Server Connection Timeout: You can set the time (in seconds) that the system will wait before the SMTP server connection fails due to timeout. The time value should be 30 seconds or more for reliable operation over congested enterprise networks. Set the option and click Add. • Maximum Message Size: You can set the maximum message size. If the scanned document is larger than this message size, it will be split into multiple messages. Set the option and click Add. • SMTP requires POP3 before SMTP authentication: You can set POP3 authentication to appear before SMTP client authentication usage. If you enable this option, POP3 is required by the SMTP server first. Set the option and click Add. • POP3 Server Address: You can set the default POP3 server address. Set the option and click Add. • POP3 Server Port: You can set the default POP3 server port number: 110 is set as a default. Set the option and click Add. • POP3 Login Name: You can set the user name for client authentication on the POP3 server. Set the option and click Add. • POP3 Login Password: You can set the login password for client authentication on the POP3 server. Set the option and click Add. You can add and store email addresses. You can download the address book in CSV file from the SWS and reuse the file for this configuration using the Import CSV button. Devices_ 48
-
 1
1 -
2
-
3
-
4
-
5
-
6
-
7
-
8
-
9
-
10
-
11
-
12
-
13
-
14
-
15
-
16
-
17
-
18
-
19
-
20
-
21
-
22
-
23
-
24
-
25
-
26
-
27
-
28
-
29
-
30
-
31
-
32
-
33
-
34
-
35
-
36
-
37
-
38
-
39
-
40
-
41
-
42
-
 43
43 -
 44
44 -
 45
45 -
 46
46 -
 47
47 -
 48
48 -
 49
49 -
 50
50 -
 51
51 -
 52
52 -
 53
53 -
54
-
55
-
56
-
57
-
58
-
59
-
60
-
61
-
62
-
63
-
64
-
65
-
66
-
67
-
68
-
69
-
70
-
71
-
72
-
73
-
74
-
75
-
76
-
77
-
78
-
79
-
80
-
81
-
82
-
83
-
84
-
85
-
86
-
87
-
88
-
89
-
90
-
91
-
92
-
93
-
94
-
95
-
96
-
97
-
98
-
99
-
100
-
101
-
102
-
103
-
104
-
105
-
106
-
107
-
108
-
109
-
110
-
111
 |
 |