Samsung SCX 4828FN SyncThru 5.0 Guide (ENGLISH) - Page 79
Configuring SNMP settings
 |
UPC - 635753612172
View all Samsung SCX 4828FN manuals
Add to My Manuals
Save this manual to your list of manuals |
Page 79 highlights
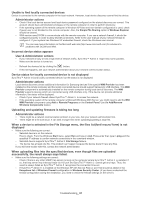
Deleting firmware file(s) 1. From SyncThru™ Admin 5, click Settings menu > Settings > Device Management > Firmware Files. 2. Select the specific firmware file(s) you want to remove. 3. Click the button. Modifying firmware file 1. From SyncThru™ Admin 5, click Settings menu > Settings > Device Management > Firmware Files. 2. Select the specific firmware file you want to modify. 3. Click the button. You can modify Model Name and Comment, which may work as an identifier for the file. Unconfigured Devices Unconfigured Devices is related to SNMPv3 supported devices. SyncThru™ Admin 5 needs additional settings for SNMPv3 devices. If you do not configure SNMPv3 settings from the Devices List, SyncThru™ Admin 5 works with SNMPv1 and SNMPv2. In this case, the devices configured with SNMPv3 will be added into this Unconfigured devices list. SNMPv3 devices can be added to the main Devices List when you configure SNMPv3 settings of SyncThru™ Admin 5 for the devices. Configuring SNMP settings In the Unconfigured Devices panel 1. From SyncThru™ Admin 5, click Settings menu > Settings > Device Management > Unconfigured Devices. You can see unconfigured devices here. 2. Select the device(s) you want to move to the main Devices List. 3. Click the button. 4. Configure SNMP settings. 5. Click OK. In the Devices List 1. From SyncThru™ Admin 5, click Settings menu > Settings > Device Management > Unconfigured Devices. You can see unconfigured devices here. 2. Select the device(s) for which you want to configure SNMP settings. 3. Click the SNMP Configuration button. 4. Configure SNMP settings. 5. Click OK. Filestorage Files You can manage font, form and macro files with SyncThru™ Admin 5. Viewing filestorage files You can see the font/form/macro files stored in SyncThru™ Admin 5 database. You can upload the files into SyncThru™ Admin 5 if you want to use them continuously (See "Uploading font/form/macro file" on page 79). From SyncThru™ Admin 5, click Settings menu > Settings > Device Management > Filestorage Files. You filter the files with default filter options from the drop-down list in Show, the options are All, PS Font, PS Form, PCL Font and PCL Macro. Uploading font/form/macro file 1. From SyncThru™ Admin 5, click Settings menu > Settings > Device Management > Filestorage Files. 2. Click the button. 3. Upload the file you want to manage. Configuring file ID 1. From SyncThru™ Admin 5, click Settings menu > Settings > Device Management > Filestorage Files. 2. Select the file for which you want to configure the ID. 3. Click the Set File ID button. 4. Type in an ID for the file. 5. Click OK/Apply. Deleting font/form/macro files 1. From SyncThru™ Admin 5, click Settings menu > Settings > Device Management > Filestorage Files. 2. Select the specific files you want to remove. 3. Click the button. Settings_ 79
-
 1
1 -
2
-
3
-
4
-
5
-
6
-
7
-
8
-
9
-
10
-
11
-
12
-
13
-
14
-
15
-
16
-
17
-
18
-
19
-
20
-
21
-
22
-
23
-
24
-
25
-
26
-
27
-
28
-
29
-
30
-
31
-
32
-
33
-
34
-
35
-
36
-
37
-
38
-
39
-
40
-
41
-
42
-
43
-
44
-
45
-
46
-
47
-
48
-
49
-
50
-
51
-
52
-
53
-
54
-
55
-
56
-
57
-
58
-
59
-
60
-
61
-
62
-
63
-
64
-
65
-
66
-
67
-
68
-
69
-
70
-
71
-
72
-
73
-
 74
74 -
 75
75 -
 76
76 -
 77
77 -
 78
78 -
 79
79 -
 80
80 -
 81
81 -
 82
82 -
 83
83 -
 84
84 -
85
-
86
-
87
-
88
-
89
-
90
-
91
-
92
-
93
-
94
-
95
-
96
-
97
-
98
-
99
-
100
-
101
-
102
-
103
-
104
-
105
-
106
-
107
-
108
-
109
-
110
-
111
 |
 |