Samsung SCX 4828FN SyncThru 5.0 Guide (ENGLISH) - Page 50
IPP Time to Keep Jobs in History
 |
UPC - 635753612172
View all Samsung SCX 4828FN manuals
Add to My Manuals
Save this manual to your list of manuals |
Page 50 highlights
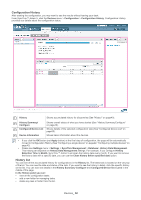
ITEM IPP LPD Raw TCP/IP SLP SNMP Traps SNMP Community TCP/IP UPnP OPTION&DESCRIPTION • IPP Enabled: You can set IPP printing usage. If you enable this option, the system will support IPP printing. Set the option and click Add. • IPP Printer Name: You can set a user-friendly IPP printer name. You can configure this name with a part of the IPP Printer URI. Set the option and click Add. • IPP Printer URI: You can set the URI of the IPP printer. Set the option and click Add. • IPP Printer Information: You can set the description of the IPP printer. Set the option and click Add. • IPP More Printer Information: You can set more information about the IPP printer. Set the option and click Add. • IPP Printer Location: You can set the physical location of the IPP printer. Set the option and click Add. • IPP Multiple Operation Timeout: You can set the time (in seconds) that the IPP printer will wait for an additional send-document or send-URI operations while a multi-document job object is still open before taking any recovery actions. Values should be 30 seconds or more for reliable job submission over congested enterprise networks. Set the option and click Add. • IPP Time to Keep Jobs in History: You can set the time (in seconds) that IPP printer will keep completed IPP jobs in history. Values should be 30 seconds or more for reliable job accounting and job completion notifications to end users and operators. Set the option and click Add. • IPP Operator Message: You can set the message from the operator for the IPP printer. Set the option and click Add. • LPR/LPD Protocol Enabled: You can set the LPR printing usage. Set the option and click Add. • LPR/LPD Protocol Port: You can set the port for LPR printing. 515 is set as a default. Set the option and click Add. • Raw TCP/IP Printing Enabled: You can set the raw printing usage. Set the option and click Add. • Raw TCP/IP Printing Port: You can set the port for raw printing: 9100 is set as a default. Set the option and click Add. • SLP Enabled : You can set the SLP protocol usage. Set the option and click Add. • SLP Message Type: You can set the UDP message type for SLP discovery requests. Set the option and click Add. • SLP Multicast Radius: You can set the UDP multicast radius - TTL or hop count - for SLP discovery requests: 255 is set as a default. Set the option and click Add. • SLP Registration Lifetime: You can set the lifetime (in seconds) of SLP registration. Set the option and click Add. • SNMP Authentication Traps Enabled : You can set the generation of SNMP authentication failure traps with this option. If you enable this option, the system will support generation of SNMP authentication failure traps. Set the option and click Add. • SNMP Trap Address Pair 1~5 Enabled: Set the option and click Add. • SNMP Trap IP Address 1~5: Set the option and click Add. • SNMP Trap Community Name 1~5: Set the option and click Add. • SNMP Community 1~5 Enabled : Set the option and click Add. • SNMP Community 1~5 Name: Set the option and click Add. • SNMP Community 1~5 Access Permission: Set the option and click Add. • Dynamic DNS Registration : Set the option and click Add. • Domain Name: Set the option and click Add. • Primary DNS Server/Secondary DNS Server: Set the option and click Add. • Primary WINS Server/Secondary WINS Server: Set the option and click Add. • Auto IP : You can set the Auto IP usage for link-local auto-configuration. If you enable this option, this data link interface will support AutoIP. Set the option and click Add. • Multicast DNS: You can set the DNS usage for printer advertisement. Set the option and click Add. • SSDP: You can set the SSDP (Simple Service Discovery Protocol) usage for printer advertisement via multicast address 239.255.255.250. Set the option and click Add. • SSDP TTL: You can set the UDP multicast message radius - TTL or hop count - for SSDP advertising. Set the option and click Add. Devices_ 50
-
 1
1 -
2
-
3
-
4
-
5
-
6
-
7
-
8
-
9
-
10
-
11
-
12
-
13
-
14
-
15
-
16
-
17
-
18
-
19
-
20
-
21
-
22
-
23
-
24
-
25
-
26
-
27
-
28
-
29
-
30
-
31
-
32
-
33
-
34
-
35
-
36
-
37
-
38
-
39
-
40
-
41
-
42
-
43
-
44
-
 45
45 -
 46
46 -
 47
47 -
 48
48 -
 49
49 -
 50
50 -
 51
51 -
 52
52 -
 53
53 -
 54
54 -
 55
55 -
56
-
57
-
58
-
59
-
60
-
61
-
62
-
63
-
64
-
65
-
66
-
67
-
68
-
69
-
70
-
71
-
72
-
73
-
74
-
75
-
76
-
77
-
78
-
79
-
80
-
81
-
82
-
83
-
84
-
85
-
86
-
87
-
88
-
89
-
90
-
91
-
92
-
93
-
94
-
95
-
96
-
97
-
98
-
99
-
100
-
101
-
102
-
103
-
104
-
105
-
106
-
107
-
108
-
109
-
110
-
111
 |
 |