Samsung SCX 4828FN SyncThru 5.0 Guide (ENGLISH) - Page 71
Viewing user accounts, Adding user accounts, Deleting user accounts, User Roles, Adding user roles
 |
UPC - 635753612172
View all Samsung SCX 4828FN manuals
Add to My Manuals
Save this manual to your list of manuals |
Page 71 highlights
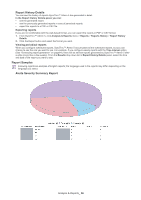
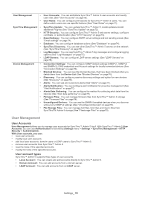
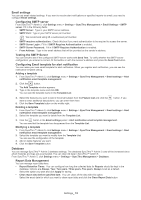
Viewing user accounts From SyncThru™ Admin 5, click Settings menu > Settings > User Management > User Accounts. You can see all the user accounts stored in SyncThru™ Admin 5. The Account List shows the following information: • Type: Shows the user type, Local, Domain or LDAP • Account: Shows the user account. • Name: Shows the user's name. • Email: Shows the user's email address. • Roles: Shows what kind of role the account has. • Modify: Click to make role modifications. You can assign specific roles to the user accounts. Adding user accounts 1. From SyncThru™ Admin 5, click Settings menu > Settings > User Management > User Accounts. 2. Click the button in the Account List. Add Account window appears. 3. Choose one user type to use from Local Account, Domain account, or LDAP. You need to configure LDAP server information in Settings menu > Settings > SyncThru Management > LDAP Servers. 4. Click OK/Apply. You can see the added user account in the Account List. After adding user accounts, you need to configure roles for added accounts. Otherwise, users cannot see anything with the accounts because the accounts have no permissions. Deleting user accounts 1. From SyncThru™ Admin 5, click Settings menu > Settings > User Management > User Accounts. 2. Select the user account(s) you want to remove. 3. Click the button in the Account List. User Roles SyncThru™ Admin 5 can assign user roles to users . A role is a set of permissions for using SyncThru™ Admin 5 features. Once a role is assigned to a user, the user will have access to the permissions designated by the role. For example, if account A has only device add permission, account A can use the device add feature only. If an account has Admin role, which is provided as a default, that account can use all the features after logging-in to SyncThru™ Admin 5. After assigning a role to an account, you need to enable authentication then log in to SyncThru™ Admin 5 to use this feature. With User Roles, you can: • view user roles. • modify permissions for user roles (See "Modifying user roles" on page72). • add/remove user roles (See "Adding user roles" on page71, "Deleting user roles" on page72). • configure permissions for user roles. • view the permissions assigned to the user role. You can refer to "Role Model" matrix in RFC 3805 for adjusting this role function according to your site (See "Role reference" on page 90). Adding user roles 1. From SyncThru™ Admin 5, click Settings menu > Settings > User Management > User Roles. 2. Click the button in the Role List. Add Roles window appears. 3. Enter role name. 4. Click OK/Apply. You can see the role in the Role List. 5. Now you can assign permissions for the role. Select the roles you want to configure permissions. 6. Select permissions you want to assign to the specified roles on Permissions panel on the right side. 7. Click Add permission button. You can see the number of permissions on the Role List. Settings_ 71
-
 1
1 -
2
-
3
-
4
-
5
-
6
-
7
-
8
-
9
-
10
-
11
-
12
-
13
-
14
-
15
-
16
-
17
-
18
-
19
-
20
-
21
-
22
-
23
-
24
-
25
-
26
-
27
-
28
-
29
-
30
-
31
-
32
-
33
-
34
-
35
-
36
-
37
-
38
-
39
-
40
-
41
-
42
-
43
-
44
-
45
-
46
-
47
-
48
-
49
-
50
-
51
-
52
-
53
-
54
-
55
-
56
-
57
-
58
-
59
-
60
-
61
-
62
-
63
-
64
-
65
-
 66
66 -
 67
67 -
 68
68 -
 69
69 -
 70
70 -
 71
71 -
 72
72 -
 73
73 -
 74
74 -
 75
75 -
 76
76 -
77
-
78
-
79
-
80
-
81
-
82
-
83
-
84
-
85
-
86
-
87
-
88
-
89
-
90
-
91
-
92
-
93
-
94
-
95
-
96
-
97
-
98
-
99
-
100
-
101
-
102
-
103
-
104
-
105
-
106
-
107
-
108
-
109
-
110
-
111
 |
 |