Seagate GoFlex Home User Guide - Page 44
Share with Other Family Accounts, Allow Downloads for this Share - default password
 |
View all Seagate GoFlex Home manuals
Add to My Manuals
Save this manual to your list of manuals |
Page 44 highlights
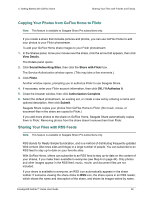
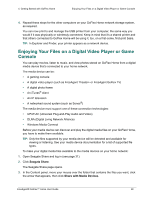
4. Getting Started with GoFlex Home Sharing Your Files with Friends and Family 5. Click inside the Enable Sharing box. 6. Click inside the Sharing boxes to grant access to your share to whomever you want: • Click Share with Other Family Accounts to make your share available to everyone on your home network who can access your GoFlex Home. • Click Share with Friends to make your share available to specific people outside your home network, then click OK. Enter at least one e-mail address, then set a share-until date and add password protection to your share, if you want, then click Send Invitations. Note: The first time you invite friends to view a share, Seagate Share prompts you for your e-mail address, which is used as the return address on the invitation sent by Seagate Share. You can change your e-mail address later, if you want (see page 62). If you choose to add password protection to your share, the people you invite to view it are prompted to create a password before they can view the share. (See "Setting Up and Managing an E-mail Address Book for Shares" on page 60 for more information.) • Click Share with Everyone to make your share available (and searchable) on the Internet and through RSS feeds, then set a share-until date, if you want. • Click Share with Media Devices to make your share available to the digital media devices on your home network (see page 48). 7. By default, Allow Downloads for this Share is enabled, which lets others download the original, full-resolution version of all the files in the share. This is particularly useful for shares that include documents you want to share with others, because the share itself contains only a references to files, not copies of the files themselves. 8. Click Create. The share is created. 9. To add content to your share, in the Content panel, select the folder you want then drag and drop either the entire folder or selected files into the share. 10. View your completed share by double-clicking the share in the Shares panel. The share opens, showing the background you chose and the description you added during setup. Within the share window, you have options to change the view of the contents, start a slide show, play music included in the share, and download the files in the share to your computer. FreeAgent® GoFlex™ Home User Guide 44
-
 1
1 -
2
-
3
-
4
-
5
-
6
-
7
-
8
-
9
-
10
-
11
-
12
-
13
-
14
-
15
-
16
-
17
-
18
-
19
-
20
-
21
-
22
-
23
-
24
-
25
-
26
-
27
-
28
-
29
-
30
-
31
-
32
-
33
-
34
-
35
-
36
-
37
-
38
-
 39
39 -
 40
40 -
 41
41 -
 42
42 -
 43
43 -
 44
44 -
 45
45 -
 46
46 -
 47
47 -
 48
48 -
 49
49 -
50
-
51
-
52
-
53
-
54
-
55
-
56
-
57
-
58
-
59
-
60
-
61
-
62
-
63
-
64
-
65
-
66
-
67
-
68
-
69
-
70
-
71
-
72
-
73
-
74
-
75
-
76
-
77
-
78
-
79
-
80
-
81
-
82
 |
 |