Sharp MX-M700 MX-M550 MX-M620 MX-M700 Operation Manual - Page 133
Touch the [OK] key inside [OK] key
 |
View all Sharp MX-M700 manuals
Add to My Manuals
Save this manual to your list of manuals |
Page 133 highlights
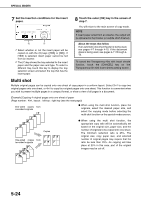
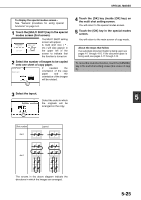
SPECIAL MODES To display the special modes screen... See "General procedure for using special functions" on page 5-2. 1 Touch the [MULTI SHOT] key in the special modes screen (2nd screen). TRANSPARENCY INSERTS TAB COPY MULTI SHOT CARD SHOT The MULTI SHOT setting screen will appear. A multi shot icon ( , etc.) will also appear in the upper left of the screen to indicate that the function is turned on. 2 Select the number of images to be copied onto one sheet of copy paper. SPECIAL MODES MULTI SHOT 2in1 4in1 If needed, the orientation of the copy paper and the orientation of the images will be rotated. 4 Touch the [OK] key (inside [OK] key) on the multi shot setting screen. You will return to the special modes screen. 5 Touch the [OK] key in the special modes screen. You will return to the main screen of copy mode. About the steps that follow If an automatic document feeder is being used, see pages 4-7 through 4-10. If the document glass is being used, see pages 4-11 through 4-13. To cancel the multi shot function, touch the [CANCEL] key in the multi shot setting screen (the screen of step 2). 3 Select the layout. OK Select the order in which 5 CANCEL OK the originals will be LAYOUT arranged on the copy. Shot number 2in1 Layout 4in1 The arrows in the above diagram indicate the directions in which the images are arranged. 5-25
-
 1
1 -
2
-
3
-
4
-
5
-
6
-
7
-
8
-
9
-
10
-
11
-
12
-
13
-
14
-
15
-
16
-
17
-
18
-
19
-
20
-
21
-
22
-
23
-
24
-
25
-
26
-
27
-
28
-
29
-
30
-
31
-
32
-
33
-
34
-
35
-
36
-
37
-
38
-
39
-
40
-
41
-
42
-
43
-
44
-
45
-
46
-
47
-
48
-
49
-
50
-
51
-
52
-
53
-
54
-
55
-
56
-
57
-
58
-
59
-
60
-
61
-
62
-
63
-
64
-
65
-
66
-
67
-
68
-
69
-
70
-
71
-
72
-
73
-
74
-
75
-
76
-
77
-
78
-
79
-
80
-
81
-
82
-
83
-
84
-
85
-
86
-
87
-
88
-
89
-
90
-
91
-
92
-
93
-
94
-
95
-
96
-
97
-
98
-
99
-
100
-
101
-
102
-
103
-
104
-
105
-
106
-
107
-
108
-
109
-
110
-
111
-
112
-
113
-
114
-
115
-
116
-
117
-
118
-
119
-
120
-
121
-
122
-
123
-
124
-
125
-
126
-
127
-
 128
128 -
 129
129 -
 130
130 -
 131
131 -
 132
132 -
 133
133 -
 134
134 -
 135
135 -
 136
136 -
 137
137 -
 138
138 -
139
-
140
-
141
-
142
-
143
-
144
-
145
-
146
-
147
-
148
-
149
-
150
-
151
-
152
-
153
-
154
-
155
-
156
-
157
-
158
-
159
-
160
-
161
-
162
-
163
-
164
-
165
-
166
-
167
-
168
-
169
-
170
-
171
-
172
-
173
-
174
-
175
-
176
-
177
-
178
-
179
-
180
-
181
-
182
-
183
-
184
-
185
-
186
-
187
-
188
-
189
-
190
-
191
-
192
-
193
-
194
-
195
-
196
-
197
-
198
-
199
-
200
 |
 |