Sharp MX-M700 MX-M550 MX-M620 MX-M700 Operation Manual - Page 56
Misfeed in the paper feed area
 |
View all Sharp MX-M700 manuals
Add to My Manuals
Save this manual to your list of manuals |
Page 56 highlights
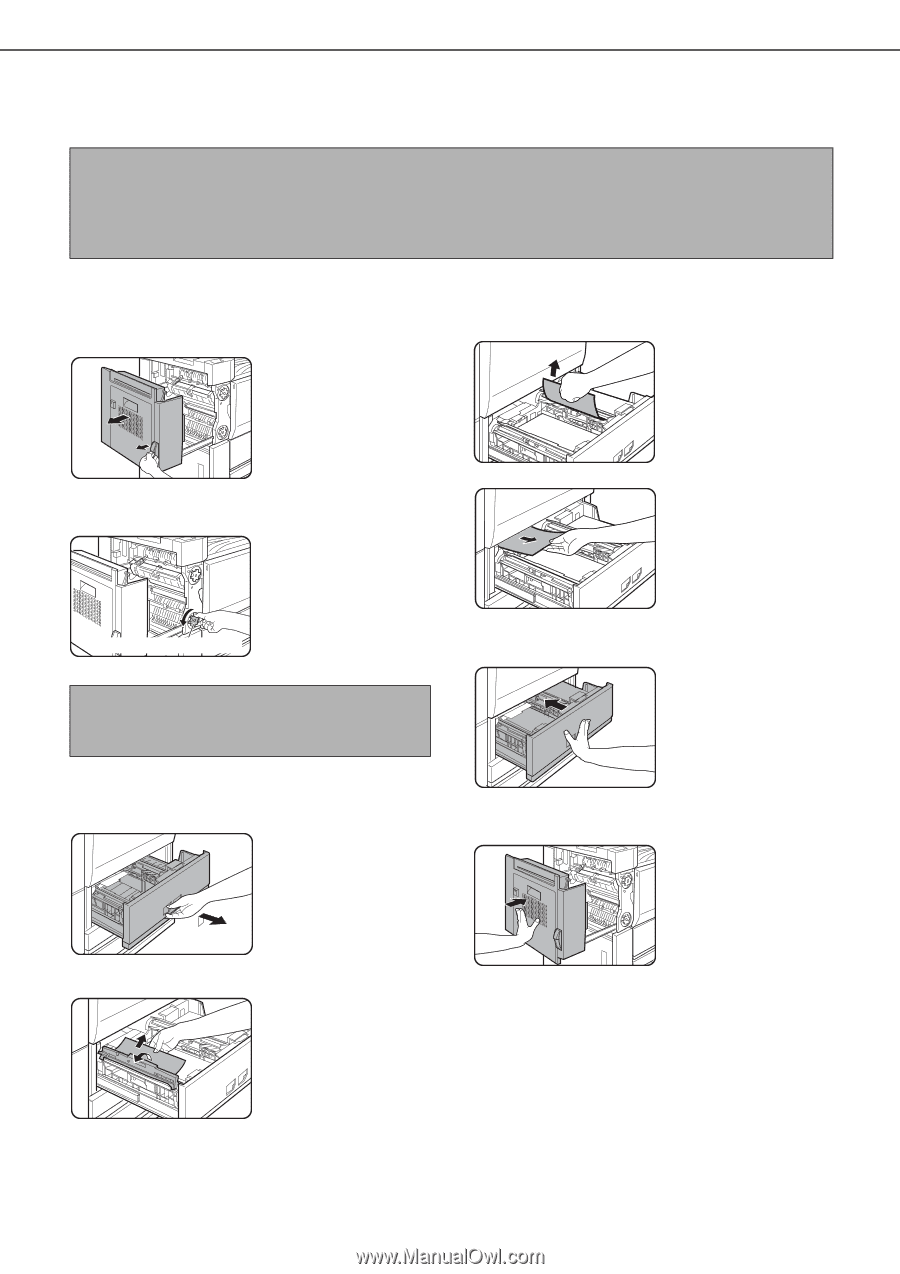
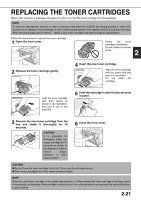
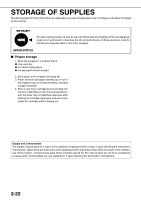
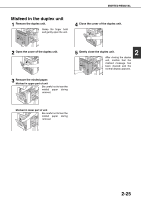
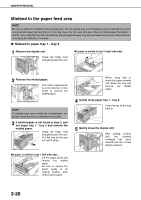
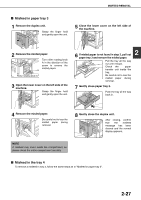
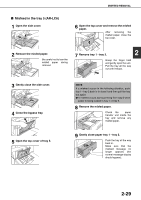
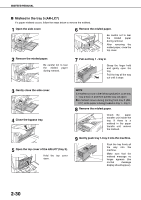
MISFEED REMOVAL Misfeed in the paper feed area NOTE Be sure to follow the misfeed removal sequence. Do not pull the tray out immediately as the misfeed may have occurred with paper partially fed out of the tray. Open the left cover and see if there is misfed paper first (steps 1 and 2). If you open the tray without checking, the partially fed paper may tear and leave torn pieces in the machine, increasing the difficulty of removal. ■ Misfeed in paper tray 1 - tray 2 1 Remove the duplex unit. Grasp the finger hold and gently open the unit. ●If paper is misfed in tray 2 (right-side tray)... 2 Remove the misfed paper. Turn roller rotating knob A in the direction of the arrow to remove the misfed paper. Roller rotating knob A NOTE A misfeed may occur inside the compartment, so please check the entire compartment carefully. 3 If misfed paper is not found in step 2, pull out paper tray 1 - tray 2 and remove the misfed paper. Grasp the finger hold and gently open the unit. Pull the tray all the way out until it stops. When using tray 2, check the paper transfer unit inside the tray and remove any misfed paper. 4 Gently close paper tray 1 - tray 2. Push the tray all the way back in. 5 Gently close the duplex unit. After closing, confirm that the misfeed message has been cleared and the normal display appears. ●If paper is misfed in tray 1 (left-side tray)... Lift the paper guide and remove the misfed paper. Be sure to replace the paper guide in its original position after removing the paper. 2-26
-
 1
1 -
2
-
3
-
4
-
5
-
6
-
7
-
8
-
9
-
10
-
11
-
12
-
13
-
14
-
15
-
16
-
17
-
18
-
19
-
20
-
21
-
22
-
23
-
24
-
25
-
26
-
27
-
28
-
29
-
30
-
31
-
32
-
33
-
34
-
35
-
36
-
37
-
38
-
39
-
40
-
41
-
42
-
43
-
44
-
45
-
46
-
47
-
48
-
49
-
50
-
 51
51 -
 52
52 -
 53
53 -
 54
54 -
 55
55 -
 56
56 -
 57
57 -
 58
58 -
 59
59 -
 60
60 -
 61
61 -
62
-
63
-
64
-
65
-
66
-
67
-
68
-
69
-
70
-
71
-
72
-
73
-
74
-
75
-
76
-
77
-
78
-
79
-
80
-
81
-
82
-
83
-
84
-
85
-
86
-
87
-
88
-
89
-
90
-
91
-
92
-
93
-
94
-
95
-
96
-
97
-
98
-
99
-
100
-
101
-
102
-
103
-
104
-
105
-
106
-
107
-
108
-
109
-
110
-
111
-
112
-
113
-
114
-
115
-
116
-
117
-
118
-
119
-
120
-
121
-
122
-
123
-
124
-
125
-
126
-
127
-
128
-
129
-
130
-
131
-
132
-
133
-
134
-
135
-
136
-
137
-
138
-
139
-
140
-
141
-
142
-
143
-
144
-
145
-
146
-
147
-
148
-
149
-
150
-
151
-
152
-
153
-
154
-
155
-
156
-
157
-
158
-
159
-
160
-
161
-
162
-
163
-
164
-
165
-
166
-
167
-
168
-
169
-
170
-
171
-
172
-
173
-
174
-
175
-
176
-
177
-
178
-
179
-
180
-
181
-
182
-
183
-
184
-
185
-
186
-
187
-
188
-
189
-
190
-
191
-
192
-
193
-
194
-
195
-
196
-
197
-
198
-
199
-
200
 |
 |