Sharp MX-M700 MX-M550 MX-M620 MX-M700 Operation Manual - Page 72
Replacing the cartridge in the saddle stitch finisher
 |
View all Sharp MX-M700 manuals
Add to My Manuals
Save this manual to your list of manuals |
Page 72 highlights
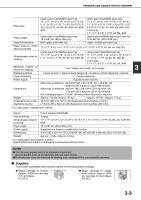
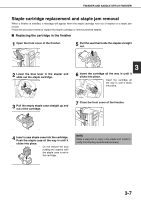
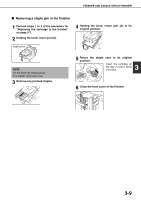
FINISHER AND SADDLE STITCH FINISHER ■ Replacing the cartridge in the saddle stitch finisher Only when the saddle stitch finisher (AR-F16) is installed. 1 Open the lower cover of the saddle stitch finisher. When an optional inserter is installed, open the front cover of the inserter before opening the lower cover of the finisher. 5 Return the saddle stitch holder and the saddle stitch unit to their respective original positions. 2 Slide out the saddle stitch unit carefully toward the front. 3 (1) Grasp the grip of the saddle staple holder and pull it out. (2) While still grasping the grip, rotate the saddle staple holder 90° in the direction of the arrow (rotate to the right). (2) 6 Make sure that the finisher is firmly attached to the machine and that 11" x 17", 8-1/2" x 11"R, or 8-1/2" x 14" (A3, A4R, or B4) size paper is loaded. If one of the above paper sizes is not set, test stapling cannot be performed. 7 Close the lower cover of the finisher. Test stapling is automatically performed on a blank sheet. This operation is carried out to avoid blank stapling. (1) 4 Remove the empty staple case and set a new one. Replace both staple cases with new ones. Remove the cover from the staple cartridge and then install the cartridge. NOTE If test stapling fails to take place, repeat steps 1 to 7. 3-8
-
 1
1 -
2
-
3
-
4
-
5
-
6
-
7
-
8
-
9
-
10
-
11
-
12
-
13
-
14
-
15
-
16
-
17
-
18
-
19
-
20
-
21
-
22
-
23
-
24
-
25
-
26
-
27
-
28
-
29
-
30
-
31
-
32
-
33
-
34
-
35
-
36
-
37
-
38
-
39
-
40
-
41
-
42
-
43
-
44
-
45
-
46
-
47
-
48
-
49
-
50
-
51
-
52
-
53
-
54
-
55
-
56
-
57
-
58
-
59
-
60
-
61
-
62
-
63
-
64
-
65
-
66
-
 67
67 -
 68
68 -
 69
69 -
 70
70 -
 71
71 -
 72
72 -
 73
73 -
 74
74 -
 75
75 -
 76
76 -
 77
77 -
78
-
79
-
80
-
81
-
82
-
83
-
84
-
85
-
86
-
87
-
88
-
89
-
90
-
91
-
92
-
93
-
94
-
95
-
96
-
97
-
98
-
99
-
100
-
101
-
102
-
103
-
104
-
105
-
106
-
107
-
108
-
109
-
110
-
111
-
112
-
113
-
114
-
115
-
116
-
117
-
118
-
119
-
120
-
121
-
122
-
123
-
124
-
125
-
126
-
127
-
128
-
129
-
130
-
131
-
132
-
133
-
134
-
135
-
136
-
137
-
138
-
139
-
140
-
141
-
142
-
143
-
144
-
145
-
146
-
147
-
148
-
149
-
150
-
151
-
152
-
153
-
154
-
155
-
156
-
157
-
158
-
159
-
160
-
161
-
162
-
163
-
164
-
165
-
166
-
167
-
168
-
169
-
170
-
171
-
172
-
173
-
174
-
175
-
176
-
177
-
178
-
179
-
180
-
181
-
182
-
183
-
184
-
185
-
186
-
187
-
188
-
189
-
190
-
191
-
192
-
193
-
194
-
195
-
196
-
197
-
198
-
199
-
200
 |
 |
