Sharp MX-M700 MX-M550 MX-M620 MX-M700 Operation Manual - Page 179
Property change]
 |
View all Sharp MX-M700 manuals
Add to My Manuals
Save this manual to your list of manuals |
Page 179 highlights
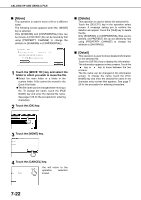
CALLING UP AND USING A FILE 11 [SEND SETTINGS] key The [SEND SETTINGS] key is displayed in scanner mode and in Internet fax mode. Touch this key to set the subject and file name. In scanner mode, the sender name can also be set. 12 [SUB ADDRESS] key or [ADDRESS ENTRY] key ● Touch this key to directly enter the destination for a Scan to E-mail, Scan to FTP, Scan to Network Folder, or Internet fax transmission. ● Touch this key to enter the sub-address and passcode for an F-code fax transmission. NOTE See the "Operation manual (for facsimile)" and "Operation manual (for image send)" for detailed explanations of 1 , 2 , 3 , 4 , 5 , 6 , 7 , 8 , 9 , 11 , and 12 . ■ [Property change] Select this operation to change the attribute of a saved file. Three attributes are available: [SHARING], [PROTECT], and [ CONFIDENTIAL]. The following screen appears when the [PROPERTY CHANGE] key is selected in the operation selection screen. Note the restrictions below on changing the attribute. JOB SETTINGS / PROPERTY CHANGE CANCEL OK Basic specifications Yamada Taro 81/2 x11 SHARING PROTECT CONFIDENTIAL PASSWORD [Restrictions on changing the attribute] ●A file that is set to [SHARING] can be changed to [PROTECT] or [CONFIDENTIAL]. However, a [SHARING] file that is saved in the Quick File folder can only be changed to [PROTECT]. ●A file that is set to [PROTECT] can be changed to [SHARING] or [CONFIDENTIAL]. However, a [PROTECT] file that is saved in the Quick File folder can only be changed to [SHARING]. ●A file that is saved in the Quick File folder cannot be changed to [CONFIDENTIAL]. 1 Touch the [PROPERTY CHANGE] key in the operation selection screen. 3 Touch the [OK] key. PROPERTY CHANGE DETAIL NCEL OK 7 2 Touch the key of the desired attribute. SHARING CONFIDENTIAL If you are changing a [SHARING] or [PROTECT] file to [CONFIDENTIAL], touch the [PASSWORD] key and enter the password. PROTECT PASSWORD 7-21
-
 1
1 -
2
-
3
-
4
-
5
-
6
-
7
-
8
-
9
-
10
-
11
-
12
-
13
-
14
-
15
-
16
-
17
-
18
-
19
-
20
-
21
-
22
-
23
-
24
-
25
-
26
-
27
-
28
-
29
-
30
-
31
-
32
-
33
-
34
-
35
-
36
-
37
-
38
-
39
-
40
-
41
-
42
-
43
-
44
-
45
-
46
-
47
-
48
-
49
-
50
-
51
-
52
-
53
-
54
-
55
-
56
-
57
-
58
-
59
-
60
-
61
-
62
-
63
-
64
-
65
-
66
-
67
-
68
-
69
-
70
-
71
-
72
-
73
-
74
-
75
-
76
-
77
-
78
-
79
-
80
-
81
-
82
-
83
-
84
-
85
-
86
-
87
-
88
-
89
-
90
-
91
-
92
-
93
-
94
-
95
-
96
-
97
-
98
-
99
-
100
-
101
-
102
-
103
-
104
-
105
-
106
-
107
-
108
-
109
-
110
-
111
-
112
-
113
-
114
-
115
-
116
-
117
-
118
-
119
-
120
-
121
-
122
-
123
-
124
-
125
-
126
-
127
-
128
-
129
-
130
-
131
-
132
-
133
-
134
-
135
-
136
-
137
-
138
-
139
-
140
-
141
-
142
-
143
-
144
-
145
-
146
-
147
-
148
-
149
-
150
-
151
-
152
-
153
-
154
-
155
-
156
-
157
-
158
-
159
-
160
-
161
-
162
-
163
-
164
-
165
-
166
-
167
-
168
-
169
-
170
-
171
-
172
-
173
-
 174
174 -
 175
175 -
 176
176 -
 177
177 -
 178
178 -
 179
179 -
 180
180 -
 181
181 -
 182
182 -
 183
183 -
 184
184 -
185
-
186
-
187
-
188
-
189
-
190
-
191
-
192
-
193
-
194
-
195
-
196
-
197
-
198
-
199
-
200
 |
 |