Sharp MX-M700 MX-M550 MX-M620 MX-M700 Operation Manual - Page 81
Misfeed removal
 |
View all Sharp MX-M700 manuals
Add to My Manuals
Save this manual to your list of manuals |
Page 81 highlights
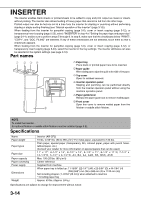
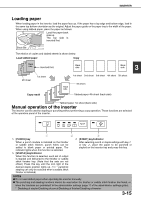
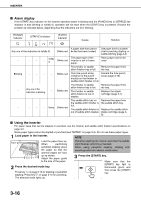
INSERTER Misfeed removal When a misfeed occurs in the inserter, remove the misfed paper following the procedure below. ■ Misfeed in the inserter 1 Gently move the inserter away from the machine while pressing the button. 6 Remove the misfed paper. Be careful not to tear the misfed paper during removal. 2 Remove the misfed paper from the main unit. Be careful not to tear the misfed paper during removal. After removing the misfed paper, perform steps 1 and 3 on page 224 to reset the machine. 3 If misfed paper is not found in step 2, open the top cover. If a misfeed was not found in step 6, 7 remove the misfed paper from under the 3 paper guide. Be careful not to tear the misfed paper during removal. 8 Return the paper guide lever to its original position. 4 Remove the misfed paper. Be careful not to tear the misfed paper during removal. 5 If a misfeed was not found in step 4, raise the paper guide lever. 9 Push the finisher to close the gap between the machine and the inserter. After attaching the inserter on the machine, make sure that the paper misfeed message has been cleared and the normal message display appears. 3-17
-
 1
1 -
2
-
3
-
4
-
5
-
6
-
7
-
8
-
9
-
10
-
11
-
12
-
13
-
14
-
15
-
16
-
17
-
18
-
19
-
20
-
21
-
22
-
23
-
24
-
25
-
26
-
27
-
28
-
29
-
30
-
31
-
32
-
33
-
34
-
35
-
36
-
37
-
38
-
39
-
40
-
41
-
42
-
43
-
44
-
45
-
46
-
47
-
48
-
49
-
50
-
51
-
52
-
53
-
54
-
55
-
56
-
57
-
58
-
59
-
60
-
61
-
62
-
63
-
64
-
65
-
66
-
67
-
68
-
69
-
70
-
71
-
72
-
73
-
74
-
75
-
 76
76 -
 77
77 -
 78
78 -
 79
79 -
 80
80 -
 81
81 -
 82
82 -
 83
83 -
 84
84 -
 85
85 -
 86
86 -
87
-
88
-
89
-
90
-
91
-
92
-
93
-
94
-
95
-
96
-
97
-
98
-
99
-
100
-
101
-
102
-
103
-
104
-
105
-
106
-
107
-
108
-
109
-
110
-
111
-
112
-
113
-
114
-
115
-
116
-
117
-
118
-
119
-
120
-
121
-
122
-
123
-
124
-
125
-
126
-
127
-
128
-
129
-
130
-
131
-
132
-
133
-
134
-
135
-
136
-
137
-
138
-
139
-
140
-
141
-
142
-
143
-
144
-
145
-
146
-
147
-
148
-
149
-
150
-
151
-
152
-
153
-
154
-
155
-
156
-
157
-
158
-
159
-
160
-
161
-
162
-
163
-
164
-
165
-
166
-
167
-
168
-
169
-
170
-
171
-
172
-
173
-
174
-
175
-
176
-
177
-
178
-
179
-
180
-
181
-
182
-
183
-
184
-
185
-
186
-
187
-
188
-
189
-
190
-
191
-
192
-
193
-
194
-
195
-
196
-
197
-
198
-
199
-
200
 |
 |
