Sharp MX-M700 MX-M550 MX-M620 MX-M700 Operation Manual - Page 168
Scan Save
 |
View all Sharp MX-M700 manuals
Add to My Manuals
Save this manual to your list of manuals |
Page 168 highlights
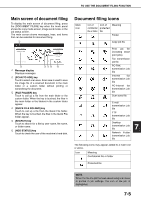
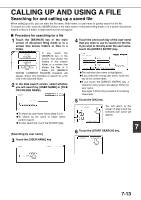
SAVING A DOCUMENT IMAGE FILE Scan Save Scan save is used to save a scanned document image in the main folder or the custom folder without copying or transmitting it. 1 Press the [DOCUMENT FILING] key on the operation panel. DOCUMENT FILING IMAGE SEND PRINT READY DATA LINE DATA COPY SYSTEM JOB STATUS SETTINGS 2 Touch the [SCAN TO HDD] key. 6 Perform any of the following steps 7 to 16 as needed. When finished, go to step 17 on page 7-11. ●To set the original size, perform steps 7 to 10. ●To set the resolution, perform steps 11 to 13 on page 7-11. ●To select the exposure, perform steps 14 to 16 on page 7-11. ●If you no not wish to select any of the above settings, go to step 17 on page 7-11. FILE STORE SCAN TO HDD 3 Touch the [SPECIAL MODES] key. Select any special functions that you wish SPECIAL MODES to use (otherwise skip FILE INFORMATION this step). When the [SPECIAL MODES] key is touched, the special modes selection screen appears. (See "Using special functions for scan save" on page 7-12.) NOTE For explanations of the special functions, see page 7-12 and chapter 5. 4 Touch the [FILE INFORMATION] key. SPECIAL MODES FILE INFORMATION 5 The screens for selecting the user name, file name, folder, and attribute appear. Configure the settings as explained in step 3 to step 15 on pages 7-7 to 7-8. When step 15 is completed, you will return to the main screen of document filing. FILE STORE SCAN TO HDD GLOBAL ACCESS FILE RETRIEVE FILE FOLDER QUICK FILE FOLDER SEARCH HDD STATUS 7 Touch the [ORIGINAL] key. 300x300dpi RESOLUTION AUTO ORIGINAL 8 To set the original size, see "Manually setting the scanning size" on page 4-5. 9 If the original is two-sided, touch the [2SIDED BOOKLET] key or the [2-SIDED TABLET] key depending on where the pages are bound. SCAN SIZE AUTO STORE SIZ 100% AUTO 2-SIDED BOOKLET 2-SIDED TABLET 10Touch the [OK] key. You will return to the screen of step 7. STORE SIZE OK AUTO IDED NOTE If the original pages are bound at the side, the document is a "booklet". If the original pages are bound at the top, the document is a "tablet". 7-10
-
 1
1 -
2
-
3
-
4
-
5
-
6
-
7
-
8
-
9
-
10
-
11
-
12
-
13
-
14
-
15
-
16
-
17
-
18
-
19
-
20
-
21
-
22
-
23
-
24
-
25
-
26
-
27
-
28
-
29
-
30
-
31
-
32
-
33
-
34
-
35
-
36
-
37
-
38
-
39
-
40
-
41
-
42
-
43
-
44
-
45
-
46
-
47
-
48
-
49
-
50
-
51
-
52
-
53
-
54
-
55
-
56
-
57
-
58
-
59
-
60
-
61
-
62
-
63
-
64
-
65
-
66
-
67
-
68
-
69
-
70
-
71
-
72
-
73
-
74
-
75
-
76
-
77
-
78
-
79
-
80
-
81
-
82
-
83
-
84
-
85
-
86
-
87
-
88
-
89
-
90
-
91
-
92
-
93
-
94
-
95
-
96
-
97
-
98
-
99
-
100
-
101
-
102
-
103
-
104
-
105
-
106
-
107
-
108
-
109
-
110
-
111
-
112
-
113
-
114
-
115
-
116
-
117
-
118
-
119
-
120
-
121
-
122
-
123
-
124
-
125
-
126
-
127
-
128
-
129
-
130
-
131
-
132
-
133
-
134
-
135
-
136
-
137
-
138
-
139
-
140
-
141
-
142
-
143
-
144
-
145
-
146
-
147
-
148
-
149
-
150
-
151
-
152
-
153
-
154
-
155
-
156
-
157
-
158
-
159
-
160
-
161
-
162
-
 163
163 -
 164
164 -
 165
165 -
 166
166 -
 167
167 -
 168
168 -
 169
169 -
 170
170 -
 171
171 -
 172
172 -
 173
173 -
174
-
175
-
176
-
177
-
178
-
179
-
180
-
181
-
182
-
183
-
184
-
185
-
186
-
187
-
188
-
189
-
190
-
191
-
192
-
193
-
194
-
195
-
196
-
197
-
198
-
199
-
200
 |
 |
