Yamaha PSR-630 Owner's Manual - Page 154
Data Backup & Initialization, Data Backup, Data Initialization
 |
View all Yamaha PSR-630 manuals
Add to My Manuals
Save this manual to your list of manuals |
Page 154 highlights
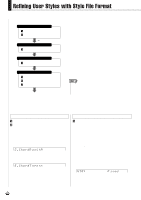
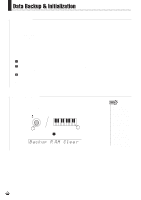
,QDa,Qta B,Qacku,Qp &,QIniti,Qaliza,Qtion,Q,Q,Q,Q,Q,Q s Data Backup Except for the data listed below, all PSR-730/630 panel settings are reset to their initial settings whenever the power is turned on. • Registration Memory • User Style Data • User Pad Data • MIDI Transmit Settings • MIDI Receive Settings The data listed above can be backed up - i.e. retained in memory - as long as a working set of batteries is installed and you keep the following Off/On procedure. z Turn the power OFF by pressing the [STAND BY/ON] switch. x Unplug the DC output cable of the PA-6 from the DC IN 10-12V jack on the rear panel of the PSR-730/630. c Then unplug the PA-6 Power Adaptor from the wall AC outlet. When turning the power ON, simply reverse the procedure. s Data Initialization All data can be initialized and restored to the factory preset condition by turning on the power while holding the highest (rightmost) white key on the keyboard. "Backup RAM Clear" will appear briefly on the display. STAND BY ON Backup R AM Clea r • All registration and User Style/Pad memory data, plus the other settings listed above, will be erased and/or changed when the data initialization procedure is carried out. • Carrying out the data initialization procedure will usually restore normal operation if the PSR730/630 freezes or begins to act erratically for any reason. 152
-
 1
1 -
2
-
3
-
4
-
5
-
6
-
7
-
8
-
9
-
10
-
11
-
12
-
13
-
14
-
15
-
16
-
17
-
18
-
19
-
20
-
21
-
22
-
23
-
24
-
25
-
26
-
27
-
28
-
29
-
30
-
31
-
32
-
33
-
34
-
35
-
36
-
37
-
38
-
39
-
40
-
41
-
42
-
43
-
44
-
45
-
46
-
47
-
48
-
49
-
50
-
51
-
52
-
53
-
54
-
55
-
56
-
57
-
58
-
59
-
60
-
61
-
62
-
63
-
64
-
65
-
66
-
67
-
68
-
69
-
70
-
71
-
72
-
73
-
74
-
75
-
76
-
77
-
78
-
79
-
80
-
81
-
82
-
83
-
84
-
85
-
86
-
87
-
88
-
89
-
90
-
91
-
92
-
93
-
94
-
95
-
96
-
97
-
98
-
99
-
100
-
101
-
102
-
103
-
104
-
105
-
106
-
107
-
108
-
109
-
110
-
111
-
112
-
113
-
114
-
115
-
116
-
117
-
118
-
119
-
120
-
121
-
122
-
123
-
124
-
125
-
126
-
127
-
128
-
129
-
130
-
131
-
132
-
133
-
134
-
135
-
136
-
137
-
138
-
139
-
140
-
141
-
142
-
143
-
144
-
145
-
146
-
147
-
148
-
 149
149 -
 150
150 -
 151
151 -
 152
152 -
 153
153 -
 154
154 -
 155
155 -
 156
156 -
 157
157 -
 158
158 -
 159
159 -
160
-
161
-
162
-
163
-
164
-
165
-
166
-
167
-
168
-
169
-
170
-
171
-
172
-
173
-
174
-
175
-
176
-
177
-
178
 |
 |