Adobe 25510629 User Guide - Page 106
is in C:\Program Files\Adobe\Adobe Ultra CS3\Content\Sample Clips\NTSC Sample
 |
UPC - 883919067353
View all Adobe 25510629 manuals
Add to My Manuals
Save this manual to your list of manuals |
Page 106 highlights
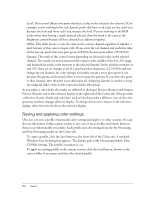
These instructions refer specifically to setting the Offset Into Scene time for a VirtualTrak effect, but the steps are essentially the same regardless of which layer a clip is on or what type of virtual set is assigned. 1. Create a session with a virtual set that has a VirtualTrak set and an input clip in which the subject walks into frame. The name of a VirtualTrak set is followed by "(Trak)". An example of a VirtualTrak set is the "Museum Intro (Trak)" set in the Virtual Sets\Museum library (from MSL1). If you don't have your own input clip handy, use "Suzy - Wide - Walk in Left", which is in C:\Program Files\Adobe\Adobe Ultra CS3\Content\Sample Clips\NTSC Sample Clips. 2. In the Output Preview Monitor, drag the preview slider to the time when you want the clip to begin playing. For VirtualTrak effects, this is typically when the plane of the input clip appears or at some time shortly thereafter. If you've already keyed the input clip, disable the keyer so that you can see the plane appear. 3. Click the Set button for the Offset Into Scene setting on the Input tab. This applies the current framecount from the Output Preview Monitor to this field, delaying the playback of the input clip until this point in the session. 4. Reenable the keyer and play the session in the Output Preview Monitor again to assess the timing of the subject's appearance. If the timing isn't correct, then you probably need to trim the In point for the input clip as described in "Trimming the In and Out Points in a video clip" on page 104. For example, in the "Suzy - Wide - Walk in Left" clip, the subject doesn't enter from the left until frame 17. 5. If the subject's position isn't correct relative to the virtual set, then you must change the position of the input. For more information, see "Moving and scaling an input within the layer plane: Input Offset controls" on page 95. If you want to try adjusting the timing for a VirtualTrak session using a clip that's built into Ultra, see the tutorial titled "Adjusting Timing on a VirtualTrak set shot" at www.adobe.com/support/ultra. 106 How to NOTE
-
 1
1 -
2
-
3
-
4
-
5
-
6
-
7
-
8
-
9
-
10
-
11
-
12
-
13
-
14
-
15
-
16
-
17
-
18
-
19
-
20
-
21
-
22
-
23
-
24
-
25
-
26
-
27
-
28
-
29
-
30
-
31
-
32
-
33
-
34
-
35
-
36
-
37
-
38
-
39
-
40
-
41
-
42
-
43
-
44
-
45
-
46
-
47
-
48
-
49
-
50
-
51
-
52
-
53
-
54
-
55
-
56
-
57
-
58
-
59
-
60
-
61
-
62
-
63
-
64
-
65
-
66
-
67
-
68
-
69
-
70
-
71
-
72
-
73
-
74
-
75
-
76
-
77
-
78
-
79
-
80
-
81
-
82
-
83
-
84
-
85
-
86
-
87
-
88
-
89
-
90
-
91
-
92
-
93
-
94
-
95
-
96
-
97
-
98
-
99
-
100
-
 101
101 -
 102
102 -
 103
103 -
 104
104 -
 105
105 -
 106
106 -
 107
107 -
 108
108 -
 109
109 -
 110
110 -
 111
111 -
112
-
113
-
114
-
115
-
116
-
117
-
118
-
119
-
120
-
121
-
122
-
123
-
124
-
125
-
126
-
127
-
128
-
129
-
130
 |
 |
