Adobe 25510629 User Guide - Page 83
Cropping and spot masking the source clip
 |
UPC - 883919067353
View all Adobe 25510629 manuals
Add to My Manuals
Save this manual to your list of manuals |
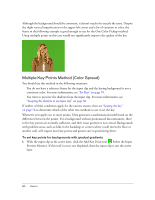
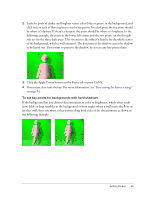
Page 83 highlights
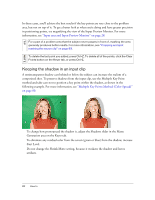
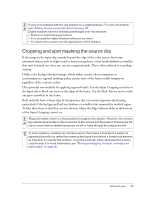
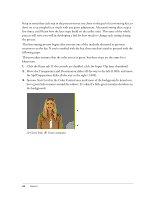
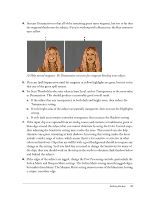
NOTE If you're not satisfied with the real shadow, try a digital shadow. For more information, see "Adding shadows and reflections" on page 111. Digital shadows have the following advantages over real shadows: • There's no special keying involved. • You can position digital shadows wherever you want. • You have more control over the appearance of the shadow. Cropping and spot masking the source clip If the image in the input clip extends beyond the edge of the color screen, shows any unwanted objects such as a light stand or boom microphone, or has harsh shadows or wrinkles that can't be keyed out, then you can use a regional mask. This is often referred to as garbage matting. Unlike color keying (chroma keying), which makes certain colors transparent or semitransparent, regional masking makes certain areas of the frame totally transparent regardless of the content's colors. Ultra provides two methods for applying regional masks. Use the Input Cropping controls on the Input tab to block out areas on the edges of the frame. Use the Mask Painter tool to mask out spots anywhere in the frame. Both methods leave a sharp edge of transparency that can remain apparent after keying, particularly if the background had any shadows or wrinkles that spanned the masked region. To blur these lines so that they are less obvious, adjust the Edge Softness slider at the bottom of the Input Cropping control set. Regional masks remain in a fixed position throughout the session. However, the chroma key adjusts dynamically to the movement of the camera and the subject. Preview the full clip to ensure that no masked areas are cut off or holes through the subject are left. In some sessions, masking can introduce space that makes it look like the subject is appearing from thin air rather than entering the frame from behind a foreground element as intended. To remedy this problem, move the input clip, which eliminates the need to crop the side. For more information, see "Moving and flipping the input vertically and horizontally" on page 97. Setting the key 83 NOTE TIP
-
 1
1 -
2
-
3
-
4
-
5
-
6
-
7
-
8
-
9
-
10
-
11
-
12
-
13
-
14
-
15
-
16
-
17
-
18
-
19
-
20
-
21
-
22
-
23
-
24
-
25
-
26
-
27
-
28
-
29
-
30
-
31
-
32
-
33
-
34
-
35
-
36
-
37
-
38
-
39
-
40
-
41
-
42
-
43
-
44
-
45
-
46
-
47
-
48
-
49
-
50
-
51
-
52
-
53
-
54
-
55
-
56
-
57
-
58
-
59
-
60
-
61
-
62
-
63
-
64
-
65
-
66
-
67
-
68
-
69
-
70
-
71
-
72
-
73
-
74
-
75
-
76
-
77
-
 78
78 -
 79
79 -
 80
80 -
 81
81 -
 82
82 -
 83
83 -
 84
84 -
 85
85 -
 86
86 -
 87
87 -
 88
88 -
89
-
90
-
91
-
92
-
93
-
94
-
95
-
96
-
97
-
98
-
99
-
100
-
101
-
102
-
103
-
104
-
105
-
106
-
107
-
108
-
109
-
110
-
111
-
112
-
113
-
114
-
115
-
116
-
117
-
118
-
119
-
120
-
121
-
122
-
123
-
124
-
125
-
126
-
127
-
128
-
129
-
130
 |
 |
