Adobe 25510629 User Guide - Page 112
Changing the position of a floor shadow, A Spread B Length C Angle D Baseline
 |
UPC - 883919067353
View all Adobe 25510629 manuals
Add to My Manuals
Save this manual to your list of manuals |
Page 112 highlights
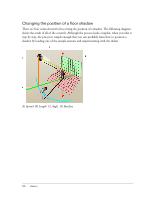
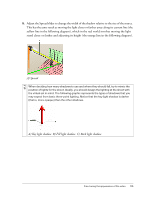
Changing the position of a floor shadow There are four controls involved in setting the position of a shadow. The following diagram shows the result of all of the controls. Although the process looks complex, when you take it step by step, the process is simple enough that you can probably learn how to position a shadow by loading one of the sample sessions and experimenting with the sliders. A) Spread B) Length C) Angle D) Baseline 112 How to
-
 1
1 -
2
-
3
-
4
-
5
-
6
-
7
-
8
-
9
-
10
-
11
-
12
-
13
-
14
-
15
-
16
-
17
-
18
-
19
-
20
-
21
-
22
-
23
-
24
-
25
-
26
-
27
-
28
-
29
-
30
-
31
-
32
-
33
-
34
-
35
-
36
-
37
-
38
-
39
-
40
-
41
-
42
-
43
-
44
-
45
-
46
-
47
-
48
-
49
-
50
-
51
-
52
-
53
-
54
-
55
-
56
-
57
-
58
-
59
-
60
-
61
-
62
-
63
-
64
-
65
-
66
-
67
-
68
-
69
-
70
-
71
-
72
-
73
-
74
-
75
-
76
-
77
-
78
-
79
-
80
-
81
-
82
-
83
-
84
-
85
-
86
-
87
-
88
-
89
-
90
-
91
-
92
-
93
-
94
-
95
-
96
-
97
-
98
-
99
-
100
-
101
-
102
-
103
-
104
-
105
-
106
-
 107
107 -
 108
108 -
 109
109 -
 110
110 -
 111
111 -
 112
112 -
 113
113 -
 114
114 -
 115
115 -
 116
116 -
 117
117 -
118
-
119
-
120
-
121
-
122
-
123
-
124
-
125
-
126
-
127
-
128
-
129
-
130
 |
 |

112
How to
Changing the position of a floor shadow
There are four controls involved in setting the position of a shadow. The following diagram
shows the result of all of the controls. Although the process looks complex, when you take it
step by step, the process is simple enough that you can probably learn how to position a
shadow by loading one of the sample sessions and experimenting with the sliders.
A) Spread B) Length C) Angle D) Baseline