Adobe 25510629 User Guide - Page 97
Moving and flipping the input vertically and horizontally, Rotating the input
 |
UPC - 883919067353
View all Adobe 25510629 manuals
Add to My Manuals
Save this manual to your list of manuals |
Page 97 highlights
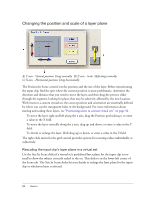
TIP If you're working with a keyed input clip and want to see the size, position, and orientation of the input clip within the frame, try either disabling the keyer or switching to a solid image. The easiest way to do this is to right-click the Input Clip thumbnail, and then choose Assign White, Assign Black, or Assign Checkerboard. When you're ready to see the keyed video against the background again, right-click the Input Clip thumbnail, and then choose Reassign Last Source. Moving and flipping the input vertically and horizontally To move the input horizontally along the X axis, drag the Input Offset grid sideways, or enter a value in the X field. To move the input vertically along the Y axis, drag the grid up and down, or enter a value in the Y field. To flip an image so that subject who was looking to the left is now looking right, or vice versa, select Flip Horizontal below the grid control To flip an image so that the top becomes the bottom, select Flip Vertical. Rotating the input To rotate the input around its center point, Ctrl-drag the Input Offset grid vertically, or enter a value in the Angle field. The scale for this field is 360° (±180°). Turning the image 90° to display it in the portrait orientation To rotate an image so that it is displayed in the portrait orientation rather than landscape, select Plus-90 (Portrait) below the grid control. This turns the layer 90° counterclockwise. If this leaves the image upside down, then select Flip Horizontal. Even though you're correcting how the image is displayed vertically in the frame, you use Flip Horizontal rather than Flip Vertical because these controls work relative to the image's native orientation. Positioning layers and performing virtual camera moves 97
-
 1
1 -
2
-
3
-
4
-
5
-
6
-
7
-
8
-
9
-
10
-
11
-
12
-
13
-
14
-
15
-
16
-
17
-
18
-
19
-
20
-
21
-
22
-
23
-
24
-
25
-
26
-
27
-
28
-
29
-
30
-
31
-
32
-
33
-
34
-
35
-
36
-
37
-
38
-
39
-
40
-
41
-
42
-
43
-
44
-
45
-
46
-
47
-
48
-
49
-
50
-
51
-
52
-
53
-
54
-
55
-
56
-
57
-
58
-
59
-
60
-
61
-
62
-
63
-
64
-
65
-
66
-
67
-
68
-
69
-
70
-
71
-
72
-
73
-
74
-
75
-
76
-
77
-
78
-
79
-
80
-
81
-
82
-
83
-
84
-
85
-
86
-
87
-
88
-
89
-
90
-
91
-
 92
92 -
 93
93 -
 94
94 -
 95
95 -
 96
96 -
 97
97 -
 98
98 -
 99
99 -
 100
100 -
 101
101 -
 102
102 -
103
-
104
-
105
-
106
-
107
-
108
-
109
-
110
-
111
-
112
-
113
-
114
-
115
-
116
-
117
-
118
-
119
-
120
-
121
-
122
-
123
-
124
-
125
-
126
-
127
-
128
-
129
-
130
 |
 |
