Adobe 25510629 User Guide - Page 84
Cropping the edge of a frame, Painting a mask, Fine-tuning the Keyer settings
 |
UPC - 883919067353
View all Adobe 25510629 manuals
Add to My Manuals
Save this manual to your list of manuals |
Page 84 highlights
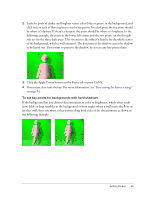
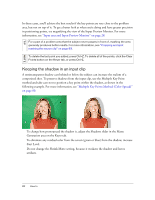
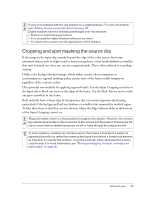
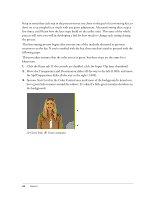
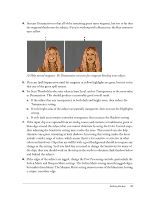
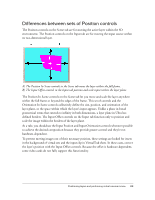
Cropping the edge of a frame The Input Cropping controls on the Input tab provide a quick method for masking off an entire edge of the frame, making the affected area of the input clip fully transparent. To crop an edge, drag the appropriate side of the blue-gray box with the corner and midpoint nodes in the Input Cropping control group. In this control, the black rectangle that's revealed when you crop an edge represents the borders of the source. The Output Preview Monitor instantly reflects this change. Painting a mask The Mask Painter lets you cut transparent holes in the input clip wherever you choose. 1. Click the Mask Painter button below the Input Preview Monitor. If this button is not displayed, then the input clip is not selected. 2. Drag in the Input Preview Monitor across the area that you want to mask out. The pointer appears as a black circle. The Input Preview Monitor and Output Preview Monitor instantly reflect the change. Zooming in the Input Preview Monitor gives you finer control. Removing a spot mask If you cut a regional mask that's too large, you can trim it back with the Mask Eraser tool. Activate the Mask Eraser tool , and drag in the Input Preview Monitor to paint an area back to opacity. This tool works only with regions masked using the Mask Painter, not on areas along the edges that were cropped. If you're painting or erasing the input clip after setting the key, the masked area is essentially invisible. To see the painted mask, disable the keyer by selecting Enable on the Keyer tab. This is particularly useful when erasing a mask so that you can see better where you need to erase. Fine-tuning the Keyer settings If an input clip has a washed out or inconsistent background color, a tricky subject, or other keying challenges, you must manually change the input clip to get the results you expect. Even some high-quality input clips may require more than clicking the Set Key button to yield a key that is acceptable. This section covers the steps to achieving the absolute best possible results from the video. For more information about the controls on the Keyer tab, see "Keyer tab" on page 35. 84 How to NOTE
-
 1
1 -
2
-
3
-
4
-
5
-
6
-
7
-
8
-
9
-
10
-
11
-
12
-
13
-
14
-
15
-
16
-
17
-
18
-
19
-
20
-
21
-
22
-
23
-
24
-
25
-
26
-
27
-
28
-
29
-
30
-
31
-
32
-
33
-
34
-
35
-
36
-
37
-
38
-
39
-
40
-
41
-
42
-
43
-
44
-
45
-
46
-
47
-
48
-
49
-
50
-
51
-
52
-
53
-
54
-
55
-
56
-
57
-
58
-
59
-
60
-
61
-
62
-
63
-
64
-
65
-
66
-
67
-
68
-
69
-
70
-
71
-
72
-
73
-
74
-
75
-
76
-
77
-
78
-
 79
79 -
 80
80 -
 81
81 -
 82
82 -
 83
83 -
 84
84 -
 85
85 -
 86
86 -
 87
87 -
 88
88 -
 89
89 -
90
-
91
-
92
-
93
-
94
-
95
-
96
-
97
-
98
-
99
-
100
-
101
-
102
-
103
-
104
-
105
-
106
-
107
-
108
-
109
-
110
-
111
-
112
-
113
-
114
-
115
-
116
-
117
-
118
-
119
-
120
-
121
-
122
-
123
-
124
-
125
-
126
-
127
-
128
-
129
-
130
 |
 |
