Adobe 25510629 User Guide - Page 86
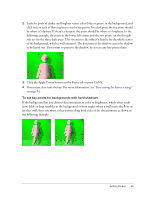
A Green halo B Green remnants
 |
UPC - 883919067353
View all Adobe 25510629 manuals
Add to My Manuals
Save this manual to your list of manuals |
Page 86 highlights
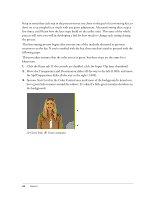
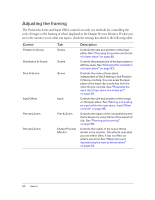
Keep in mind that each step in the process moves you closer to the goal of a convincing key, so don't try to accomplish too much with any given adjustment. After performing these steps a few times, you'll learn how the later steps build on the earlier ones. This sense of the whole process will serve you well in developing a feel for how much to change each setting during the process. This fine-tuning process begins after you use one of the methods discussed in previous sections to set the key. If you're satisfied with the key, then you don't need to proceed with the following steps. This procedure assumes that the color screen is green, but these steps are the same for a bluescreen. 1. Click the Keyer tab. If the controls are disabled, click the Input Clip layer thumbnail. 2. Move the Transparency and Desaturation sliders all the way to the left (0.000), and move the Spill Suppression slider all the way to the right (1.000). 3. Increase Start Level in the Color Control area until most of the background is keyed out, but a green halo remains around the subject. It's okay if a little green remains elsewhere in the background. A) Green halo B) Green remnants 86 How to
-
 1
1 -
2
-
3
-
4
-
5
-
6
-
7
-
8
-
9
-
10
-
11
-
12
-
13
-
14
-
15
-
16
-
17
-
18
-
19
-
20
-
21
-
22
-
23
-
24
-
25
-
26
-
27
-
28
-
29
-
30
-
31
-
32
-
33
-
34
-
35
-
36
-
37
-
38
-
39
-
40
-
41
-
42
-
43
-
44
-
45
-
46
-
47
-
48
-
49
-
50
-
51
-
52
-
53
-
54
-
55
-
56
-
57
-
58
-
59
-
60
-
61
-
62
-
63
-
64
-
65
-
66
-
67
-
68
-
69
-
70
-
71
-
72
-
73
-
74
-
75
-
76
-
77
-
78
-
79
-
80
-
 81
81 -
 82
82 -
 83
83 -
 84
84 -
 85
85 -
 86
86 -
 87
87 -
 88
88 -
 89
89 -
 90
90 -
 91
91 -
92
-
93
-
94
-
95
-
96
-
97
-
98
-
99
-
100
-
101
-
102
-
103
-
104
-
105
-
106
-
107
-
108
-
109
-
110
-
111
-
112
-
113
-
114
-
115
-
116
-
117
-
118
-
119
-
120
-
121
-
122
-
123
-
124
-
125
-
126
-
127
-
128
-
129
-
130
 |
 |
