Adobe 25510629 User Guide - Page 17
Quick-start session, Step-by-step workflow
 |
UPC - 883919067353
View all Adobe 25510629 manuals
Add to My Manuals
Save this manual to your list of manuals |
Page 17 highlights
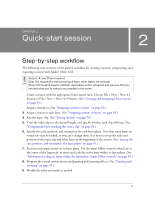
CHAPTER 2 Quick-start session 2 NOTE Step-by-step workflow The following is an overview of the general workflow for creating a session, compositing, and exporting a movie with Adobe® Ultra® CS3. Steps 1, 4, and 10 are required. Step 3 is required for the source input layer; other layers are optional. Steps 5 through 9 may be optional, depending on the virtual set and sources that you use and what you're trying to accomplish in the scene. Create a session with the appropriate frame aspect ratio: Choose File > New > New 4:3 Session or File > New > New 16:9 Session. (See "Creating and managing Ultra sessions" on page 55.) Assign a virtual set. (See "Assigning content to layers" on page 63.) 3. Assign a source to each layer. (See "Assigning content to layers" on page 63.) 4. Key the input clip. (See "Setting the key" on page 76.) 5. Trim the video clips to the desired length, and specify whether each clip will loop. (See "Cropping and spot masking the source clip" on page 83.) 6. Specify the scale, position, and orientation for each layer plane. Note that some layers in virtual sets may be locked, so you can't change them. It is best to set up the scale and position of the input clip and other layers at the beginning of the session. (See "Setting the size, position, and orientation of a layer plane" on page 91.) 7. Position each input source on its layer plane. Use the Input Offset controls, which are at the center of the Input tab, to move and scale the active layer within its layer plane. (See "Moving and scaling an input within the layer plane: Input Offset controls" on page 95.) 8. Program the virtual camera moves and panning and zooming effects. (See "Panning and zooming" on page 99.) 9. Modify the video and audio as needed. 17
-
 1
1 -
2
-
3
-
4
-
5
-
6
-
7
-
8
-
9
-
10
-
11
-
 12
12 -
 13
13 -
 14
14 -
 15
15 -
 16
16 -
 17
17 -
 18
18 -
 19
19 -
 20
20 -
 21
21 -
 22
22 -
23
-
24
-
25
-
26
-
27
-
28
-
29
-
30
-
31
-
32
-
33
-
34
-
35
-
36
-
37
-
38
-
39
-
40
-
41
-
42
-
43
-
44
-
45
-
46
-
47
-
48
-
49
-
50
-
51
-
52
-
53
-
54
-
55
-
56
-
57
-
58
-
59
-
60
-
61
-
62
-
63
-
64
-
65
-
66
-
67
-
68
-
69
-
70
-
71
-
72
-
73
-
74
-
75
-
76
-
77
-
78
-
79
-
80
-
81
-
82
-
83
-
84
-
85
-
86
-
87
-
88
-
89
-
90
-
91
-
92
-
93
-
94
-
95
-
96
-
97
-
98
-
99
-
100
-
101
-
102
-
103
-
104
-
105
-
106
-
107
-
108
-
109
-
110
-
111
-
112
-
113
-
114
-
115
-
116
-
117
-
118
-
119
-
120
-
121
-
122
-
123
-
124
-
125
-
126
-
127
-
128
-
129
-
130
 |
 |
