Adobe 25510629 User Guide - Page 111
Adding shadows and reflections, Enabling a shadow or reflection and making it the active one
 |
UPC - 883919067353
View all Adobe 25510629 manuals
Add to My Manuals
Save this manual to your list of manuals |
Page 111 highlights
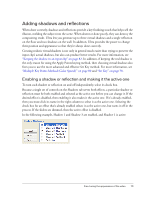
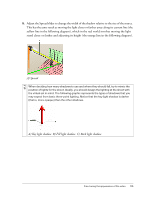
Adding shadows and reflections When done correctly, shadows and reflections provide a key finishing touch that helps sell the illusion, melding the subject into the scene. When absent or done poorly, they can destroy the compositing result. Ultra lets you generate up to three virtual shadows and a single reflection on the floor and two shadows on the wall. In addition, Ultra provides the power to change their position and appearance so that they're always done correctly. Creating realistic virtual shadows is not only in general much easier than trying to preserve the input clip's actual shadows, but also can produce better results. For more information, see "Keeping the shadow in an input clip" on page 82. In addition, if keeping the real shadow is the only reason for using the Apply Points keying method, then choosing virtual shadows also frees you to use the more advanced and effective Set Key method. For more information, see "Multiple Key Points Method (Color Spread)" on page 80 and "Set Key" on page 78. Enabling a shadow or reflection and making it the active one To turn each shadow or reflection on and off independently, select its check box. Because a single set of controls on the Shadows tab serves both effects, a particular shadow or reflection must be both enabled and selected as the active one before you can change it. If the desired effect is disabled, then enabling it also makes it the active one. If it's already enabled, then you must click its name in the right column to select it as the active one. Selecting the check box for an effect that's already enabled selects it as the active one, but turns it off in the process. If the sliders are dimmed, then the active effect is disabled. In the following example, Shadow 1 and Shadow 3 are enabled, and Shadow 1 is active. Fine-tuning the appearance of the video 111
-
 1
1 -
2
-
3
-
4
-
5
-
6
-
7
-
8
-
9
-
10
-
11
-
12
-
13
-
14
-
15
-
16
-
17
-
18
-
19
-
20
-
21
-
22
-
23
-
24
-
25
-
26
-
27
-
28
-
29
-
30
-
31
-
32
-
33
-
34
-
35
-
36
-
37
-
38
-
39
-
40
-
41
-
42
-
43
-
44
-
45
-
46
-
47
-
48
-
49
-
50
-
51
-
52
-
53
-
54
-
55
-
56
-
57
-
58
-
59
-
60
-
61
-
62
-
63
-
64
-
65
-
66
-
67
-
68
-
69
-
70
-
71
-
72
-
73
-
74
-
75
-
76
-
77
-
78
-
79
-
80
-
81
-
82
-
83
-
84
-
85
-
86
-
87
-
88
-
89
-
90
-
91
-
92
-
93
-
94
-
95
-
96
-
97
-
98
-
99
-
100
-
101
-
102
-
103
-
104
-
105
-
 106
106 -
 107
107 -
 108
108 -
 109
109 -
 110
110 -
 111
111 -
 112
112 -
 113
113 -
 114
114 -
 115
115 -
 116
116 -
117
-
118
-
119
-
120
-
121
-
122
-
123
-
124
-
125
-
126
-
127
-
128
-
129
-
130
 |
 |
