Adobe 25510629 User Guide - Page 94
Positioning insets in custom virtual sets, then Source B is selected by default.
 |
UPC - 883919067353
View all Adobe 25510629 manuals
Add to My Manuals
Save this manual to your list of manuals |
Page 94 highlights
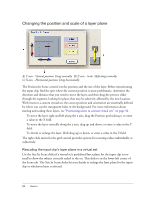
NOTE NOTE Dragging sideways in the Position In Scene control changes the X value, but changes the Y value in the Orientation In Scene control. The right-click menu for the grid control provides options for resetting values individually or collectively and for rotating the plane in 90° increments on the perpendicular axis (Z). The orientation is relative to the center of the 3D space, which for virtual sets is often not the actual center of the frame. For example, you may expect that a Y value of 90° always shows the plane edge-on; however, this is only true if the 3D-center is centered on the frame in the horizontal dimension and the position is centered in that plane. If either the 3D-center or the current position is off-center, then the layer has a dimension with the value set to 90°. Because of the interrelationship of the three coordinates, any given orientation can be defined by two sets of coordinates. As a result, Ultra may under certain circumstances change a set of values to a different set of values with identical results. For example, if all three values are zero and you enter 180 for Y, Ultra displays 180 for X, 0 for Y, and 180 for Z. Positioning insets in custom virtual sets All of the custom sets (such as "Simple Keyed with B") are in the Basic folder of the Virtual Sets library and are initially scaled to full frame. Although in special circumstances you may want to display an inset in full frame, you typically scale and position each inset to its correct location as defined by the transparent regions in the custom background. Adobe recommends the following workflow: 1. Assign the desired basic set and background. If necessary, change the size, scale, and orientation of the background. You must use a background that has one or more transparent regions cut in it to show the sources behind it. For backgrounds that you use with one or more inset sources, you must create an alpha region in the graphic for each inset. 2. Click the inset's thumbnail to make it the active layer. If the basic set has multiple insets, then Source B is selected by default. 3. Assign the desired source to the inset. 4. Reduce the scale to roughly the size of the transparent region in the background through which it will be seen. You probably can't see the image in the Output Preview Monitor, so you must rely on the relative size of the grid in the Position In Scene control. 5. Change the position so that the image is centered in its transparent region. 6. Fine-tune the scale, orientation, and position to achieve the desired framing. 94 How to
-
 1
1 -
2
-
3
-
4
-
5
-
6
-
7
-
8
-
9
-
10
-
11
-
12
-
13
-
14
-
15
-
16
-
17
-
18
-
19
-
20
-
21
-
22
-
23
-
24
-
25
-
26
-
27
-
28
-
29
-
30
-
31
-
32
-
33
-
34
-
35
-
36
-
37
-
38
-
39
-
40
-
41
-
42
-
43
-
44
-
45
-
46
-
47
-
48
-
49
-
50
-
51
-
52
-
53
-
54
-
55
-
56
-
57
-
58
-
59
-
60
-
61
-
62
-
63
-
64
-
65
-
66
-
67
-
68
-
69
-
70
-
71
-
72
-
73
-
74
-
75
-
76
-
77
-
78
-
79
-
80
-
81
-
82
-
83
-
84
-
85
-
86
-
87
-
88
-
 89
89 -
 90
90 -
 91
91 -
 92
92 -
 93
93 -
 94
94 -
 95
95 -
 96
96 -
 97
97 -
 98
98 -
 99
99 -
100
-
101
-
102
-
103
-
104
-
105
-
106
-
107
-
108
-
109
-
110
-
111
-
112
-
113
-
114
-
115
-
116
-
117
-
118
-
119
-
120
-
121
-
122
-
123
-
124
-
125
-
126
-
127
-
128
-
129
-
130
 |
 |
