Brother International HL-3400CN Service Manual - Page 195
Caution, Precaution
 |
UPC - 012502526223
View all Brother International HL-3400CN manuals
Add to My Manuals
Save this manual to your list of manuals |
Page 195 highlights
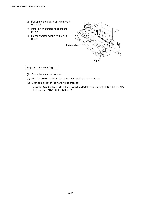
CHAPTER 6 PERIODIC MAINTENANCE A CAUTION • When removing the fusing unit, take care to keep the unit level so that no oil leakage or spillage occurs. • When shipping the printer, remove the oil bottle and the fuser cleaner from the fusing unit. After removing the oil bottle, be sure to remove the oil remaining in the fusing unit with the supplied syringe. Failure to do so will cause severe damage to the printer. Sequence of Replacement (1) Prepare a new fusing unit before starting the replacement work. (2) Set the fusing unit pressure release levers to the SET position. (Fig.6-16) (3) Install the oil bottle and fuser cleaner to the new fusing unit. Pressure release lever .._-- 1 -2-' -10- I e- a cs Sequence of Assembling (1) Install the new fusing unit onto the printer. (Fig. 6-17) i) After setting the fusing unit in place, lightly press down the unit to firmly connect to the connector on the base. ii) Tighten the two screws to secure the fusing unit. iii) Close the top cover. Fig. 6-17 Pressure release lever O Fusing unit Fig. 6-18 L.: / , / A PRECAUTION When replacing the fusing unit, take time and great care to complete the job properly. Application of strong force to the fusing unit may result in the failure of the fusing unit and other parts. (2) Plug the power cable into the power outlet and turn on the printer. (3) Upon completion of the warming-up process; Press the Reset button while holding down the Shift button, and select "RESET PARTS LIFE" and then "FUSING UNIT". NOTE: When installing the new fusing unit into the printer, you have to wait approximately for 30 minutes after the unit is installed to allow the fusing oil to circulate in the unit. 6-24
-
 1
1 -
2
-
3
-
4
-
5
-
6
-
7
-
8
-
9
-
10
-
11
-
12
-
13
-
14
-
15
-
16
-
17
-
18
-
19
-
20
-
21
-
22
-
23
-
24
-
25
-
26
-
27
-
28
-
29
-
30
-
31
-
32
-
33
-
34
-
35
-
36
-
37
-
38
-
39
-
40
-
41
-
42
-
43
-
44
-
45
-
46
-
47
-
48
-
49
-
50
-
51
-
52
-
53
-
54
-
55
-
56
-
57
-
58
-
59
-
60
-
61
-
62
-
63
-
64
-
65
-
66
-
67
-
68
-
69
-
70
-
71
-
72
-
73
-
74
-
75
-
76
-
77
-
78
-
79
-
80
-
81
-
82
-
83
-
84
-
85
-
86
-
87
-
88
-
89
-
90
-
91
-
92
-
93
-
94
-
95
-
96
-
97
-
98
-
99
-
100
-
101
-
102
-
103
-
104
-
105
-
106
-
107
-
108
-
109
-
110
-
111
-
112
-
113
-
114
-
115
-
116
-
117
-
118
-
119
-
120
-
121
-
122
-
123
-
124
-
125
-
126
-
127
-
128
-
129
-
130
-
131
-
132
-
133
-
134
-
135
-
136
-
137
-
138
-
139
-
140
-
141
-
142
-
143
-
144
-
145
-
146
-
147
-
148
-
149
-
150
-
151
-
152
-
153
-
154
-
155
-
156
-
157
-
158
-
159
-
160
-
161
-
162
-
163
-
164
-
165
-
166
-
167
-
168
-
169
-
170
-
171
-
172
-
173
-
174
-
175
-
176
-
177
-
178
-
179
-
180
-
181
-
182
-
183
-
184
-
185
-
186
-
187
-
188
-
189
-
 190
190 -
 191
191 -
 192
192 -
 193
193 -
 194
194 -
 195
195 -
 196
196 -
 197
197 -
 198
198 -
 199
199 -
 200
200 -
201
-
202
-
203
-
204
-
205
-
206
-
207
-
208
-
209
-
210
-
211
-
212
-
213
-
214
-
215
-
216
-
217
-
218
-
219
-
220
-
221
-
222
-
223
-
224
-
225
-
226
-
227
-
228
-
229
-
230
-
231
-
232
-
233
-
234
-
235
-
236
-
237
-
238
-
239
-
240
-
241
-
242
-
243
-
244
-
245
-
246
-
247
-
248
-
249
-
250
-
251
-
252
-
253
-
254
-
255
-
256
-
257
-
258
-
259
-
260
-
261
-
262
-
263
-
264
-
265
-
266
-
267
-
268
-
269
-
270
-
271
-
272
-
273
-
274
-
275
-
276
-
277
-
278
-
279
-
280
-
281
-
282
-
283
-
284
-
285
-
286
-
287
-
288
-
289
-
290
-
291
-
292
-
293
-
294
-
295
-
296
-
297
-
298
-
299
-
300
-
301
-
302
-
303
-
304
-
305
-
306
-
307
-
308
-
309
-
310
-
311
-
312
-
313
-
314
-
315
-
316
-
317
-
318
-
319
-
320
-
321
-
322
-
323
-
324
-
325
-
326
-
327
-
328
-
329
-
330
-
331
-
332
-
333
-
334
-
335
-
336
-
337
-
338
-
339
-
340
-
341
-
342
-
343
-
344
-
345
-
346
-
347
 |
 |
