Brother International HL-3400CN Service Manual - Page 252
adjustment
 |
UPC - 012502526223
View all Brother International HL-3400CN manuals
Add to My Manuals
Save this manual to your list of manuals |
Page 252 highlights
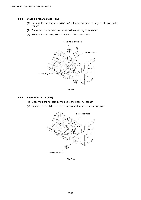
HL-3400CN SERVICE MANUAL 4.5.3 Laser unit (Scanner motor inclusive) ( :ptical unit 3) (1) Remove the set screws ST3x6 (2 pcs.) to remove the scanner cover. (2) Remove the fixing screws with flanges FST3x10 (3 pcs.) from the laser unit. (3) Disconnect the harness connector (1 pc.) from the laser unit. (4) Remove the laser unit from the printer. 6N. Laser unit Fig. 7-71 AWARNING • There is a classIIlb laser within the laser unit. Do not attempt to disassemble the laser. • The laser unit is replaced as a complete unit. No adjustment is required to the replacement laser unit. • Confirm that all the covers have been correctly installed prior to any test run or operation in order to prevent any laser radiation escaping from the printer. 7-47
-
 1
1 -
2
-
3
-
4
-
5
-
6
-
7
-
8
-
9
-
10
-
11
-
12
-
13
-
14
-
15
-
16
-
17
-
18
-
19
-
20
-
21
-
22
-
23
-
24
-
25
-
26
-
27
-
28
-
29
-
30
-
31
-
32
-
33
-
34
-
35
-
36
-
37
-
38
-
39
-
40
-
41
-
42
-
43
-
44
-
45
-
46
-
47
-
48
-
49
-
50
-
51
-
52
-
53
-
54
-
55
-
56
-
57
-
58
-
59
-
60
-
61
-
62
-
63
-
64
-
65
-
66
-
67
-
68
-
69
-
70
-
71
-
72
-
73
-
74
-
75
-
76
-
77
-
78
-
79
-
80
-
81
-
82
-
83
-
84
-
85
-
86
-
87
-
88
-
89
-
90
-
91
-
92
-
93
-
94
-
95
-
96
-
97
-
98
-
99
-
100
-
101
-
102
-
103
-
104
-
105
-
106
-
107
-
108
-
109
-
110
-
111
-
112
-
113
-
114
-
115
-
116
-
117
-
118
-
119
-
120
-
121
-
122
-
123
-
124
-
125
-
126
-
127
-
128
-
129
-
130
-
131
-
132
-
133
-
134
-
135
-
136
-
137
-
138
-
139
-
140
-
141
-
142
-
143
-
144
-
145
-
146
-
147
-
148
-
149
-
150
-
151
-
152
-
153
-
154
-
155
-
156
-
157
-
158
-
159
-
160
-
161
-
162
-
163
-
164
-
165
-
166
-
167
-
168
-
169
-
170
-
171
-
172
-
173
-
174
-
175
-
176
-
177
-
178
-
179
-
180
-
181
-
182
-
183
-
184
-
185
-
186
-
187
-
188
-
189
-
190
-
191
-
192
-
193
-
194
-
195
-
196
-
197
-
198
-
199
-
200
-
201
-
202
-
203
-
204
-
205
-
206
-
207
-
208
-
209
-
210
-
211
-
212
-
213
-
214
-
215
-
216
-
217
-
218
-
219
-
220
-
221
-
222
-
223
-
224
-
225
-
226
-
227
-
228
-
229
-
230
-
231
-
232
-
233
-
234
-
235
-
236
-
237
-
238
-
239
-
240
-
241
-
242
-
243
-
244
-
245
-
246
-
 247
247 -
 248
248 -
 249
249 -
 250
250 -
 251
251 -
 252
252 -
 253
253 -
 254
254 -
 255
255 -
 256
256 -
 257
257 -
258
-
259
-
260
-
261
-
262
-
263
-
264
-
265
-
266
-
267
-
268
-
269
-
270
-
271
-
272
-
273
-
274
-
275
-
276
-
277
-
278
-
279
-
280
-
281
-
282
-
283
-
284
-
285
-
286
-
287
-
288
-
289
-
290
-
291
-
292
-
293
-
294
-
295
-
296
-
297
-
298
-
299
-
300
-
301
-
302
-
303
-
304
-
305
-
306
-
307
-
308
-
309
-
310
-
311
-
312
-
313
-
314
-
315
-
316
-
317
-
318
-
319
-
320
-
321
-
322
-
323
-
324
-
325
-
326
-
327
-
328
-
329
-
330
-
331
-
332
-
333
-
334
-
335
-
336
-
337
-
338
-
339
-
340
-
341
-
342
-
343
-
344
-
345
-
346
-
347
 |
 |

HL-3400CN
SERVICE
MANUAL
4.5.3
Laser
unit
(Scanner
motor
inclusive)
(
:ptical
unit
3)
(1)
Remove
the
set
screws
ST3x6
(2
pcs.)
to
remove
the
scanner
cover.
(2)
Remove
the
fixing
screws
with
flanges
FST3x10
(3
pcs.)
from
the
laser
unit.
(3)
Disconnect
the
harness
connector
(1
pc.)
from
the
laser
unit.
(4)
Remove
the
laser
unit
from
the
printer.
6N.
Laser
unit
Fig.
7-71
A
WARNING
•
There
is
a
class
IIlb
laser
within
the
laser
unit.
Do
not
attempt
to
disassemble
the
laser.
•
The
laser
unit
is
replaced
as
a
complete
unit.
No
adjustment
is
required
to
the
replacement
laser
unit.
•
Confirm
that
all
the
covers
have
been
correctly
installed
prior
to
any
test
run
or
operation
in
order
to
prevent
any
laser
radiation
escaping
from
the
printer.
7-47