Brother International MacBroidery„ Embroidery Lettering Software for Mac - Page 41
Height, Text Spacing, Sewing Order, Choosing a Fill Pattern
 |
View all Brother International MacBroidery„ Embroidery Lettering Software for Mac manuals
Add to My Manuals
Save this manual to your list of manuals |
Page 41 highlights
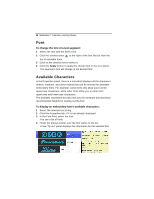
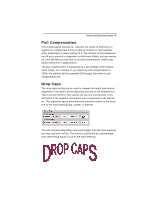
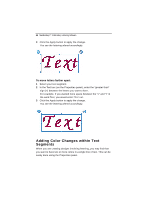
Creating and Editing New Designs 39 Height Determines the height of lettering in your text segment. To change the height of the text: 1 Select the text segment. 2 In the height field of the Properties tab, type a new value. 3 Click the Apply button. The letter height will be adjusted accordingly. Text Spacing The Spacing setting allows you to add a specified amount of space between each letter. If the spacing is set at zero, the normal kerning operation for the font is used. If the spacing is set to less than zero, then the spacing between letters decreases; if it is set to a value greater than zero, than the spacing increases. To change font spacing: 1 Use the Select tool to select a text object. 2 Open the Properties panel. 3 In the spacing field, enter the font spacing you want to apply. 4 Click Apply to save your changes. You see your text's letter spacing altered accordingly. Sewing Order The sew order property determines at what point in the text segment the sewing will start; from the left, from the right or from the center. To change the sewing order, choose either Left, Right, or Center from the drop-down list, and press the Apply button. Choosing a Fill Pattern By default, the letters in a segment of text will consist of satin fill. However, a variety of complex fill patterns are available which can be used instead. You can choose the pattern you wish to use in the Properties tab. To choose the fill pattern: 1 Select the lettering segment.
-
 1
1 -
2
-
3
-
4
-
5
-
6
-
7
-
8
-
9
-
10
-
11
-
12
-
13
-
14
-
15
-
16
-
17
-
18
-
19
-
20
-
21
-
22
-
23
-
24
-
25
-
26
-
27
-
28
-
29
-
30
-
31
-
32
-
33
-
34
-
35
-
 36
36 -
 37
37 -
 38
38 -
 39
39 -
 40
40 -
 41
41 -
 42
42 -
 43
43 -
 44
44 -
 45
45 -
 46
46 -
47
-
48
-
49
-
50
-
51
-
52
-
53
-
54
-
55
 |
 |