Dell 1125 dell Users Guide - Page 29
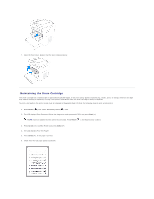
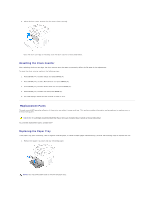
Insert the drum cartridge into the printer, using the guiding slots to correctly position the drum.
 |
UPC - 043232161187
View all Dell 1125 manuals
Add to My Manuals
Save this manual to your list of manuals |
Page 29 highlights
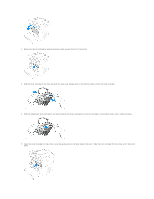
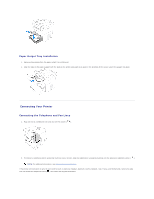
2. Remove the Drum Cartridge by pulling the green handle toward the front of the printer. 3. Hold the drum cartridge in one hand and push the blue toner release lever in the direction shown to free the toner cartridge. 4. Hold the replacement drum cartridge in one hand and push the toner cartridge into the drum cartridge in the direction shown until it clicks into place. 5. Insert the drum cartridge into the printer, using the guiding slots to correctly position the drum. Slide the drum cartridge into the printer until it clicks into place.
-
 1
1 -
2
-
3
-
4
-
5
-
6
-
7
-
8
-
9
-
10
-
11
-
12
-
13
-
14
-
15
-
16
-
17
-
18
-
19
-
20
-
21
-
22
-
23
-
 24
24 -
 25
25 -
 26
26 -
 27
27 -
 28
28 -
 29
29 -
 30
30 -
 31
31 -
 32
32 -
 33
33 -
 34
34 -
35
-
36
-
37
-
38
-
39
-
40
-
41
-
42
-
43
-
44
-
45
-
46
-
47
-
48
-
49
-
50
-
51
-
52
-
53
-
54
-
55
-
56
-
57
-
58
-
59
-
60
-
61
-
62
-
63
-
64
-
65
-
66
-
67
-
68
-
69
-
70
-
71
-
72
-
73
-
74
-
75
-
76
-
77
-
78
-
79
-
80
-
81
-
82
-
83
-
84
-
85
-
86
-
87
-
88
-
89
-
90
-
91
-
92
-
93
-
94
-
95
-
96
-
97
-
98
-
99
-
100
-
101
-
102
-
103
-
104
-
105
-
106
-
107
-
108
-
109
-
110
-
111
 |
 |

2.
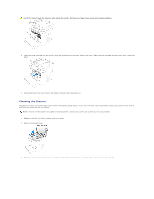
Remove the Drum Cartridge by pulling the green handle toward the front of the printer.
3.
Hold the drum cartridge in one hand and push the blue toner release lever in the direction shown to free the toner cartridge.
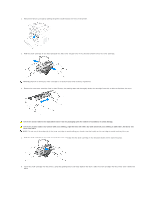
4.
Hold the replacement drum cartridge in one hand and push the toner cartridge into the drum cartridge in the direction shown until it clicks into place.
5.
Insert the drum cartridge into the printer, using the guiding slots to correctly position the drum. Slide the drum cartridge into the printer until it clicks into
place.