Dell 1125 dell Users Guide - Page 43
About Sharing the Printer on a Network, Setting Up the Locally Shared Printer - driver windows 7
 |
UPC - 043232161187
View all Dell 1125 manuals
Add to My Manuals
Save this manual to your list of manuals |
Page 43 highlights
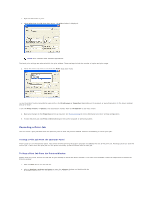
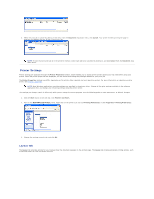
Back to Contents Page Printing Dell™ Multi-Function Printer 1125 User's Guide About Sharing the Printer on a Network Setting Up the Locally Shared Printer Printing a Document Printer Settings Printing Multiple Pages on One Sheet of Paper Printing a Reduced or Enlarged Document Printing Posters Printing Booklets Printing on Both Sides of Paper Using Watermarks Using Overlays This chapter provides information on how to print from an application and how to set the various options provided by the print driver to achieve the best printing results. About Sharing the Printer on a Network Locally Shared Printer You can connect the printer directly to a selected computer, which is called the host computer on the network. The printer can then be shared by other users on the network through a Microsoft®Windows® XP or Windows Vista™ network printer connection. Setting Up the Locally Shared Printer You can connect the printer directly to a selected computer, which is called the host computer, on the network. Your printer can be shared by other users on the network through a Windows XP or Vista network printer connection. NOTE: Start Menu must be set to its original, default settings to view the following procedures. For Windows XP Setting Up the Host Computer 1. Click the Start® Printers and Faxes. 2. Right click your printer icon. 3. Click Properties. 4. Click the Sharing tab. 5. Check the Share this Printer box. 6. Fill in the Share Name field and click OK. Setting Up the Client Computer 1. Click the Start® Printers and Faxes. 2. Click Add a Printer to launch the Add Printer Wizard. 3. Click Next.
-
 1
1 -
2
-
3
-
4
-
5
-
6
-
7
-
8
-
9
-
10
-
11
-
12
-
13
-
14
-
15
-
16
-
17
-
18
-
19
-
20
-
21
-
22
-
23
-
24
-
25
-
26
-
27
-
28
-
29
-
30
-
31
-
32
-
33
-
34
-
35
-
36
-
37
-
 38
38 -
 39
39 -
 40
40 -
 41
41 -
 42
42 -
 43
43 -
 44
44 -
 45
45 -
 46
46 -
 47
47 -
 48
48 -
49
-
50
-
51
-
52
-
53
-
54
-
55
-
56
-
57
-
58
-
59
-
60
-
61
-
62
-
63
-
64
-
65
-
66
-
67
-
68
-
69
-
70
-
71
-
72
-
73
-
74
-
75
-
76
-
77
-
78
-
79
-
80
-
81
-
82
-
83
-
84
-
85
-
86
-
87
-
88
-
89
-
90
-
91
-
92
-
93
-
94
-
95
-
96
-
97
-
98
-
99
-
100
-
101
-
102
-
103
-
104
-
105
-
106
-
107
-
108
-
109
-
110
-
111
 |
 |
