Dell 1125 dell Users Guide - Page 71
Changing Default Settings
 |
UPC - 043232161187
View all Dell 1125 manuals
Add to My Manuals
Save this manual to your list of manuals |
Page 71 highlights
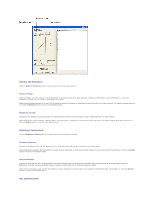
Select a scan task and click Remove to delete the scan task from the preview area. Scan/Preview Area This area displays the item you are scanning or enables you to select the area to scan. Use the rectangle to select the area to scan. Drag the scan areas to change the size of the scan area. Place the mouse cursor inside the rectangle to move the scan area. Exit Click Exit to close the dialog box. Scan Click Scan to scan the item that is loaded in the ADF or on the scanner glass. Preview Click Preview to display the item that is in loaded in the ADF or on the scanner glass. Changing Default Settings You can set up default scan settings instead of changing settings for each scan. 1. Press Scroll () to select Scan and press Select (P). 2. Press Scroll () to select Scan Default and press Select (P). 3. Press Scroll () to select to P C and press Select (P). 4. Press Scroll () to select the new destination default: ¡ Microsoft Paint ¡ Email ¡ My Documents ¡ PaperPort ¡ OCR 5. Press Select (P) to select the new destination default. 6. Press Scroll () to select Scan Color and Select (P).
-
 1
1 -
2
-
3
-
4
-
5
-
6
-
7
-
8
-
9
-
10
-
11
-
12
-
13
-
14
-
15
-
16
-
17
-
18
-
19
-
20
-
21
-
22
-
23
-
24
-
25
-
26
-
27
-
28
-
29
-
30
-
31
-
32
-
33
-
34
-
35
-
36
-
37
-
38
-
39
-
40
-
41
-
42
-
43
-
44
-
45
-
46
-
47
-
48
-
49
-
50
-
51
-
52
-
53
-
54
-
55
-
56
-
57
-
58
-
59
-
60
-
61
-
62
-
63
-
64
-
65
-
 66
66 -
 67
67 -
 68
68 -
 69
69 -
 70
70 -
 71
71 -
 72
72 -
 73
73 -
 74
74 -
 75
75 -
 76
76 -
77
-
78
-
79
-
80
-
81
-
82
-
83
-
84
-
85
-
86
-
87
-
88
-
89
-
90
-
91
-
92
-
93
-
94
-
95
-
96
-
97
-
98
-
99
-
100
-
101
-
102
-
103
-
104
-
105
-
106
-
107
-
108
-
109
-
110
-
111
 |
 |
