Dell 1125 dell Users Guide - Page 41
Setting the Paper Size, Setting the Paper Type - drivers
 |
UPC - 043232161187
View all Dell 1125 manuals
Add to My Manuals
Save this manual to your list of manuals |
Page 41 highlights
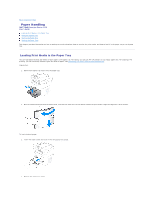
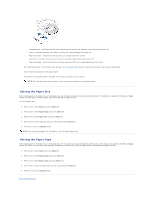
l Transparencies - load them with the print side up and the top with the adhesive strip entering the printer first l Labels - load labels with the print side up and top short edge entering the printer first l Preprinted paper - load with the design face up, top edge toward the printer l Card stock - load them with the print side up and the short edge entering the printer first l Preprinted paper - the printed side must be face downward with an uncurled edge toward the printer l After loading the paper, set the paper type and size. See Setting the Paper Type for copying and faxing or Paper Tab for PC-printing. l Start the printer operation in the usual manner l The printer automatically detects the paper in the bypass tray and prints as normal. NOTE: The settings made from the printer driver override the settings on the operator panel. Setting the Paper Size After loading paper in the paper tray or the bypass tray, set the paper size using the operator panel buttons. This setting only applies to the Fax and Copy modes. For PC-printing, select the paper type in the application program used. To set the paper size: 1. Press () to select Setup and press Select (P). 2. Press () to select Paper Setup and press Select (P). 3. Press () to select Paper Size and press Select (P). 4. Press () to select the paper size you are using and press Select (P). 5. Press (V) to return to Standby mode. NOTE: Fax mode only supports A4, LTR (letter), and LGL (legal) paper sizes. Setting the Paper Type After loading paper in the paper tray or the bypass tray, set the paper type using the operator panel buttons. This setting only applies to the Fax and Copy modes. For faxing, only the plain paper setting is available. For PC-printing, select the paper type in the application program you use. 1. Press () to select Setup and press Select (P). 2. Press () to select Paper Setup and press Select (P). 3. Press () to select Paper Type and press Select (P). 4. Press () to select the paper type you are using and press Select (P). 5. Press (V) to return to Standby mode. Back to Contents Page
-
 1
1 -
2
-
3
-
4
-
5
-
6
-
7
-
8
-
9
-
10
-
11
-
12
-
13
-
14
-
15
-
16
-
17
-
18
-
19
-
20
-
21
-
22
-
23
-
24
-
25
-
26
-
27
-
28
-
29
-
30
-
31
-
32
-
33
-
34
-
35
-
 36
36 -
 37
37 -
 38
38 -
 39
39 -
 40
40 -
 41
41 -
 42
42 -
 43
43 -
 44
44 -
 45
45 -
 46
46 -
47
-
48
-
49
-
50
-
51
-
52
-
53
-
54
-
55
-
56
-
57
-
58
-
59
-
60
-
61
-
62
-
63
-
64
-
65
-
66
-
67
-
68
-
69
-
70
-
71
-
72
-
73
-
74
-
75
-
76
-
77
-
78
-
79
-
80
-
81
-
82
-
83
-
84
-
85
-
86
-
87
-
88
-
89
-
90
-
91
-
92
-
93
-
94
-
95
-
96
-
97
-
98
-
99
-
100
-
101
-
102
-
103
-
104
-
105
-
106
-
107
-
108
-
109
-
110
-
111
 |
 |
