Dell 1125 dell Users Guide - Page 56
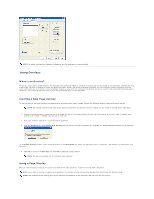
Deleting a Overlay
 |
UPC - 043232161187
View all Dell 1125 manuals
Add to My Manuals
Save this manual to your list of manuals |
Page 56 highlights
1. Create or open the document you want to print with an overlay. 2. From your software application, access the printer properties. 3. From the Overlays tab, select the One Overlay from the Overlay Function drop down menu. 4. Select the overlay you want to print from the Overlay Select box. NOTE: If you have stored the overlay file you want to use on an external source, such as a CD or floppy disk, you can also load the file when you access this Load Overlay window. NOTE: After you select the file, click Open. The file is now shown in the Overlay List box and is available for printing. Select the overlay from the Overlay List box. 5. Click OK to return to the Print screen. Click OK to start printing the document with the selected overlay. Deleting a Page Overlay Overlays that are no longer used should be deleted to minimize the Overlay Select window size. To delete an overlay: 1. From your software application, access the printer properties. 2. From the Overlays tab, select the overlay to be deleted from the Overlay Select window and click the Delete button. 3. The overlay is deleted. NOTE: There is no confirmation message and the overlay is unrecoverable. Back to Contents Page
-
 1
1 -
2
-
3
-
4
-
5
-
6
-
7
-
8
-
9
-
10
-
11
-
12
-
13
-
14
-
15
-
16
-
17
-
18
-
19
-
20
-
21
-
22
-
23
-
24
-
25
-
26
-
27
-
28
-
29
-
30
-
31
-
32
-
33
-
34
-
35
-
36
-
37
-
38
-
39
-
40
-
41
-
42
-
43
-
44
-
45
-
46
-
47
-
48
-
49
-
50
-
 51
51 -
 52
52 -
 53
53 -
 54
54 -
 55
55 -
 56
56 -
 57
57 -
 58
58 -
 59
59 -
 60
60 -
 61
61 -
62
-
63
-
64
-
65
-
66
-
67
-
68
-
69
-
70
-
71
-
72
-
73
-
74
-
75
-
76
-
77
-
78
-
79
-
80
-
81
-
82
-
83
-
84
-
85
-
86
-
87
-
88
-
89
-
90
-
91
-
92
-
93
-
94
-
95
-
96
-
97
-
98
-
99
-
100
-
101
-
102
-
103
-
104
-
105
-
106
-
107
-
108
-
109
-
110
-
111
 |
 |
