Dell Broadcom NetXtreme Family of Adapters Broadcom NetXtreme 57XX User Guide - Page 131
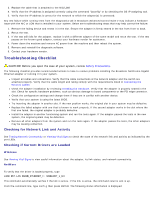
Troubleshooting Checklist
 |
View all Dell Broadcom NetXtreme Family of Adapters manuals
Add to My Manuals
Save this manual to your list of manuals |
Page 131 highlights
3. Replace the cable that is attached to the NIC/LOM. 4. Verify that the IP address is assigned correctly using the command "ipconfig" or by checking the OS IP assigning tool. 5. Verify that the IP address is correct for the network to which the adapter(s) is connected. Any test failure while running tests from the Diagnostics tab in Broadcom Advanced Control Suite 2 may indicate a hardware issue with the NIC or LOM that is installed in your system. Below are troubleshooting steps that may help correct the failure: 1. Remove the failing device and reseat it in the slot. Ensure the adapter is firmly seated in the slot from front to back. 2. Rerun the test. 3. If the test still fails for the adapter, replace it with a different adapter of the same model and rerun the test. If the test passes on the known good adapter, contact your hardware vendor for assistance. 4. Power down the machine and remove AC power from the machine and then reboot the system. 5. Remove and reinstall the diagnostic software. 6. Contact your hardware vendor. Troubleshooting Checklist CAUTION! Before you open the case of your system, review Safety Precautions. The following checklist provides recommended actions to take to resolve problems installing the Broadcom NetXtreme Gigabit Ethernet adapter or running it in your system. Inspect all cables and connections. Verify that the cable connections at the network adapter and the switch are attached properly. Verify that the cable length and rating comply with the requirements listed in Connecting the Network Cables. Check the adapter installation by reviewing Installing the Hardware. Verify that the adapter is properly seated in the slot. Check for specific hardware problems, such as obvious damage to board components or the PCI edge connector. Check the configuration settings and change them if they are in conflict with another device. Verify that your system is using the latest BIOS. Try inserting the adapter in another slot. If the new position works, the original slot in your system may be defective. Replace the failed adapter with one that is known to work properly. If the second adapter works in the slot where the first one failed, the original adapter is probably defective. Install the adapter in another functioning system and run the tests again. If the adapter passed the tests in the new system, the original system may be defective. Remove all other adapters from the system and run the tests again. If the adapter passes the tests, the other adapters may be causing contention. Checking for Network Link and Activity See Testing Network Connectivity or Viewing Vital Signs to check the state of the network link and activity as indicated by the port LEDs. Checking if Current Drivers are Loaded Windows See Viewing Vital Signs to view useful information about the adapter, its link status, and network connectivity. NetWare To verify that the driver is loaded properly, type LOAD B57.LAN FRAME_ETHERNET_II NAME=B57_1_EII This command automatically verifies if the link is active. If the link is active, the command returns Link is up. From the command line, type config then press ENTER. The following status information is displayed:
-
 1
1 -
2
-
3
-
4
-
5
-
6
-
7
-
8
-
9
-
10
-
11
-
12
-
13
-
14
-
15
-
16
-
17
-
18
-
19
-
20
-
21
-
22
-
23
-
24
-
25
-
26
-
27
-
28
-
29
-
30
-
31
-
32
-
33
-
34
-
35
-
36
-
37
-
38
-
39
-
40
-
41
-
42
-
43
-
44
-
45
-
46
-
47
-
48
-
49
-
50
-
51
-
52
-
53
-
54
-
55
-
56
-
57
-
58
-
59
-
60
-
61
-
62
-
63
-
64
-
65
-
66
-
67
-
68
-
69
-
70
-
71
-
72
-
73
-
74
-
75
-
76
-
77
-
78
-
79
-
80
-
81
-
82
-
83
-
84
-
85
-
86
-
87
-
88
-
89
-
90
-
91
-
92
-
93
-
94
-
95
-
96
-
97
-
98
-
99
-
100
-
101
-
102
-
103
-
104
-
105
-
106
-
107
-
108
-
109
-
110
-
111
-
112
-
113
-
114
-
115
-
116
-
117
-
118
-
119
-
120
-
121
-
122
-
123
-
124
-
125
-
 126
126 -
 127
127 -
 128
128 -
 129
129 -
 130
130 -
 131
131 -
 132
132 -
 133
133 -
 134
134 -
 135
135 -
 136
136 -
137
-
138
-
139
-
140
-
141
-
142
-
143
-
144
-
145
-
146
-
147
-
148
-
149
-
150
-
151
-
152
-
153
-
154
-
155
-
156
-
157
-
158
-
159
-
160
-
161
-
162
-
163
-
164
-
165
-
166
-
167
-
168
-
169
-
170
-
171
-
172
-
173
-
174
-
175
-
176
-
177
-
178
 |
 |
