Dell Broadcom NetXtreme Family of Adapters Broadcom NetXtreme 57XX User Guide - Page 19
Configuring the MBA Driver, Setting Up the BIOS
 |
View all Dell Broadcom NetXtreme Family of Adapters manuals
Add to My Manuals
Save this manual to your list of manuals |
Page 19 highlights
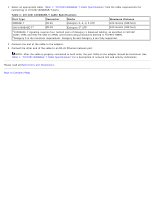
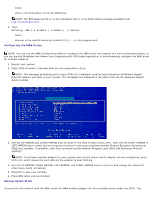
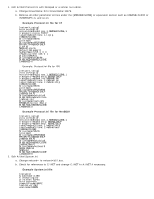
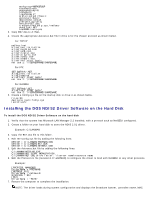
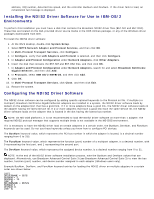
where drive is the drive letter of the CD-ROM drive. NOTE: The B57udiag.exe file is on the installation CD or in the DOS Utilities package available from http://support.dell.com/. 3. Type: b57udiag -mba [ 0-disable | 1-enable ] -c devnum where devnum is the specific device(s) number (0,1,2, ...) to be programmed. Configuring the MBA Driver NOTE: You can use the MBA Configuration Menu to configure the MBA driver one adapter at a time as described below, or you can use the Broadcom NetXtreme User Diagnostics MS-DOS based application to simultaneously configure the MBA driver for multiple adapters. 1. Restart your system. 2. Press CTRL+S within 4 seconds after you are prompted to do so. NOTE: The message prompting you to press CTRL+S is displayed once for each Broadcom NetXtreme Gigabit Ethernet adapter you have in your system. The messages are displayed in the same order as the assigned adapter device number. 3. Use the UP ARROW and DOWN ARROW keys to move to the Boot Protocol menu item. Then use the RIGHT ARROW or LEFT ARROW key to select the boot protocol of choice if other boot protocols besides Preboot Execution Environment (PXE) are available. If available, other boot protocols include Remote Program Load (RPL) and Bootstrap Protocol (BOOTP). NOTE: If you have multiple adapters in your system and you are unsure which adapter you are configuring, press CTRL+F6, which causes the port LEDs on the adapter to start blinking. 4. Use the UP ARROW, DOWN ARROW, LEFT ARROW, and RIGHT ARROW keys to move to and change the values for other menu items, as desired. 5. Press F4 to save your settings. 6. Press ESC when you are finished. Setting Up the BIOS To boot from the network with the MBA, make the MBA enabled adapter the first bootable device under the BIOS. This
-
 1
1 -
2
-
3
-
4
-
5
-
6
-
7
-
8
-
9
-
10
-
11
-
12
-
13
-
 14
14 -
 15
15 -
 16
16 -
 17
17 -
 18
18 -
 19
19 -
 20
20 -
 21
21 -
 22
22 -
 23
23 -
 24
24 -
25
-
26
-
27
-
28
-
29
-
30
-
31
-
32
-
33
-
34
-
35
-
36
-
37
-
38
-
39
-
40
-
41
-
42
-
43
-
44
-
45
-
46
-
47
-
48
-
49
-
50
-
51
-
52
-
53
-
54
-
55
-
56
-
57
-
58
-
59
-
60
-
61
-
62
-
63
-
64
-
65
-
66
-
67
-
68
-
69
-
70
-
71
-
72
-
73
-
74
-
75
-
76
-
77
-
78
-
79
-
80
-
81
-
82
-
83
-
84
-
85
-
86
-
87
-
88
-
89
-
90
-
91
-
92
-
93
-
94
-
95
-
96
-
97
-
98
-
99
-
100
-
101
-
102
-
103
-
104
-
105
-
106
-
107
-
108
-
109
-
110
-
111
-
112
-
113
-
114
-
115
-
116
-
117
-
118
-
119
-
120
-
121
-
122
-
123
-
124
-
125
-
126
-
127
-
128
-
129
-
130
-
131
-
132
-
133
-
134
-
135
-
136
-
137
-
138
-
139
-
140
-
141
-
142
-
143
-
144
-
145
-
146
-
147
-
148
-
149
-
150
-
151
-
152
-
153
-
154
-
155
-
156
-
157
-
158
-
159
-
160
-
161
-
162
-
163
-
164
-
165
-
166
-
167
-
168
-
169
-
170
-
171
-
172
-
173
-
174
-
175
-
176
-
177
-
178
 |
 |
