Dell Broadcom NetXtreme Family of Adapters Broadcom NetXtreme 57XX User Guide - Page 52
TCP/IP parameters via DHCP
 |
View all Dell Broadcom NetXtreme Family of Adapters manuals
Add to My Manuals
Save this manual to your list of manuals |
Page 52 highlights
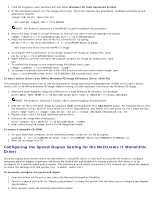
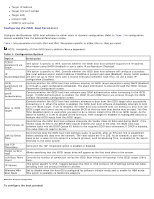
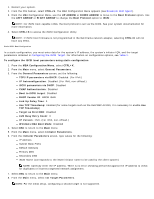
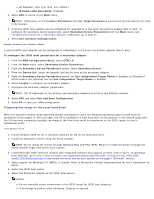
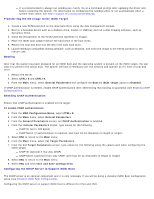
1. Restart your system. 2. From the PXE banner, select CTRL+S. The MBA Configuration Menu appears (see Broadcom Boot Agent). 3. From the MBA Configuration Menu, use the UP ARROW or DOWN ARROW to move to the Boot Protocol option. Use the LEFT ARROW or RIGHT ARROW to change the Boot Protocol option to iSCSI. NOTE: For iSCSI boot-capable LOMs, the boot protocol is set via the BIOS. See your system documentation for more information. 4. Select CTRL+K to access the iSCSI Configuration Utility. NOTE: If iSCSI boot firmware is not programmed in the NetXtreme network adapter, selecting CTRL+K will not have any effect. Static iSCSI Boot Configuration In a static configuration, you must enter data for the system's IP address, the system's initiator IQN, and the target parameters obtained in Configuring the iSCSI Target. For information on configuration options, see Table 1. To configure the iSCSI boot parameters using static configuration 1. From the MBA Configuration Menu, select CTRL+K. 2. From the Main menu, select General Parameters. 3. From the General Parameters screen, set the following: TCP/IP parameters via DHCP: Disabled. (For IPv4.) IP Autoconfiguration: Disabled. (For IPv6, non-offload.) iSCSI parameters via DHCP: Disabled CHAP Authentication: Disabled Boot to iSCSI target: Disabled DHCP Vendor ID: BRCM ISAN Link Up Delay Time: 0 Use TCP Timestamp: Enabled (for some targets such as the Dell/EMC AX100i, it is necessary to enable Use TCP Timestamp) Target as First HDD: Disabled LUN Busy Retry Count: 0 IP Version: IPv6. (For IPv6, non-offload.) Windows HBA Boot Mode: Disabled 4. Select ESC to return to the Main menu. 5. From the Main menu, select Initiator Parameters. 6. From the Initiator Parameters screen, type values for the following: IP Address Subnet Mask Prefix Default Gateway Primary DNS Secondary DNS iSCSI Name (corresponds to the iSCSI initiator name to be used by the client system) NOTE: Carefully enter the IP address. There is no error-checking performed against the IP address to check for duplicates or incorrect segment/network assignment. 7. Select ESC to return to the Main menu. 8. From the Main menu, select 1st Target Parameters. NOTE: For the initial setup, configuring a second target is not supported.
-
 1
1 -
2
-
3
-
4
-
5
-
6
-
7
-
8
-
9
-
10
-
11
-
12
-
13
-
14
-
15
-
16
-
17
-
18
-
19
-
20
-
21
-
22
-
23
-
24
-
25
-
26
-
27
-
28
-
29
-
30
-
31
-
32
-
33
-
34
-
35
-
36
-
37
-
38
-
39
-
40
-
41
-
42
-
43
-
44
-
45
-
46
-
 47
47 -
 48
48 -
 49
49 -
 50
50 -
 51
51 -
 52
52 -
 53
53 -
 54
54 -
 55
55 -
 56
56 -
 57
57 -
58
-
59
-
60
-
61
-
62
-
63
-
64
-
65
-
66
-
67
-
68
-
69
-
70
-
71
-
72
-
73
-
74
-
75
-
76
-
77
-
78
-
79
-
80
-
81
-
82
-
83
-
84
-
85
-
86
-
87
-
88
-
89
-
90
-
91
-
92
-
93
-
94
-
95
-
96
-
97
-
98
-
99
-
100
-
101
-
102
-
103
-
104
-
105
-
106
-
107
-
108
-
109
-
110
-
111
-
112
-
113
-
114
-
115
-
116
-
117
-
118
-
119
-
120
-
121
-
122
-
123
-
124
-
125
-
126
-
127
-
128
-
129
-
130
-
131
-
132
-
133
-
134
-
135
-
136
-
137
-
138
-
139
-
140
-
141
-
142
-
143
-
144
-
145
-
146
-
147
-
148
-
149
-
150
-
151
-
152
-
153
-
154
-
155
-
156
-
157
-
158
-
159
-
160
-
161
-
162
-
163
-
164
-
165
-
166
-
167
-
168
-
169
-
170
-
171
-
172
-
173
-
174
-
175
-
176
-
177
-
178
 |
 |
