Dell PowerEdge R805 Hardware Owner's Manual (PDF) - Page 127
Sideplane Board, Removing the Sideplane Board
 |
View all Dell PowerEdge R805 manuals
Add to My Manuals
Save this manual to your list of manuals |
Page 127 highlights
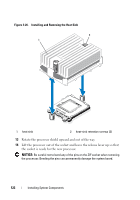
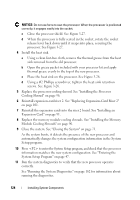
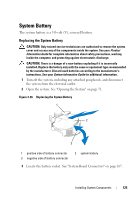
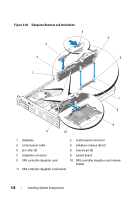
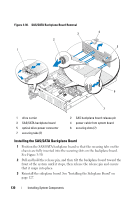
13 Enter the System Setup program and if the time and date are still incorrect, see "Getting Help" on page 175 for instructions on obtaining technical assistance. Sideplane Board Removing the Sideplane Board CAUTION: Only trained service technicians are authorized to remove the system cover and access any of the components inside the system. See your Product Information Guide for complete information about safety precautions, working inside the computer, and protecting against electrostatic discharge. 1 Turn off the system and attached peripherals, and disconnect the system from the electrical outlet. 2 Open the system. See "Opening the System" on page 71. 3 Remove the SAS controller daughter card. See "Removing a SAS Controller Daughter Card" on page 86. 4 Remove any cables from the sideplane board. NOTICE: When detaching the control panel cable from the sideplane board, squeeze the metal ends of the cable connectors and gently work the connector out of the socket. Do not pull on the cable to unseat the connector. Doing so can damage the cable. 5 Pressing inward on the sideplane release tabs, lift the sideplane up and away from the system. See Figure 3-29 Installing the Sideplane Board 1 Insert the sideplane board into sideplane slots along the left wall of the chassis and lower the sideplane board so that the pin collars connect with the two pins on the system board. Press the sideplane down until sideplane connector is fully seated into the system board connector. See Figure 3-29. 2 Reattach the control panel cable to the sideplane board. 3 Replace the storage controller daughter card. See "Installing a SAS Controller Daughter Card" on page 84. 4 Close the system. See "Closing the System" on page 71. Installing System Components 127
-
 1
1 -
2
-
3
-
4
-
5
-
6
-
7
-
8
-
9
-
10
-
11
-
12
-
13
-
14
-
15
-
16
-
17
-
18
-
19
-
20
-
21
-
22
-
23
-
24
-
25
-
26
-
27
-
28
-
29
-
30
-
31
-
32
-
33
-
34
-
35
-
36
-
37
-
38
-
39
-
40
-
41
-
42
-
43
-
44
-
45
-
46
-
47
-
48
-
49
-
50
-
51
-
52
-
53
-
54
-
55
-
56
-
57
-
58
-
59
-
60
-
61
-
62
-
63
-
64
-
65
-
66
-
67
-
68
-
69
-
70
-
71
-
72
-
73
-
74
-
75
-
76
-
77
-
78
-
79
-
80
-
81
-
82
-
83
-
84
-
85
-
86
-
87
-
88
-
89
-
90
-
91
-
92
-
93
-
94
-
95
-
96
-
97
-
98
-
99
-
100
-
101
-
102
-
103
-
104
-
105
-
106
-
107
-
108
-
109
-
110
-
111
-
112
-
113
-
114
-
115
-
116
-
117
-
118
-
119
-
120
-
121
-
 122
122 -
 123
123 -
 124
124 -
 125
125 -
 126
126 -
 127
127 -
 128
128 -
 129
129 -
 130
130 -
 131
131 -
 132
132 -
133
-
134
-
135
-
136
-
137
-
138
-
139
-
140
-
141
-
142
-
143
-
144
-
145
-
146
-
147
-
148
-
149
-
150
-
151
-
152
-
153
-
154
-
155
-
156
-
157
-
158
-
159
-
160
-
161
-
162
-
163
-
164
-
165
-
166
-
167
-
168
-
169
-
170
-
171
-
172
-
173
-
174
-
175
-
176
-
177
-
178
-
179
-
180
-
181
-
182
-
183
-
184
-
185
-
186
-
187
-
188
-
189
-
190
-
191
-
192
-
193
-
194
-
195
-
196
-
197
-
198
-
199
-
200
 |
 |
