Dell PowerEdge R805 Hardware Owner's Manual (PDF) - Page 78
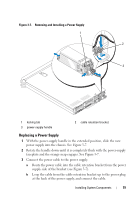
Removing a Power Supply, Disconnect the power cable from the power source.
 |
View all Dell PowerEdge R805 manuals
Add to My Manuals
Save this manual to your list of manuals |
Page 78 highlights
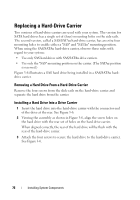
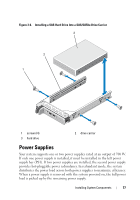
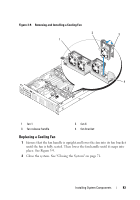
NOTICE: To ensure proper system cooling, the power supply blank must be installed on the unoccupied power supply bay in a non-redundant configuration. See "Installing the Power Supply Blank" on page 80. Removing a Power Supply NOTICE: The system requires one power supply to operate the system normally. On power-redundant systems, remove and replace only one power supply at a time in a system that is powered on. NOTE: On your rack system, you may have to unlatch and lift the optional cable management arm if it interferes with power supply removal. For information about the cable management arm, see the system's Rack Installation Guide. 1 If your system has a single power supply, turn off the system and all attached peripherals. For a redundant system, you can leave the system running and proceed to the next step. 2 Disconnect the power cable from the power source. 3 Disconnect the power cable from the power supply and remove the cable from the cable retention bracket. 4 Release the locking tab on the left side of the power supply by pressing in toward the right, and rotate the power-supply handle up until the power supply is released from the chassis. See Figure 3-7. 5 Pull the power supply straight out to clear the chassis. 78 Installing System Components
-
 1
1 -
2
-
3
-
4
-
5
-
6
-
7
-
8
-
9
-
10
-
11
-
12
-
13
-
14
-
15
-
16
-
17
-
18
-
19
-
20
-
21
-
22
-
23
-
24
-
25
-
26
-
27
-
28
-
29
-
30
-
31
-
32
-
33
-
34
-
35
-
36
-
37
-
38
-
39
-
40
-
41
-
42
-
43
-
44
-
45
-
46
-
47
-
48
-
49
-
50
-
51
-
52
-
53
-
54
-
55
-
56
-
57
-
58
-
59
-
60
-
61
-
62
-
63
-
64
-
65
-
66
-
67
-
68
-
69
-
70
-
71
-
72
-
 73
73 -
 74
74 -
 75
75 -
 76
76 -
 77
77 -
 78
78 -
 79
79 -
 80
80 -
 81
81 -
 82
82 -
 83
83 -
84
-
85
-
86
-
87
-
88
-
89
-
90
-
91
-
92
-
93
-
94
-
95
-
96
-
97
-
98
-
99
-
100
-
101
-
102
-
103
-
104
-
105
-
106
-
107
-
108
-
109
-
110
-
111
-
112
-
113
-
114
-
115
-
116
-
117
-
118
-
119
-
120
-
121
-
122
-
123
-
124
-
125
-
126
-
127
-
128
-
129
-
130
-
131
-
132
-
133
-
134
-
135
-
136
-
137
-
138
-
139
-
140
-
141
-
142
-
143
-
144
-
145
-
146
-
147
-
148
-
149
-
150
-
151
-
152
-
153
-
154
-
155
-
156
-
157
-
158
-
159
-
160
-
161
-
162
-
163
-
164
-
165
-
166
-
167
-
168
-
169
-
170
-
171
-
172
-
173
-
174
-
175
-
176
-
177
-
178
-
179
-
180
-
181
-
182
-
183
-
184
-
185
-
186
-
187
-
188
-
189
-
190
-
191
-
192
-
193
-
194
-
195
-
196
-
197
-
198
-
199
-
200
 |
 |
