Epson 680Pro Service Manual - Page 104
EPSON Stylus COLOR 680/777/777i, Revision B, Adjustment, Overview
 |
UPC - 010343832138
View all Epson 680Pro manuals
Add to My Manuals
Save this manual to your list of manuals |
Page 104 highlights
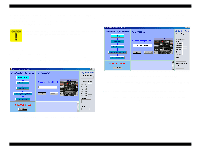
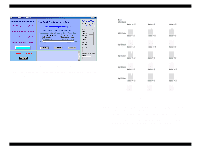
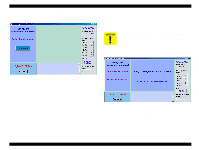
EPSON Stylus COLOR 680/777/777i Revision B This adjustment function enables you to write printhead ID into the specific address of the EEPROM. This operation is considered the most important to maintain proper ink discharging system. If any ID is not written correctly, it results in white or color lines and also gives bad influence on dot weight. C A U T IO N Before or after performing this operation, refer to the table 5-1 and perform any appropriate adjustments or operations. 3. If you replace the failure Main board with a new on, try to perform the "Check head ID". In case the logic circuit dose not have any damage, you can read out the Head data of the present Head ID data. If this function is available, you can check the present Head ID without removing the Head FFC holder. 1. Run the Adjustment program and enter the Adjustment Main menu. 2. Choose the "Head ID" and click it. The menu shown in the next page appears. This function is useful only when the Main board is replaced with new one. When the print head is replaced with new one, go to step 5. Figure 5-5. Read out the Head ID from the EEPROM 4. If you can read out the present Head voltage ID, take memo the read out Head ID voltage. NOTE: In this Adjustment program, you can not write the read out Head ID to the new Main board in the read out Head ID menu. In case you write the read out Head ID to the new main board, you have to take menu the read out Head ID and input it again in the "Input head menu." Figure 5-4. 1st Head ID adjustment items menu Adjustment Overview 104
-
 1
1 -
2
-
3
-
4
-
5
-
6
-
7
-
8
-
9
-
10
-
11
-
12
-
13
-
14
-
15
-
16
-
17
-
18
-
19
-
20
-
21
-
22
-
23
-
24
-
25
-
26
-
27
-
28
-
29
-
30
-
31
-
32
-
33
-
34
-
35
-
36
-
37
-
38
-
39
-
40
-
41
-
42
-
43
-
44
-
45
-
46
-
47
-
48
-
49
-
50
-
51
-
52
-
53
-
54
-
55
-
56
-
57
-
58
-
59
-
60
-
61
-
62
-
63
-
64
-
65
-
66
-
67
-
68
-
69
-
70
-
71
-
72
-
73
-
74
-
75
-
76
-
77
-
78
-
79
-
80
-
81
-
82
-
83
-
84
-
85
-
86
-
87
-
88
-
89
-
90
-
91
-
92
-
93
-
94
-
95
-
96
-
97
-
98
-
 99
99 -
 100
100 -
 101
101 -
 102
102 -
 103
103 -
 104
104 -
 105
105 -
 106
106 -
 107
107 -
 108
108 -
 109
109 -
110
-
111
-
112
-
113
-
114
-
115
-
116
-
117
-
118
-
119
-
120
-
121
-
122
-
123
-
124
-
125
-
126
-
127
-
128
-
129
-
130
-
131
-
132
-
133
-
134
-
135
-
136
-
137
-
138
-
139
-
140
-
141
-
142
-
143
-
144
-
145
 |
 |
