Epson 680Pro Service Manual - Page 58
Table 3-18. Dot missing occur and it is not recovered with CL, Table 3-19. Dot missing occur and
 |
UPC - 010343832138
View all Epson 680Pro manuals
Add to My Manuals
Save this manual to your list of manuals |
Page 58 highlights
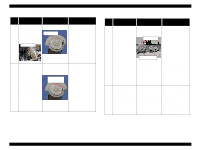
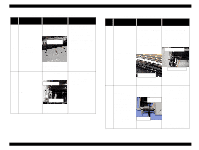
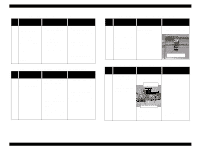
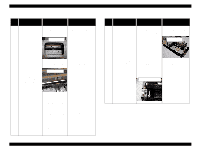
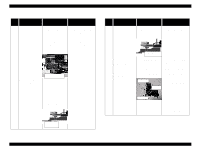
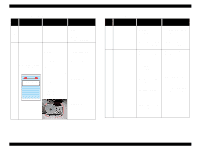
EPSON Stylus COLOR 680/777/777i Table 3-18. Dot missing occur and it is not recovered with CL Step No. Detail phenomenon Check point Remedy 1. Check if ink is ejected to the waste ink pad via pump unit in the CL sequence. 2. Check if there is any foreign material around the seal rubber parts on the cap assembly. 1. If ink is not ejected at all to the waste ink pad in the CL sequence, proceed the following check point 2). 2. Remove the foreign material around the seal rubber parts. In the CL sequence, the pump unit seems work correctly. But, ink is not ejected to the 1 waste ink pad at all. Cap seal rubber parts Moreover, any ink is not absorbed from the head to the cap. 3. Check if any damage is observed around the seal rubber parts on 3. Replace the Cap assembly with new one. the cap assembly. 4. Check if the two compression spring are assembled in the Cap assembly correctly. 4. Set the Compression spring into the Cap assembly. Compression spring Revision B Table 3-19. Dot missing occur and it is not recovered with CL Step No. Detail phenomenon Check point Remedy 5. Check if the Pump tube is connected to the bottom of the Cap assembly correctly 7. Connect the Pump tube to the bottom of the Cap assembly deeply. Pump tube connection point In the CL sequence, the pump unit seems work correctly. But, 6. Check if the pump 8. Pump unit may coil the tube has a little slack pump tube inside the any ink is not ejected between the Cap unit. 1 to waste ink pad. assembly and the pump unit when the In this case, pull out the coiled tube from the Moreover, any ink is Cap assembly is slide pump unit carefully. not absorbed from the up completely. After that, connect the head to the cap. Tube pump tube to the Cap assembly after placing the tube correctly. Cap assy. Pump unit 9. If the problem is not solved, replace the Pump unit with new one. Troubleshooting Troubleshooting with LED Error Indications 58
-
 1
1 -
2
-
3
-
4
-
5
-
6
-
7
-
8
-
9
-
10
-
11
-
12
-
13
-
14
-
15
-
16
-
17
-
18
-
19
-
20
-
21
-
22
-
23
-
24
-
25
-
26
-
27
-
28
-
29
-
30
-
31
-
32
-
33
-
34
-
35
-
36
-
37
-
38
-
39
-
40
-
41
-
42
-
43
-
44
-
45
-
46
-
47
-
48
-
49
-
50
-
51
-
52
-
 53
53 -
 54
54 -
 55
55 -
 56
56 -
 57
57 -
 58
58 -
 59
59 -
 60
60 -
 61
61 -
 62
62 -
 63
63 -
64
-
65
-
66
-
67
-
68
-
69
-
70
-
71
-
72
-
73
-
74
-
75
-
76
-
77
-
78
-
79
-
80
-
81
-
82
-
83
-
84
-
85
-
86
-
87
-
88
-
89
-
90
-
91
-
92
-
93
-
94
-
95
-
96
-
97
-
98
-
99
-
100
-
101
-
102
-
103
-
104
-
105
-
106
-
107
-
108
-
109
-
110
-
111
-
112
-
113
-
114
-
115
-
116
-
117
-
118
-
119
-
120
-
121
-
122
-
123
-
124
-
125
-
126
-
127
-
128
-
129
-
130
-
131
-
132
-
133
-
134
-
135
-
136
-
137
-
138
-
139
-
140
-
141
-
142
-
143
-
144
-
145
 |
 |
